27x Reclassify color gradient
In node editor when a color ramp node is selected a new panel named Reclassify appear in editor properties sheft.
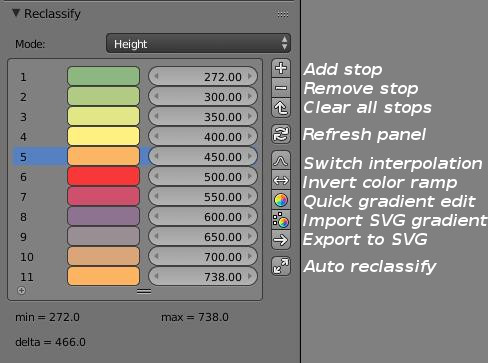
The main purpose of the panel is to help the user to setting the color ramp stops. Color ramp node input values must be range from 0 to 1, so it's hard to make the relationship between theses normalized values and a physical value like height, slope or aspect.
Values display in reclassify panel are converted to represents their physical equivalent. To compute this correctly the user must choose the display mode of the panel according to the currently applied materials.

- Height mode scale the values according to the object bounding box to get the true altitude
- Slope mode multiply the node value by 100 to get the slope in degrees (as explained in node setup description for slope material)
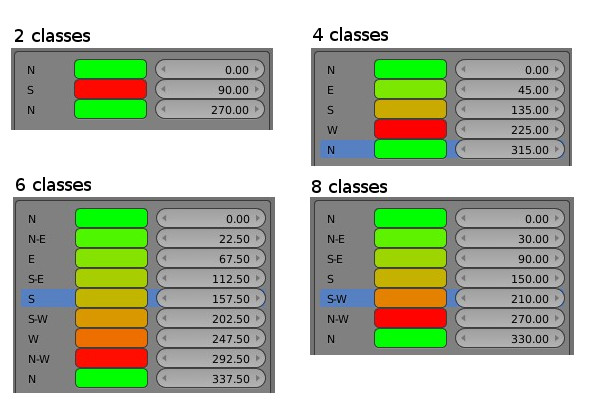
- Aspect mode multiply the value by 360 to get azimuth angle (with north = 0°)

You can directly edit in the panel color and position of each stops of the color ramp node. You can also add a new stop or delete an existing one.

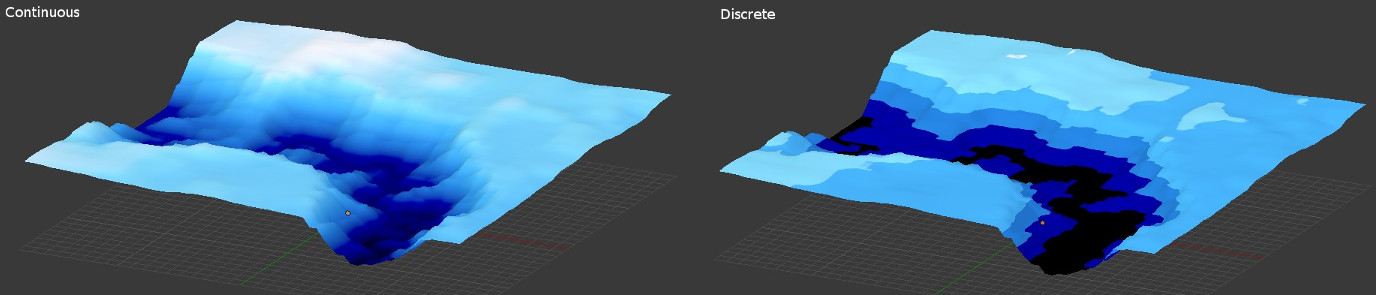
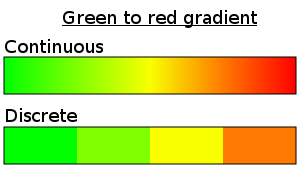
You can switch color ramp node interpolation between constant and linear. Linear interpolation make a continuous ramp while constant interpolation make a discrete ramp.
You can also reverse the color ramp. Note that this tool doesn't work like the tool include in the color ramp node because it reverse only the colors and not the positions.

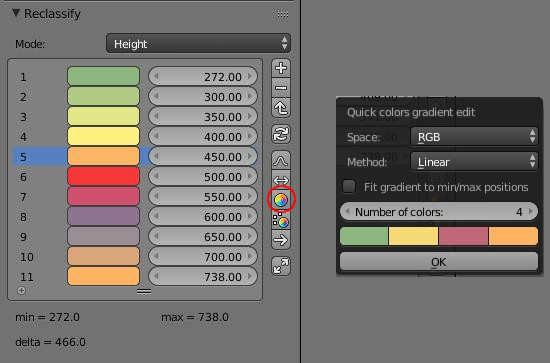
This tool allows to change colors of each stops of the color ramp node by refering to a small gradient defined on the fly by the user. For each stop of the color ramp node, the script will use this user defined gradient to evaluate the color at this stop's position.
For example, if we define a gradient with 5 colors then the preview display in the popup dialog represents the expected colors at positions 0 - 0.2 - 0.4 - 0.6 - 0.8 - 1. In the node, the color at position 0.5 will be computed by interpolating between color 3 and color 4.

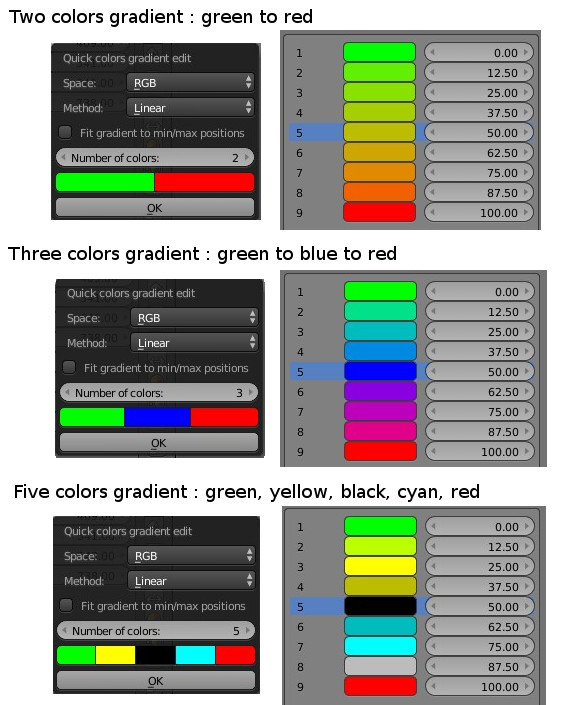
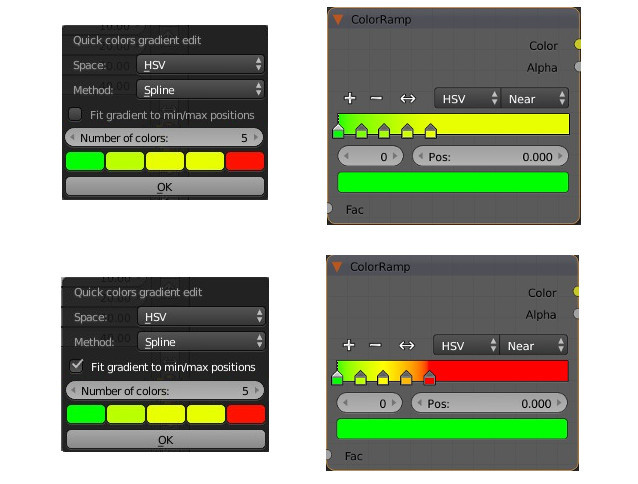
Sometimes, there is no stops at the bounds of the color ramp node (positions 0 and 1). To fit the quick gradient definition to this special case you can use the dedicated option.

This addon is packaged with a few SVG color ramp. All these ramp are pick up from the cpt-city archive. SVG files are stored in Blender_install_folder\2.xx\scripts\addons\terrain_analysis\gradients. You can add, edit or remove svg file from here to manage your color ramp library.
Like previous tool, for each stop of the color ramp node, the script evaluate by interpolation the color inside the svg gradient at the corresponding stop position.
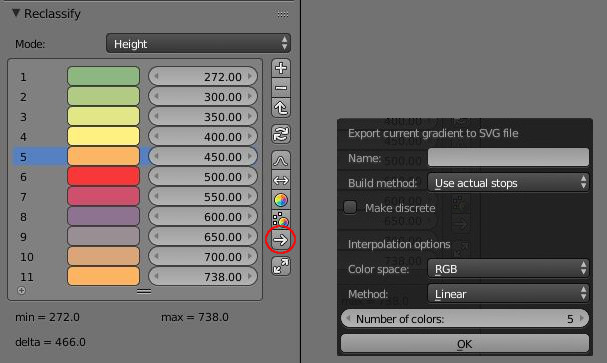
You can export actual color ramp node configuration to svg files. This file will be stored in Blender_install_folder\2.xx\scripts\addons\terrain_analysis\gradients folder, so the ramp is added to the library and can be immediatly reused.
There are 2 methods to build the svg file:
- Use actual stops build svg ramp with exactly the same positions and colors currently define in the color ramp node. There is no interpolation.
- Interpolate n colors produce a svg gradient with a predefined number of colors interpolate from the color ramp node definition. The interpolation options of the popup window will only be used along with this method.
SVG gradient can be continuous or discrete, use the dedicated checkbox to produce one or the other type.
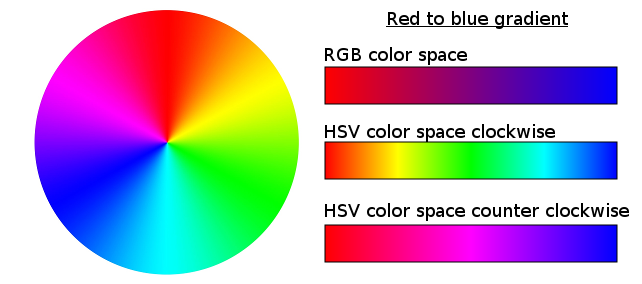
Interpolation can be computed through RGB or HSV color space. HSV interpolation often gives better results, but in this color space hue is cyclic and the interpolation must be done through the shortest path (clockwise or counterclockwise). By defaut this addon use the shortest path.
You can use several algorithms for interpolation:
- Linear is the most simple way but this method do not provides a smooth interpolation.
-
Spline interpolation gives smooth results. Here we use the Akima method instead of the well know Cubic spline. The disadvantage of cubic splines is that they could oscillate in the neighborhood of an outlier while the Akima spline is less affected by them.

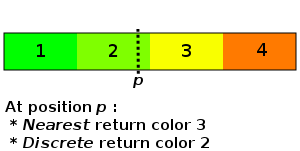
- Discrete isn't an interpolation method, it just return the previous color.
-
Nearest isn't an interpolation method, it just return the nearest color.
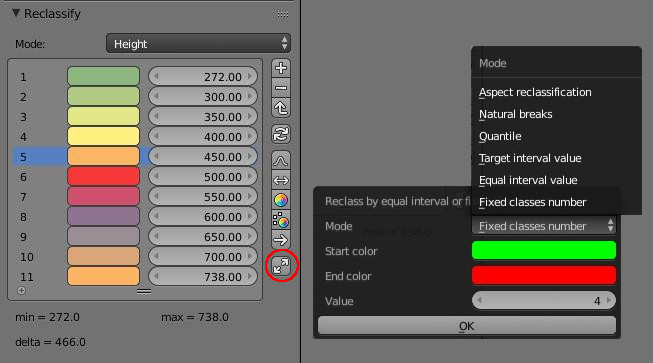
This tool allows to automatically classify the values following specified rules:
-
Fixed classes number produce an predefined number of classes by divided equally the entire range of data values. The interval is determined by the desired number of classes. Note that for define x classes we need x+1 stops in the color ramp.

-
Equal interval value produce a similar result but instead of predefining the number of classes, we define the interval. The number of classes is determined by the desired interval.

-
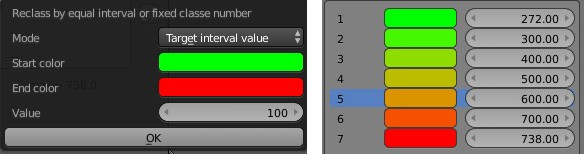
Target interval value make a stop for each multiple of the target value. This method is ideal if you want to classifying with an absolute step value. The intervals will not be necessary equals.
- Quantile classification assigns the same number of data values to each class.
- Natural break classification determine the best arrangement of values into different classes. It use an optimization on kmeans algorithm to the case of one dimensionnal data. Results are similar to the well know Jenks natural breaks classification.
-
Aspect reclassification is a specific method dedicated to aspect map. The number of classes determine the number of azimuth represented.