Mapache ([maˈpa.t͡ʃe]) is a lightweight mapping pipeline for ancient DNA using the workflow manager Snakemake.
Visit the Wiki for extensive documentation on how to use mapache and follow the tutorial to map and impute the test dataset.
If you already have some experience with DNA mapping and/or Snakemake, you can follow the quick guide below.
The usage of this workflow is described in the Snakemake Workflow Catalog.
The following main steps are included in mapache:
for each fastq file:
    - subsampling of a small subset of reads (options, not run by default; useful for quick tests)
    - adapter removal with AdapterRemoval (optional; run by default)
    - mapping with bwa aln (default), bwa mem or bowtie2
for each library:
    - marking duplicates with MarkDuplicates (optional; duplicates are removed by default)
    - rescaling of base qualitiy scores with mapDamage (optional, not run by default)
for each sample:
    - re-alignment of reads with GATK (optional; run by default)
    - re-computation of the md flag with samtools (optional; run by default)
    - imputation of low-coverage genomes with GLIMPSE (optional, not run by default)
Moreover, mapache allows you to map large datasets to a single reference genome or to multiple genomes.
Mapache is designed having in mind that one or multiple DNA libraries are generated per sample, and such libraries are sequenced at least once (e.g., for screening), but usually multiple times (normally prioritizing the highest-quality libraries). This results in several FASTQ files, which have to be mapped several times over the course of a project in order to generate a single BAM file.
The goal of mapache is to make the mapping process as easy and transparent as possible, whether you are mapping to a single or multiple genomes, mapping for the first time, needing to update a BAM file or even impute low-coverage genomes.

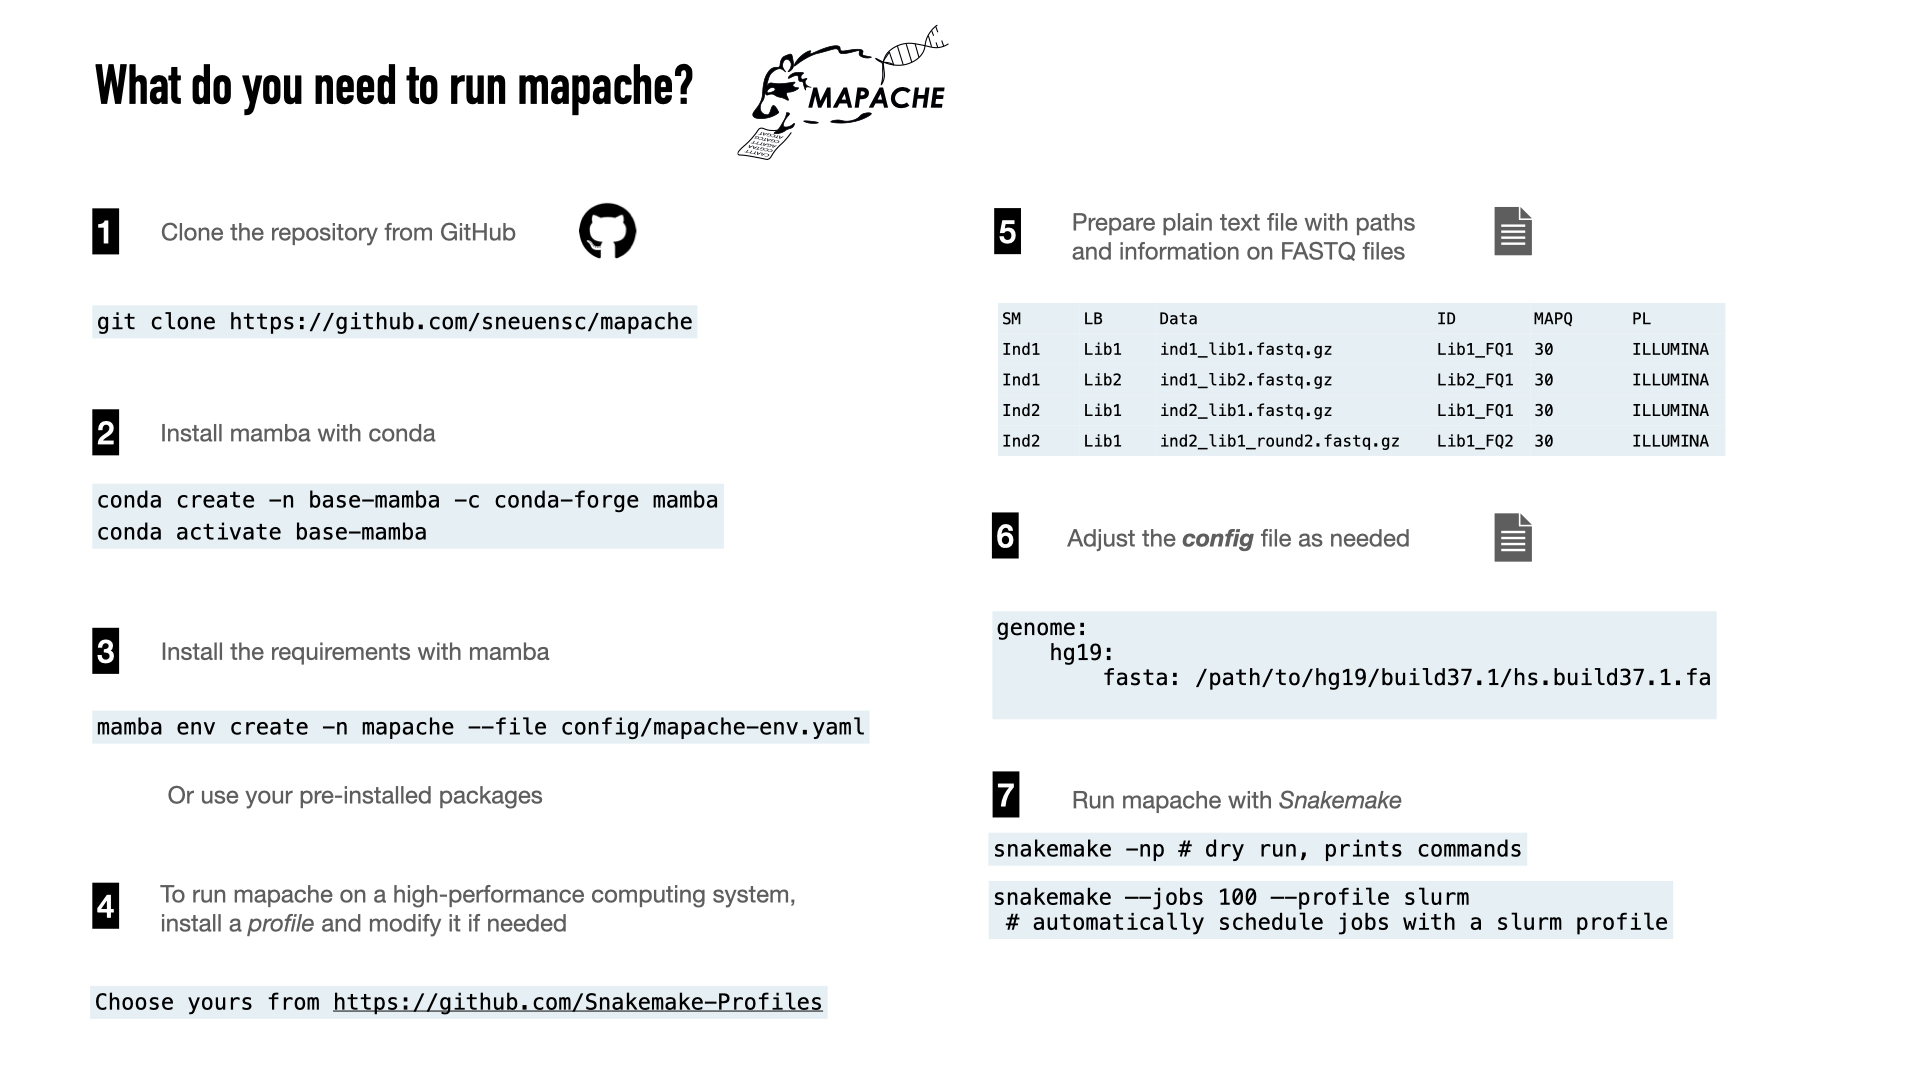
To install mapache, you need to clone the repository and create a conda environment following the instructions below. This will automatically install the software needed to map FASTQ files to a reference genome and create a report with the mapping statistics.
To execute mapache, you can move to the cloned directory (mapache) or symlink its content (the directories config/, results/, workflow/, and test_data/ if you want to run the test) to your working directory.
You will mostly interact with mapache through its configuration file (config/config.yaml), where you can tweak the parameteres of the pipeline, and the samples file (config/samples.tsv), in which you can list all the input FASTQ files.
#--------------------------------------------------------------#
## create mamba environment
conda create -n base-mamba -c conda-forge mamba

## activate mamba environment
conda activate base-mamba

#--------------------------------------------------------------#
## clone mapache repository
git clone https://github.com/sneuensc/mapache.git
cd mapache

## create conda environment for mapache
mamba env create -n mapache --file config/mapache-env.yaml

#--------------------------------------------------------------#
## now you can activate the mapache environment
conda activate mapache

A samples file for the test dataset is provided (config/samples.tsv). If you want to run it on your own datasets, you can prepare a tab-separated file containing the same columns as the example.
Example of a sample file for single-end libraries:
SM      LB    ID       Data
ind1    L1    L1_1     reads/ind1.L1_R1_001.fastq.gz
ind1    L1    L1_2     reads/ind1.L1_R1_002.fastq.gz
ind1    L2    L2_1     reads/ind1.L2_R1_001.fastq.gz
ind1    L2    L2_2     reads/ind1.L2_R1_002.fastq.gz
Example of a sample file for paired-end and single-end libraries:
SM      LB    ID       Data1                            Data2
ind2    L1    L1_1     reads/ind2.L1_R1_001.fastq.gz    reads/ind2.L1_R2_001.fastq.gz
ind2    L1    L1_2     reads/ind2.L1_R1_002.fastq.gz    reads/ind2.L1_R2_001.fastq.gz
ind2    L2    L2_1     reads/ind2.L2_R1_002.fastq.gz    NULL
In the first example, four fastq files will be mapped. They were generated from two different libraries (here, labelled as L1 and L2) from a single sample (ind1).
In the second example, there is still only one sample (ind2), and two libraries, sequenced in paired-end (L1) and single-end (L2) mode.
You can add more samples/libraries/fastq files in the input dataset by adding a new row including the 4 or 5 fields indicated above.
The columns of the sample file are:
- SM: Sample name. Libraries are merged according to this name.
- LB: Library name. Fastq files are merged according to this name.
- ID: An ID for the fastq library (examples: id1, fq_1, ind1_lib1_fq2, etc.)
- Data (single-end format): Path to the fastq file. The file may be gzipped or not. Path may be absolute or relative to the working directory.
- Data1 (paired-end format): Path to the forward fastq file (R1) for paired-end data or the fastq file for single-end data. The file may be gzipped or not. Path may be absolute or relative to the working directory.
- Data2 (paired-end format): Path to the reverse fastq file (R2) for paired-end data or
NULLfor single-end data. The file may be gzipped or not. Path may be absolute or relative to the working directory.
👆🏿 Note that you can select any label you want for the columns SM, LB, and ID, but they may not contain points '.'. That is, they do not need to match any substring or the name of your FASTQ files (FASTQ file names may in contrast contain points). However, we recommend that you stick to meaningful names (e.g.: Denisova, Mota, UstIshim, Anzick, lib1, lib2, lib3_USER, etc.) and ACII characters.
By default, mapache is configured to map ancient data to a human reference genome. You need to specify the path to the reference genome in FASTA format in the configuration file (config/config.yaml) provided by mapache.
Mapache will map the input FASTQ files to the reference genome(s) indicated in the config file under the keyword genome.
The path to the genome in FASTA format should be indicated with the keyword fasta.
In the example below, all the samples will be mapped to two versions of the human genome. The final BAM files will be named with the format {sample_ID}.{genome_name}.bam (e.g., ind1.hg19.bam, ind1.GRCh38.bam).
genome:
    GRCh37: path_to_reference/GRCh37.fasta
# GRCh38: path_to_reference/GCA_000001405.15_GRCh38.faMapache will perform different steps (see below) in order to produce a BAM file. Most of the steps are optional, but run by default.
The config file contains entries corresponding to each of the steps that can be run and customized. For example, the entry with the options to clean the fastq files looks like this:
# fastq cleaning (optional)
cleaning:
    run: 'adapterremoval'   # options: adapterremoval (default), fastp, False
    params_adapterremoval: '--minlength 30 --trimns --trimqualities'
    params_fastp: ''
    threads: 4
    mem: 4 ## in GB
    time: 2
If you need to modify the pipeline, for instance to ommit the step step, you can set in the config file its option to run: False, or run: 'adapterremovel' and run: 'fastp' to run AdapterRemoval2 and fastp, respectively. Additionally, if you intend to run mapache on an HPC system, you can specify the number of threads, memory (mem in GB), and runtime (time in hours) to be allocated to each step. Finally, you can pass additional parameters to the tool to be executed (e.g. --minlength 30 to AdapterRemoval2) with the keyword params_adapterremoval.
To run mapache on your working directory, you will need to copy or create symbolic links to the following directories:
- workflow (mandatory)
- config (mandatory)
- test_data (optional, only if you want to run the tutorial)
- slurm (optional, useful to submit jobs in HPC systems with slurm as cluster manager)
Assuming that you are in the mapache directory, you can use the next lines to create an alias to copy or symlink those directories. You can adjust it by including only the directories that you want to copy/symlink.
# alias to cp directories
 echo "alias copy_mapache='cp -r $(pwd -P)/{config,workflow,test_data,slurm} . ' " >> ~/.bash_profile
# alias to symlink directories
 echo "alias symlink_mapache='ln -s $(pwd -P)/{config,workflow,test_data,slurm} . ' ">> ~/.bash_profile

source ~/.bash_profile

Make sure that the paths to
- the reference genome(s) in the config files
- the file listing the FASTQ files (samples.tsv)
as well as the paths listed in samples.tsv are properly specified
We highly recommend to make use of dry runs to get an idea of the jobs that will be executed.
# print jobs to be executed
snakemake -pn
# Visualization of the pipeline in a directed acyclic graph (DAG).
snakemake dag --dag | dot -Tpng > dag.png
The command below will produce a figure with the rules that will be run.
snakemake --rulegraph |dot -Tpng > rulegraph.png

Examples for the DAG and rulegraph can be found here and here, respectively.
This is a very handy utility that will allow mapache to automatically schedule jobs for submission to a queuing system. If you work with a system managed by slurm, you can skip this step, as mapache comes with a slurm profile (mapache/slurm).
Other profiles are available at: https://github.com/Snakemake-Profiles
Note however that the exact configuration might vary depending on your system (i.e., some users might have different accounts on a server for billing purposes). We thus highly encourage you to seek for help with your IT team if you are in doubt about the configuration that suits your system the best. Please note that we are not in charge of developing these profiles.
mapache can be run locally by indicating the number of cores available or with a high-performance computing system, by configuring a profile.
Example of execution using only one CPU:
snakemake --cores 1

If you work on an HPC system managed by slurm, you can use the slurm profile in the repository (mapache/slurm/) by symlinking it to your working directory. We recommend to start a screen session prior to the job submission.
Example of a submission of 999 jobs (simoultaneously) with the slurm profile:
snakemake --jobs 999 --profile slurmThe template using to produce the html report will change depending on the version of Snakemake that you are using with mapache. Although we try to include one of the most recent distributions of Snakemake, we think that the template used in older versions is more useful to navigate through the results in the report. We thus recommend you to create a new environment with conda or mamba to create such report:
mamba create -n snakemake610 snakemake=6.10.0
mamba activate snakemake610
Once you have activated the new environment, creating the report is straightforward:
snakemake --report report.zipor
snakemake --report report.htmlWe recommend creating the zip version of the report, as it contains the html report in it and it allows you to download any of the output tables or plots by clicking on the links of the report, making it easier to share with your colleagues.
Explore the zipped report produced with Snakemake 6.10.0.
#------------------------------------------
# Get an idea of the jobs that will be executed. Not mandatory but very useful to spot possible mistakes in the configuration or input files

snakemake dag --dag | dot -Tsvg > dag.svg                Visualization of the pipeline in a directed acyclic graph (DAG).
snakemake dag --rulegraph | dot -Tsvg > rulegraph.svg    Visualization the interplay of the rules.
snakemake -n                                             Dry run
snakemake -p -n                                          Print out the commands in a dry run

#------------------------------------------
# recommended workflow on a cluster (e.g. slurm)
snakemake --jobs 999 --profile slurm                     Run all mappings and imputation (note that the profile has to be the last argument)

#------------------------------------------
# recommended workflow on a single machine without a queuing system
snakemake --cores 16                                     Run all mappings and imputation (assuming that you have 16 CPUs available)

#------------------------------------------
# Create report (after execution)

snakemake --report report.html                           Create a html report
snakemake --report report.zip                            Create a zip report; useful if you want to download the files by clicking on the HTML report

#------------------------------------------
# Options to control the execution.
# Visit https://snakemake.readthedocs.io/en/stable/ for full documentation

--profile slurm                           To send it on the cluster (must be the last argument).
-R RULE_NAME                              Force a start at least at the given rule.
--until RULE_NAME                         Run until the given rule (included).
--rerun-incomplete                        Re-run all jobs the output of which is recognized as incomplete.
--configfile FILE                         Define the config file (default config/config.yaml).
-t                                        Reset the timestamp that the output is not re-computed.
-p                                        Print out the shell commands that will be executed.
--rerun-triggers mtime                    for a rerun, consider only the time stamp (previously the default
                                          setting, now any change (code, config,..) lead to a rerun of
the rule)If you use mapache in your study, please cite Neuenschwander S, Cruz Dávalos DI, et al. (2023) Mapache: a flexible pipeline to map ancient DNA. Bioinformatics (https://doi.org/10.1093/bioinformatics/btad028) and the tools that you used within mapache. See the table below for a list of tools used at each step.
| Version | Reference | Link | |
|---|---|---|---|
| Workflow manager | |||
| Snakemake | 7.18.2 | Mölder, et al. (2021) | https://github.com/snakemake/snakemake |
| Subsample | |||
| seqtk | 1.3 | https://github.com/lh3/seqtk | |
| Clean | |||
| AdapterRemoval2 | 2.3.2 | Schubert, et al. (2016) | https://github.com/MikkelSchubert/adapterremoval |
| fastp | 0.23.2 | Chen, et al. (2018) | https://github.com/OpenGene/fastp |
| Map | |||
| BWA aln | 0.7.17 | Li and Durbin (2009) | https://github.com/lh3/bwa |
| BWA mem | 0.7.17 | Li and Durbin (2009) | https://github.com/lh3/bwa |
| Bowtie2 | 2.4.4 | Langmead and Salzberg (2012) | https://github.com/BenLangmead/bowtie2 |
| Sort | |||
| SAMtools | 1.14 | Danecek, et al. (2021) | https://github.com/samtools/samtools |
| Filter | |||
| SAMtools | 1.14 | Danecek, et al. (2021) | https://github.com/samtools/samtools |
| Merge lanes | |||
| SAMtools | 1.14 | Danecek, et al. (2021) | https://github.com/samtools/samtools |
| Remove duplicates | |||
| Picard MarkDuplicates | 2.25.5 | Broad Institute (2019) | http://broadinstitute.github.io/picard |
| dedup | 0.12.8 | Peltzer, et al.(2016) | https://github.com/apeltzer/DeDup |
| Rescale damage | |||
| mapDamage2 | 2.2.1 | Jonsson, et al. (2013) | https://github.com/ginolhac/mapDamage |
| Trim alignments | |||
| BamUtil | 1.0.15 | Jun, et al. (2015) | https://github.com/statgen/bamUtil |
| Merge libraries | |||
| SAMtools | 1.14 | Danecek, et al. (2021) | https://github.com/samtools/samtools |
| Realign indels | |||
| GATK IndelRealigner | 3.8 | DePristo, et al. (2011) | https://gatk.broadinstitute.org |
| Recompute md flag | |||
| SAMtools | 1.14 | Danecek, et al. (2021) | https://github.com/samtools/samtools |
| Imputation | |||
| GLIMPSE | 1.1.1 | Rubinacci, et al. (2021) | https://github.com/odelaneau/GLIMPSE |
| BCFtools | 1.15 | Danecek, et al. (2021) | https://github.com/samtools/bcftools |
| Reports | |||
| FastQC | 0.11.9 | Andrews (2010) | https://www.bioinformatics.babraham.ac.uk/projects/fastqc |
| Qualimap | 2.2.2d | Okonechnikov, et al. (2016) | http://qualimap.conesalab.org |
| MultiQC | 1.13 | Ewels, et al. (2016) | https://multiqc.info |
| Statistics | |||
| BEDTools | 2.30.0 | Quinlan and Hall (2010) | https://github.com/arq5x/bedtools2 |
| bamdamage | modified | Malaspinas, et al. (2014) | https://savannah.nongnu.org/projects/bammds |
| R | 4.0 | R Core Team (2022) | https://www.r-project.org |