This project is a highly scalable architecture for NextJS 13, built and configured to easily achieve quality and consistency of code among the team of developers.
- Introduction to Screaming Architecture
- Getting Started
- Code Generator
- Project Architecture Rules
- Group by feature
- Create a separate file for each module
- Avoid nesting of feature files inside feature file
- Create barrel file then name the component file by its name, not index.tsx
- Create a type-only barrel file for types
- Place UI components inside features/ui directory
- Place utility functions inside features/utils directory
- Create separate directory for section components
- Use kebab-case for file/folder names
- Use relative import when importing from the same module
- Reference
- Notes
- Feature File Structure
- Project Configurations & Setup
- Resources About Screaming Architecture
Screaming Architecture is a concept introduced by Uncle Bob (Robert C. Martin) as a metaphor for software architecture that emphasizes the clarity and intent of the system's architecture through its structure and organization. The idea behind Screaming Architecture is to make the architecture of a software system so evident and expressive that it "screams" its purpose and design, making it easy for developers and stakeholders to understand and work with.
-
Forking the Project
- For users who want to collaborate and contribute to this project, forking this repository is the way to go.
-
Download the Files
- For users who simply want to integrate the project into their next project, downloading the project files is the straightforward approach.
-
Referencing for Project Structure
- Maybe you already have an existing project, or perhaps the tech stack you're using is different. In such cases, you can use this project as a valuable reference for structuring your own. Extract insights, learnings, or even download essential files like code templates to enhance your project structure.
If you decided to either fork or do the same setup by downloading the files, you can get started by running the following command:
pnpm install
pnpm dev
This will install the necessary dependencies and launch the app in development mode.
One of the core features of this project is code generation, providing built-in templates for the structures outlined here. Maintaining code consistency in a codebase can be challenging, especially when working with a team of junior, mid, and senior developers. This feature aims to establish code consistency in your codebase and will save you a lot of time by avoiding the need to set up boilerplates every time.
The base path of every generated code is src/features, so when you input todos in File path prompt, the generated code will be placed in src/features/todos.
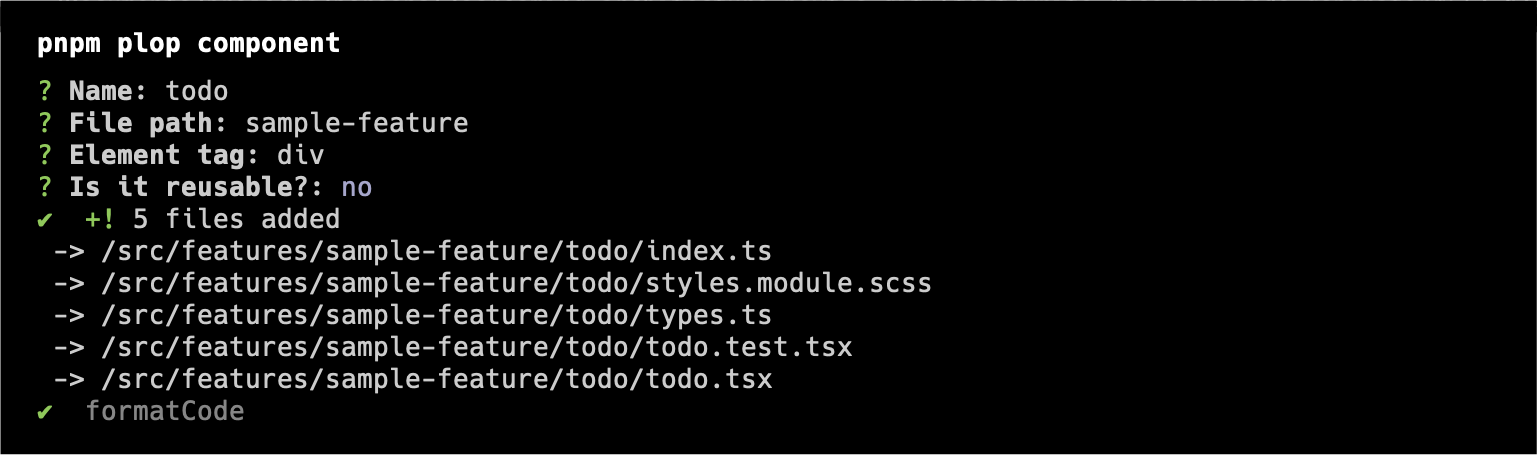
Generate component by running this command:
pnpm plop component
These list of prompts will show after running that command
| Prompt | Description | Default Value |
|---|---|---|
Name |
Input the name of the component you want to generate | |
File path |
Input the file path for where you want place the component | |
Element tag |
Input the html element wrapper of your component | div |
Is it reusable? |
Select yes if you want the component to be setup as reusable |
no |
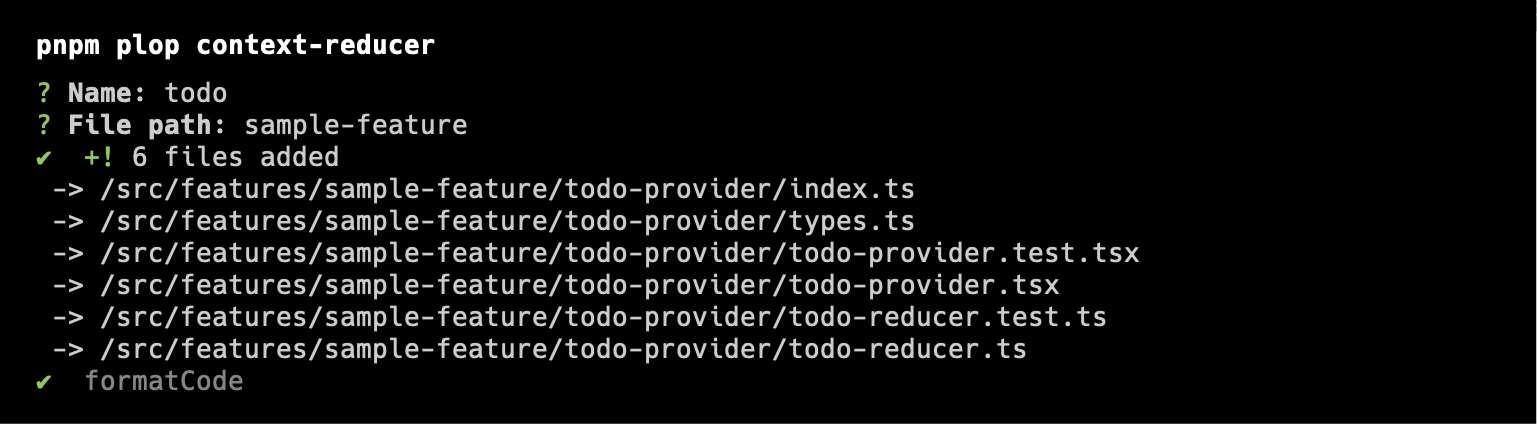
Generate context-reducer by running this command:
pnpm plop context-reducer
These list of prompts will show after running that command
| Prompt | Description | Default Value |
|---|---|---|
Name |
Input the name of the component you want to generate. Name will have -provider suffix automatically |
|
File path |
Input the file path for where you want place the component |
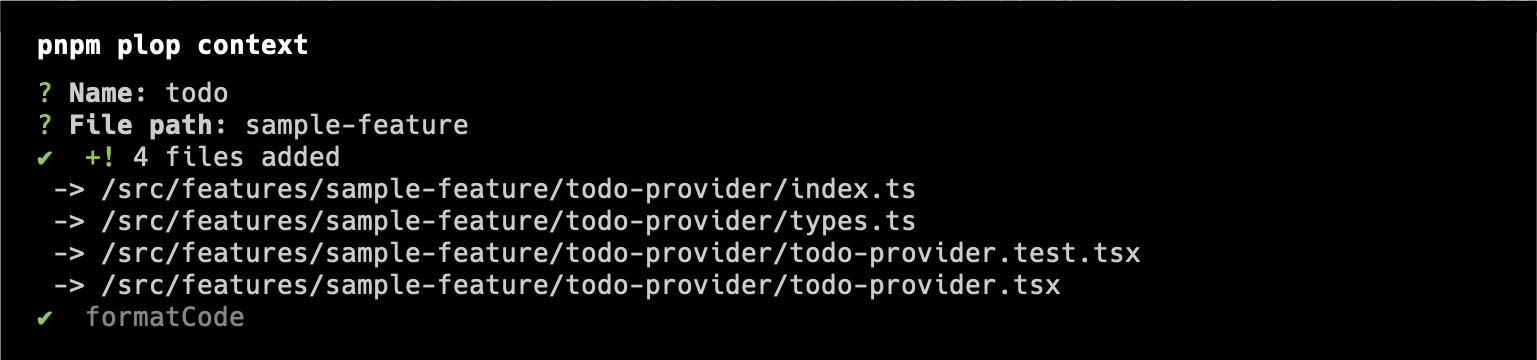
Generate context by running this command:
pnpm plop context
These list of prompts will show after running that command
| Prompt | Description | Default Value |
|---|---|---|
Name |
Input the name of the component you want to generate. Name will have -provider suffix automatically |
|
File path |
Input the file path for where you want place the component |
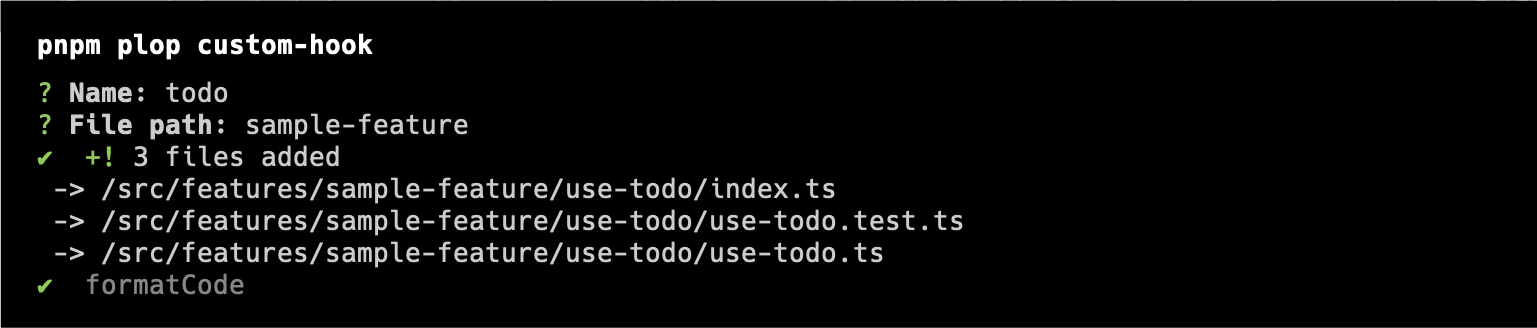
Generate custom-hook by running this command:
pnpm plop custom-hook
These list of prompts will show after running that command
| Prompt | Description | Default Value |
|---|---|---|
Name |
Input the name of the component you want to generate. Name will have use- prefix automatically |
|
File path |
Input the file path for where you want place the component |
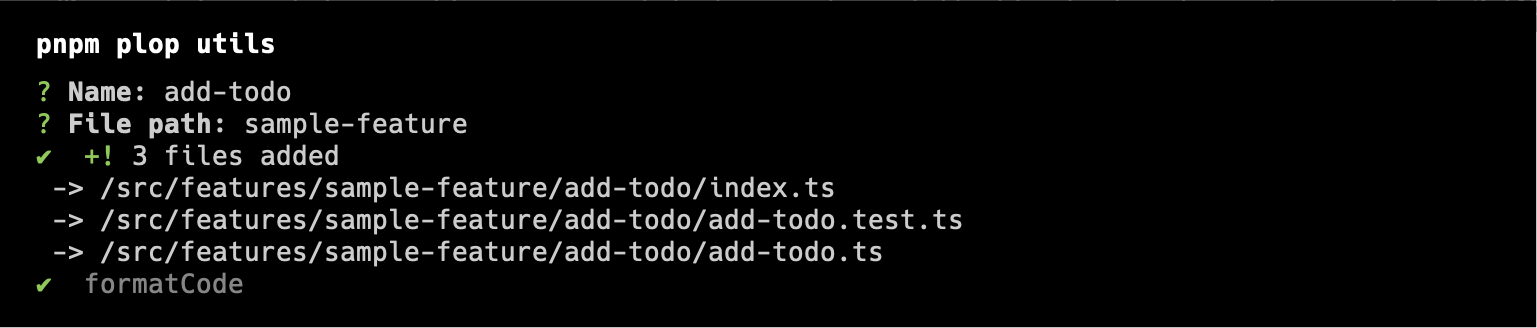
Generate utility functions by running this command:
pnpm plop utils
These list of prompts will show after running that command
| Prompt | Description | Default Value |
|---|---|---|
Name |
Input the name of the component you want to generate | |
File path |
Input the file path for where you want place the component |
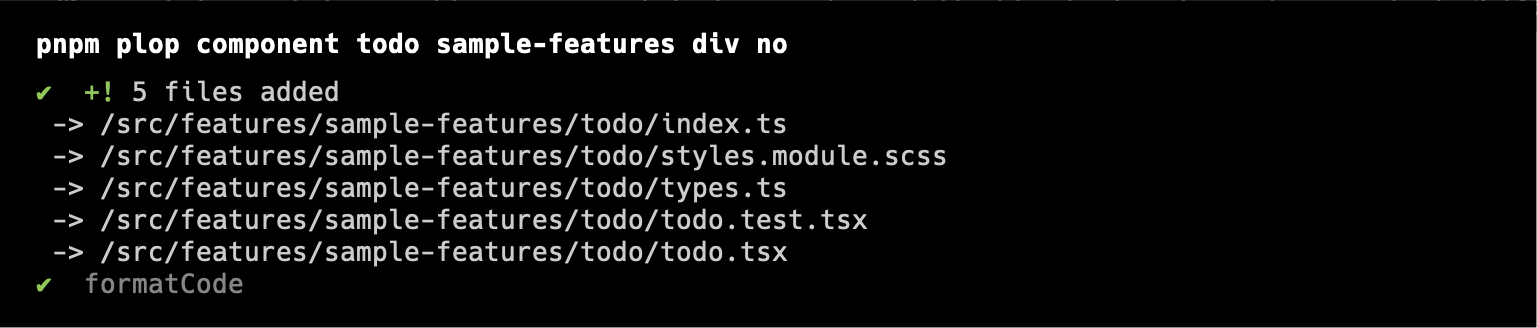
Once you have memorized the sequence of prompts for each template, you can skip the prompts and run a shorthand command. For the component template, you can skip the prompts by running this shorthand command.
pnpm plop component todo sample-feature div no
That command will generate a non-reusable component named todo-item with div element as its wrapper and placed inside src/features/todos directory
Adhere to the following guidelines when grouping by feature:
- Store all feature codes within the
src/featuresdirectory. - Co-locate all files related to a specific feature.
- Avoid naming folders based on the framework you are using.
Here's an example of structure that does not comply with all the guidelines mentioned above:
❌ Don't do this ❌

└── 📁 src/
    ├── 📁 components/
    │   ├── 📁 add-todo-form/
    │   └── 📁 todo-list/
    ├── 📁 contexts/
    │   └── 📁 todo-provider/
    ├── 📁 hooks/
    │   └── 📁 use-todo/
    └── 📁 graphql/
        └── 📁 todos/
And here's how to fix it:
✅ Do this instead ✅

└── 📁 src/
    └── 📁 features/
        └── 📁 todos/
            ├── 📁 add-todo-form/
            ├── 📁 todo-provider/
            ├── 📁 todo-list/
            ├── 📁 todo-query/
            ├── 📁 use-todo/
            └── 📄 index.ts
There are a lot of potential drawbacks to having multiple modules in a single file. To mention a few:
-
Maintainability
- As the size of your project grows, having multiple modules in one file can lead to increased complexity. It becomes harder to locate and modify specific sections of code.
-
Testing
- Having separate files for each module allows for more granular testing. If modules are combined into one file, it might be challenging to isolate and test specific functionalities independently.
-
Collaboration
- When multiple developers are working on the same file, it's more likely that they'll need to make changes to the same module. This can result in merge conflicts and hinder collaborative development.
A typical example of this is creating a one file for all the utility functions:
// ❌ Don't do this ❌

// index.ts
export const debounce = () => {}
export const useMediaQuery = () => {}
// ✅ Do this instead ✅
// debounce.ts
export const debounce = () => {}
// use-media-query.ts
export const useMediaQuery = () => {}Nesting of files can affect the readability of the project architecture, so as much as possible we want to avoid it. For instance, consider the scenario where todo-item is only being used in todo-list and we have use-todo-item which is being used inside todo-item only. We might think of nesting use-todo-item inside todo-item and nesting todo-item inside todo-list. But what if there's another file that is only being used in use-todo-item? The nesting would be endless, so it might be better to just avoid it from the start.
❌ Don't do this ❌

└── 📁 src/
    └── 📁 features/
        │   ✅ root level of feature file
        └── 📁 todos/
            │   ✅ 1st level
            └── 📁 todo-list/
                │   ❌ 2nd level
                ├── 📁 todo-item/
                │   │   ❌ 3rd level
                │   ├── 📁 use-todo-item/
                │   │   ├── 📄 use-todo-item.tsx
                │   │   └── 📄 index.ts
                │   ├── 📄 todo-item.tsx
                │   └── 📄 index.ts
                ├── 📄 todo-list.tsx
                └── 📄 index.ts
✅ Do this instead ✅

└── 📁 src/
    └── 📁 features/
        │   ✅ root level of feature file
        └── 📁 todos/
            │   ✅ 1st level
            ├── 📁 todo-list/
            │   ├── 📄 todo-list.tsx
            │   └── 📄 index.ts
            │   ✅ 1st level
            ├── 📁 todo-item/
            │   ├── 📄 todo-item.tsx
            │   └── 📄 index.ts
            │   ✅ 1st level
            └── 📁 use-todo-item/
                ├── 📄 use-todo-item.tsx
                └── 📄 index.ts
Naming the component file as index.tsx will create confusion in the directory and will make it harder to search a specific component in IDE, resulting in poor developer experience.
❌ Don't do this ❌

└── 📁 todo-list/
    └── 📄 index.tsx
✅ Do this instead ✅

└── 📁 todo-list/
    ├── 📄 todo-list.tsx
    └── 📄 index.ts
See component structure for reference.
It is easier to use Type-Only Imports and Export with types when we store all types in a type-only barrel file. See illustration below.
└── 📁 src/
    └── 📁 features/
        └── 📁 todos/
            ├── 📁 todo-list/
            │   ├── 📄 todo-list.tsx
            │   │   # This is the barrel file of todo-list component
            │   ├── 📄 index.ts
            │   └── 📄 types.ts
            │   # This is the barrel file of components for todos feature
            ├── 📄 index.ts
            │   # This is the barrel file of types for todos feature
            └── 📄 types.ts
This way, we can use Type-Only Imports and Export with ease like
// todos/types.ts

// re-export types using type-only export
export type * from './todo-list/types'
// import TodoListProps somewhere
// import types using type-only import
import type { TodoListProps } from '@features/todos/types'Treat every component as a feature, even if that component doesn't do anything besides displaying its UI on the webpage. UI components are the components that is shared/reusable and have generic purpose like <Button>, <Input>, <Container>, etc. Those components should be placed inside features/ui directory.
Utility function is a function designed to perform a specific task or set of tasks, often focused on providing common functionalities that can be reused across the app. Just like UI components, utility functions are also considered a feature and should be placed inside features/utils directory.
Section component is a component that contains composition or layout of multiple feature components. It usually doesn't contain any logic, only styles that controls the layout. Each feature item can have section directory that contains section components.
└── 📁 src/
    └── 📁 features/
        └── 📁 todos/
            ├── 📁 add-todo-form/
            │   ├── 📄 add-todo-form.tsx
            │   ├── 📄 index.ts
            │   └── 📄 types.ts
            ├── 📁 todo-list/
            │   ├── 📄 todo-list.tsx
            │   ├── 📄 index.ts
            │   └── 📄 types.ts
            │   ✨ Sections directory ✨
            ├── 📁 sections/
            │   ├── 📁 todo-section/
            │   │   ├── 📄 todo-section.tsx
            │   │   ├── 📄 index.ts
            │   │   └── 📄 types.ts
            │   │   # Barrel file for sections
            │   └── 📄 index.ts
            ├── 📄 index.ts
            └── 📄 types.ts
const TodoSection = () => (
  <section>
    <AddTodoForm />
    <TodoList />
  </section>
)A common convention in React is to name components in PascalCase and non-components in camelCase. However, this can lead to inconsistency and potentially confuse developers. Moreover, it is susceptible to conflicts with case-sensitive file systems, such as Continuous Integration, Version Control, and Operating Systems. Using kebab-case helps avoid these issues. See feature file structure for reference.
By having feature-based directory and barrel files, this type of architecture is prone to having circular dependency by importing a module from the same module. For example we have this directory setup:
└── 📁 src/
    └── 📁 features/
        └── 📁 todos/
            ├── 📁 add-todo-form/
            │   ├── 📄 add-todo-form.tsx
            │   ├── 📄 index.ts
            │   └── 📄 types.ts
            ├── 📁 todo-list/
            │   ├── 📄 todo-list.tsx
            │   ├── 📄 index.ts
            │   └── 📄 types.ts
            ├── 📄 index.ts
            └── 📄 types.ts
Inside the todo-list, if you intend to import the add-todo-form, it's advisable to refrain from using a path alias and opt for a relative path instead.
// Alias path
// ❌ Don't do this ❌
import { AddTodoForm } from '@features/todos'
// Relative path
// ✅ Do this instead ✅
import { AddTodoForm } from '../add-todo-form'This project includes a simple todo app implementation that follows the mentioned rules above, acting as a handy reference and guide on rule compliance. Furthermore, the codes in this todo app, along with the test suites, adheres to best practices and widely-used React patterns. This can be particularly helpful as a learning resource for less experienced developers on the team.
Although this project have certain rules to achieve the goal of Screaming Architecture, there can still be a lot of different implementations of it. It will only be a matter of preference and what will work for you or everyone in the team. There's no right or wrong here as long as you apply the important rule of Screaming Architecture, which is to tell the readers and developers about the system, not about the frameworks you used in your app.
└── 📁 todo-list/
    ├── 📄 index.ts
    ├── 📄 styles.module.scss
    ├── 📄 todo-list.test.tsx
    ├── 📄 todo-list.tsx
    └── 📄 types.ts
└── 📁 todos/
    └── 📁 sections/
        ├── 📁 todo-section/
        │   ├── 📄 index.ts
        │   ├── 📄 todo-section.tsx
        │   ├── 📄 todo-section.test.tsx
        │   └── 📄 types.ts
        ├── 📁 todo-form-section/
        │   ├── 📄 index.ts
        │   ├── 📄 todo-form-section.tsx
        │   ├── 📄 todo-form-section.test.tsx
        │   └── 📄 types.ts
        └── 📄 index.ts
└── 📁 todo-provider/
    ├── 📄 index.ts
    ├── 📄 todo-provider.test.tsx
    ├── 📄 todo-provider.tsx
    ├── 📄 todo-reducer.test.ts
    ├── 📄 todo-reducer.ts
    └── 📄 types.ts
└── 📁 todo-provider/
    ├── 📄 index.ts
    ├── 📄 todo-provider.test.tsx
    ├── 📄 todo-provider.tsx
    └── 📄 types.ts
└── 📁 use-todo/
    ├── 📄 index.ts
    ├── 📄 use-todo.test.ts
    ├── 📄 use-todo.ts
    └── 📄 types.ts
└── 📁 utils/
    ├── 📁 debounce/
    │   ├── 📄 debounce.test.ts
    │   ├── 📄 debounce.ts
    │   └── 📄 index.ts
    ├── 📁 use-media-query/
    │   ├── 📄 index.ts
    │   ├── 📄 use-media-query.test.ts
    │   └── 📄 use-media-query.ts
    └── 📄 index.ts
This project uses pnpm as package manager. pnpm is known to be 3 times faster and more efficient than npm and it is also faster than yarn in many cases. There are still more reasons to be choosing pnpm over npm and yarn, but it is still a matter of team's preference. Listed down below some helpful resources about pnpm:
- Why you should prefer using pnpm over npm and yarn?
- JavaScript Package Managers: NPM vs YARN vs PNPM
- PNPM Benchmark
This project runs an automated error-checks workflow, including linting, type checking, and testing in every pull request. This will help developers to identify and address potential errors, ensuring code quality in the codebase.
To protect the repository from bad commits, this project is configured with Husky pre-commit, which runs lint and type checks. It prevents a commit if there are any lint or type errors.
This project is configured with NextJS TypeScript config with an additional helpful config that will help maintain code quality.
-
Path Alias
- Every root directory inside
./srcis set to have alias with this format@name-of-directory/. See examples below:./src/features--->@features/./src/styles--->@styles/
- With this config, every non-relative import will become like
@features/todo,@features/ui,@styles/abstracts
- Every root directory inside
-
Global Types
- This project has
global.d.tsfile where global types and utilities are being declared. Global types that is being declared here are usually the types for the integrated third-party scripts that doesn't provide type declarations on their module.
- This project has
This project is configured with NextJS ESLint config with an additional helpful rules that will help maintain code quality especially in ReactJS. A rule that is worth mentioning here is the react-hooks/exhaustive-deps rule is set to error. That rule will prevent any bad usages of useEffect and will help developers to think twice when using it, since most of the time you might not need an effect.
The vscode settings are configured to align with the code standards of this project. Configs that are worth mentioning are the ff:
-
Organize imports on save.
- This will remove unused imports and sort imports alphabetically.
-
Format on save.
- This will run prettier on the specific file you save.
-
Fix eslint errors on save.
- This will automatically fix eslint errors on the specific file you save.
This project uses the default config of NextJS and just configured with circular-dependency-plugin in webpack to trace circular dependency errors easily.
This project is configured to use the following testing frameworks:
-
Unit, Integration & Component Testing
- Jest + React Testing Library
-
End-to-end Testing
- Cypress
This project uses SCSS modules for styling.
Directories
- styles/abstract
- This is like the utilities for scss. This is where all variables, mixins, functions and other non-css property codes are placed
- styles/base
- This is where the global styles are placed like reset and base styles. This set of styles are imported in the root app.