Creating hilly terrain
In the previous tutorials, we have shown how to create a flat world, and how to write a configuration file for that world. Here, we are going to improve the terrain generation by creating hilly terrain. In this tutorial, we won't write code line by line; instead we will give you code samples and some background information. This should hopefully get you started to writing your own terrain generator.
First, let's start by reading something Notch wrote in a blog post on terrain generation in Minecraft:
In the very earliest version of Minecraft, I used a 2D Perlin noise heightmap to set the shape of the world. Or, rather, I used quite a few of them. One for overall elevation, one for terrain roughness, and one for local detail. For each column of blocks, the height was
(elevation + (roughness*detail))*64+64. Both elevation and roughness were smooth, large scale noises, and detail was a more intricate one. This method had the great advantage of being very fast as there’s just16*16*(noiseNum)samples per chunk to generate, but the disadvantage of being rather dull. Specifically, there’s no way for this method to generate any overhangs.So I switched the system over into a similar system based off 3D Perlin noise. Instead of sampling the “ground height”, I treated the noise value as the “density”, where anything lower than 0 would be air, and anything higher than or equal to 0 would be ground. To make sure the bottom layer is solid and the top isn’t, I just add the height (offset by the water level) to the sampled result.
Unfortunately, I immediately ran into both performance issues and playability issues. Performance issues because of the huge amount of sampling needed to be done, and playability issues because there were no flat areas or smooth hills. The solution to both problems turned out to be just sampling at a lower resolution (scaled 8x along the horizontals, 4x along the vertical) and doing a linear interpolation. Suddenly, the game had flat areas, smooth hills, and also most single floating blocks were gone.
Notch, creator of Minecraft - https://notch.tumblr.com/post/3746989361/terrain-generation-part-1
We are going to implement something similar as Notch did for the 3D Perlin noise. For simplicity, we are going to use only one noise generator, but it should be straightforward to extend this.
We could write our own BaseTerrainGenerator, which allows precise control over where each block goes. However, this is quite a lot of work: we would need to design our noise function, sample it at the lower resolution and then use linear interpolation for the blocks in between. WorldGeneratorApi includes a simpler method: you can register your own BaseNoiseGenerator. WorldGeneratorApi will then perform the necessary sampling and interpolation.
What we need to do is write a function that receives an x and z coordinate as parameters, and then fills an array with 33 elements, each element representing (x, y, z) 4 x 8 x 4 blocks. Together, this is enough for WorldGeneratorApi to create the terrain from y=0 all the way up to y=256. Bukkit includes several noise generators in the org.bukkit.util.noise package. They are easy to use:
SimplexNoiseGenerator generator = new SimplexNoiseGenerator(worldSeed);
double noise = generator.noise(x, y, z);
Let's implement this:
package your.package.here;

import org.bukkit.util.noise.SimplexNoiseGenerator;

import nl.rutgerkok.worldgeneratorapi.BaseNoiseGenerator;
import nl.rutgerkok.worldgeneratorapi.BiomeGenerator;
import nl.rutgerkok.worldgeneratorapi.WorldRef;

public class YourNoiseGenerator implements BaseNoiseGenerator {

    private final SimplexNoiseGenerator mainNoiseGenerator;

    public YourNoiseGenerator(YourConfig config, WorldRef world) {
        // Initialize the noise generator based on the world seed
        this.mainNoiseGenerator = new SimplexNoiseGenerator(config.seed.get(world));
    }

    @Override
    public void getNoise(BiomeGenerator biomeGenerator, double[] buffer, int scaledX, int scaledZ) {
        for (int scaledY = 0; scaledY  < buffer.length; scaledY ++) {
            // Get a noise value (from -1 to 1)
            double noise = this.mainNoiseGenerator.noise(scaledX, scaledY, scaledZ);
            // Calculate an offset. This value will range from (-0 + 8) = 8 to (-33 + 8) = -25
            int heightOffset = -scaledY + 8;
            // Fill in the noise. Around scaledY = 8 (which is blockY = 64), this value will become negative
            buffer[scaledY] = noise + heightOffset;
        }
    }

}
The YourConfig class is a class that we're going to use to store the settings for this world generator. For now, it just holds the world seed:
package your.package.here;

import org.bukkit.plugin.Plugin;

import nl.rutgerkok.worldgeneratorapi.property.Property;
import nl.rutgerkok.worldgeneratorapi.property.PropertyRegistry;

public class YourConfig {

    public final Property<Long> seed;

    public YourConfig(Plugin plugin, PropertyRegistry registry) {
        // Store the property for the world seed. This is one of the built-in properties
        seed = registry.getProperty(PropertyRegistry.WORLD_SEED, 0L);
    }

    public void readConfig(WorldRef world, FileConfiguration fileConfiguration) {
        // No settings to read from a configuration file yet
    }

    public void writeConfig(WorldRef world, FileConfiguration fileConfiguration) {
        // No settings to write to a configuration file yet
    }

}
We wire it all up together in the main plugin class:
package your.package.here;

import java.io.File;
import java.io.IOException;
import java.util.logging.Level;

import org.bukkit.configuration.file.FileConfiguration;
import org.bukkit.configuration.file.YamlConfiguration;
import org.bukkit.generator.ChunkGenerator;
import org.bukkit.plugin.java.JavaPlugin;

import nl.rutgerkok.worldgeneratorapi.WorldGeneratorApi;
import nl.rutgerkok.worldgeneratorapi.WorldRef;

public class YourMainPluginClass extends JavaPlugin {

    @Override
    public ChunkGenerator getDefaultWorldGenerator(String worldName, String id) {
        WorldGeneratorApi api = WorldGeneratorApi.getInstance(this, 0, 5);
        WorldRef world = WorldRef.ofName(worldName);
        YourConfig yourConfig = new YourConfig(this, api.getPropertyRegistry());

        return api.createCustomGenerator(world, generator -> {
            // Read the config file
            File configFile = new File(getDataFolder(), world.getName() + ".yml");
            FileConfiguration configYaml = YamlConfiguration.loadConfiguration(configFile);
            yourConfig.readConfig(world, configYaml);

            // Set the noise generator
            generator.setBaseNoiseGenerator(new YourNoiseGenerator(yourConfig, world));

            // Write the config file
            yourConfig.writeConfig(world, configYaml);
            try {
                configYaml.save(configFile);
            } catch (IOException e) {
                getLogger().log(Level.SEVERE, "Failed to save config of world " + world.getName(), e);
            }

            // Log a message
            this.getLogger().info("Enabled your custom world generator for world \"" + worldName + "\"");
        });
    }

}
If you combine this with a plugin.yml file and activate your world generator for a world (see Your first world generator if you forgot how to do this), then you will end up with terrain like this:

Clearly, the scale of the noise is wrong. By dividing the noise scale in the YourNoiseGenerator class by 10 on the x and z axis, we can make an improvement:
double noise = this.mainNoiseGenerator.noise(scaledX / 10, scaledY, scaledZ / 10);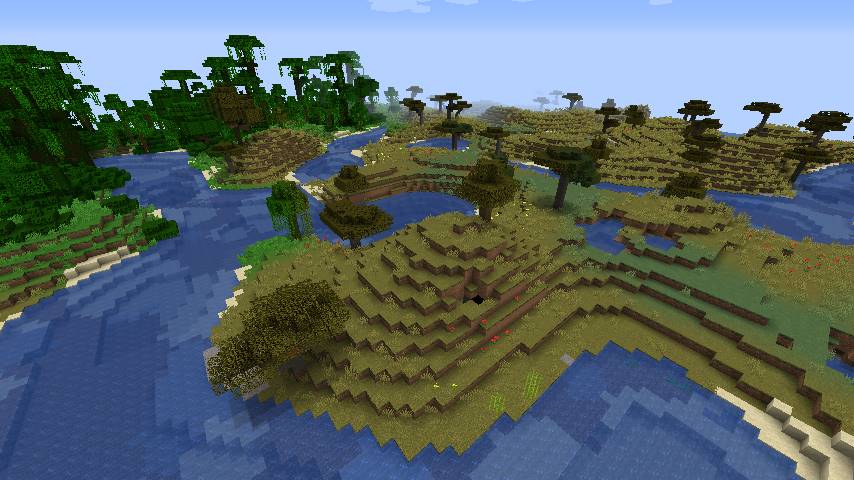
It's a good practise to make "magic numbers" like 10 configurable. We will expand the configuration class for this:
public class YourConfig {
    private static final String NOISE_SCALE_HORIZONTAL = "noise_scale_horizontal";

    public final Property<Long> seed;
    public final FloatProperty noiseScaleHorizontal;

    public YourConfig(Plugin plugin, PropertyRegistry registry) {
        // The constructor initializes the default settings
        seed = registry.getProperty(PropertyRegistry.WORLD_SEED, 0L);
        noiseScaleHorizontal = registry.getFloat(new NamespacedKey(plugin, NOISE_SCALE_HORIZONTAL), 10);
    }

    public void readConfig(WorldRef world, FileConfiguration fileConfiguration) {
        // This method reads all the settings for a world
        noiseScaleHorizontal.setWorldDefault(world,
                (float) fileConfiguration.getDouble(NOISE_SCALE_HORIZONTAL, noiseScaleHorizontal.get(world)));
    }

    public void writeConfig(WorldRef world, FileConfiguration fileConfiguration) {
        // This method writes all the settings for a world
        fileConfiguration.set(NOISE_SCALE_HORIZONTAL, noiseScaleHorizontal.get(world));
    }
}
And use that setting in our terrain noise generator:
public class YourNoiseGenerator implements BaseNoiseGenerator {

    private final SimplexNoiseGenerator mainNoiseGenerator;
    private final WorldRef world;
    private final YourConfig config;

    public YourNoiseGenerator(YourConfig config, WorldRef world) {
        this.config = Objects.requireNonNull(config, "config");
        this.world = Objects.requireNonNull(world, "world");
        this.mainNoiseGenerator = new SimplexNoiseGenerator(config.seed.get(world));
    }

    @Override
    public void getNoise(BiomeGenerator biomeGenerator, double[] buffer, int scaledX, int scaledZ) {
        float noiseScaleHorizontal = config.noiseScaleHorizontal.get(world);
        for (int y = 0; y < buffer.length; y++) {
            double noise = this.mainNoiseGenerator.noise(scaledX / noiseScaleHorizontal, y, scaledZ / noiseScaleHorizontal);
            int heightOffset = -y + 8;
            buffer[y] = noise + heightOffset;
        }
    }

}
By making the noise scale configurable, you can update the configuration file while the server is running and then use /worldgeneratorapi reload to immediately see the effect in new chunks. You can also use /worldgeneratorapi set world your_plugin_name:noise_scale_horizontal 20 to temporarily change the value for the world named world.
To further improve the terrain, it is recommended to use multiple Simplex noise generators. See the blog post of Notch above for an example. This allows you to have smoother areas, but also rougher, more hilly areas.