muimanual
The monochrome minimal graphical user interface (MUI) is a small addon for u8g2 library. The purpose is to create interactive user interfaces with u8g2.
Key features:
- Event Processing
- User interface drawing
- Many predefined user element
- User interface definition in PROGMEM for AVR systems
- Static menu definitions
- Small code size
- Optimized for monochrome displays
- MUI Reference: https://github.com/olikraus/u8g2/wiki/muiref
Steps to implement a graphical user interface::
- Draw the user interface on a display.
- Detect user input events (like a button press)
- Map the user input event to a user interface action (like moving the focus or changing a value)
- Execute the user interface action (and continue with 1.)
The user interface and your own display procedures need to coexist. Both parts may share the same display:
- Check if the user interface is active or inactive
- If user interface is active: Draw UI, handle events, execute actions (see above)
- If user interface is inactive: Draw custom code, check whether user wants to return to the menu system
Definitions for some terms, used in this documentation (see also the more detailed definitions here).
- Form: A form contains multiple fields and is described in FDS.
- Field: A field is placed at a certain position on the form in FDS. Each field must have a corresponding MUIF entry in the MUIF table.
- MUIF The MUI Function declares properties of a field. A field on the form referes to a MUIF. All MUIF must be part of a MUIF table.
- FDS The "Form Definition String" defines all the forms with their fields.
- MUI setup for U8g2
- Preconditions for the user interface: MUIF array and FDS
- How to draw the menu
- How to process events
- How to deactivate the user interface
This is a minimal example for MUI together with U8g2. The code will assume the dogs102 shield (http://shieldlist.org/controlconnection/dogs102).
Full Arduino code of for this example
#include <Arduino.h>
#include <U8g2lib.h>
#include <MUIU8g2.h>
U8G2_UC1701_EA_DOGS102_1_4W_HW_SPI u8g2(U8G2_R0, /* cs=*/ 10, /* dc=*/ 9, /* reset=*/ 8);
MUIU8G2 mui;
muif_t muif_list[] = {
MUIF_VARIABLE("BN", NULL, mui_u8g2_btn_exit_wm_fi)
};
fds_t fds_data[] =
MUI_FORM(1)
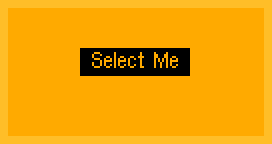
MUI_XYT("BN", 64, 30, " Select Me ")
;
void setup(void) {
u8g2.begin(/* menu_select_pin= */ 5, /* menu_next_pin= */ 4, /* menu_prev_pin= */ 2, /* menu_up_pin= */ U8X8_PIN_NONE, /* menu_down_pin= */ U8X8_PIN_NONE, /* menu_home_pin= */ 3);
mui.begin(u8g2, fds_data, muif_list, sizeof(muif_list)/sizeof(muif_t));
mui.gotoForm(/* form_id= */ 1, /* initial_cursor_position= */ 0);
}
uint8_t is_redraw = 1;
void loop(void) {
u8g2.setFont(u8g2_font_helvR08_tr);
if ( mui.isFormActive() )
{
/* menu is active: draw the menu */
if ( is_redraw ) {
u8g2.firstPage();
do {
mui.draw();
} while( u8g2.nextPage() );
is_redraw = 0;
}
/* handle events */
switch(u8g2.getMenuEvent()) {
case U8X8_MSG_GPIO_MENU_SELECT:
mui.sendSelect();
is_redraw = 1;
break;
}
} else {
/* menu not active: show something else */
u8g2.firstPage();
do {
u8g2.setCursor(0,20);
u8g2.print(millis());
} while( u8g2.nextPage() );
} /* mui.isFormActive() */
} /* loop */
The following sections will discuss the code step by step.
#include <Arduino.h>
#include <U8g2lib.h>
#include <MUIU8g2.h>

U8G2_UC1701_EA_DOGS102_1_4W_HW_SPI u8g2(U8G2_R0, /* cs=*/ 10, /* dc=*/ 9, /* reset=*/ 8);
MUIU8G2 mui;
After the usual includes create the u8g2 object and the new mui object.
The mui object will not receive any arguments. This is done later with the .begin function.
muif_t muif_list[] = {
  MUIF_VARIABLE("BN", NULL, mui_u8g2_btn_exit_wm_fi)
};
This is a list of all the MUIFs (field processing functions), which are required for the menu. In this case there is only one MUIF, because there will be only one element in the menu system.
Available MUIFs are listed in the MUIF reference. From left to right, the arguments for the MUIF are:
-
"BN": A unique identifier. This MUST be a string with exactly two chars. This identifier is later used in the field definitions. -
NULL: This is a pointer to a data value.NULLmeans, that there is no variable assigned to this field. -
mui_u8g2_btn_exit_wm_fi: This is the callback function for the field. It will render the button on the display and handle the select event for the corresponding field. The name usually reflects the behaviour ("exit" = leave menu system) and the visual representation ("fi" = "with frame, inverted text"). The MUIF reference will include all predefined callback functions.
Details for this MUIF can be found here.
fds_t fds_data[] =
MUI_FORM(1)
MUI_XYT("BN", 64, 30, " Select Me ")
;
The form definition string (fds) defines all forms along with their fields. In this
case there is only one form with the number 1. A form always starts with the
macro MUI_FORM.
The field is defined with the macro MUI_XYT, which requires the following
arguments:
-
"BN": The MUIF identifier for the MUIF callback which should render and handle this field. -
64: The X reference position -
30: The Y reference position -
" Select Me ": A UTF8 string, which is rendered as button text on the display.
FDS and MUIF are connected with each other:
Each identifier in FDS (like "BN") must also appear in the MUIF list. If the identifier is
used in FDS, but not found in the MUIF list, then the field will not appear on the form.
void setup(void) {
  u8g2.begin(/* menu_select_pin= */ 5, /* menu_next_pin= */ 4, /* menu_prev_pin= */ 2, /* menu_up_pin= */ U8X8_PIN_NONE, /* menu_down_pin= */ U8X8_PIN_NONE, /* menu_home_pin= */ 3);
  mui.begin(u8g2, fds_data, muif_list, sizeof(muif_list)/sizeof(muif_t));
  mui.gotoForm(/* form_id= */ 1, /* initial_cursor_position= */ 0);
}
In this case U8g2 is configured to check button events from the DOGS102 shield. However any other button library can also be used.
In the second line, the mui object is connected to u8g2 object, FDS list and MUIF list. The last
argument of the mui begin statement is the number of entries in the MUIF list.
This is calculated by the compiler with help of the sizeof operator.
The last statement (mui.gotoForm) will setup the menu system and
jump to form 1 as initial menu form. Obviously the form with the number 1 should exist in FDS (MUI_FORM(1))
otherwise mui.gotoForm will fail and the menu is not activated.
The focus cursor will be placed on the first interactive field (initial_cursor_position).
uint8_t is_redraw = 1;          // indicates whether the menu should be drawn
void loop(void) {
  u8g2.setFont(u8g2_font_helvR08_tr);
  if ( mui.isFormActive() )
  {
    /* menu is active: draw the menu */
    if ( is_redraw ) {                  // is any redraw of the menu required?
      u8g2.firstPage();
      do {
          mui.draw();
      } while( u8g2.nextPage() );
      is_redraw = 0;                    // menu is now up to date, no redraw required at the moment
    }
The is_redraw variable will be used to avoid unrequired redraws. Drawing the menu
will happen only if is_redraw is not 0 (which is the initally the case, because 1 is
assigned as default value)
The menu system is also active because of the previous mui.gotoForm statement:
mui.isFormActive() will return true.
mui.draw() is called to draw the complete current state of the user interface and finally
the is_redraw is cleared to ensure that the menu is not rendered again without change
in the user interface.
    /* handle events */
    switch(u8g2.getMenuEvent()) {
      case U8X8_MSG_GPIO_MENU_SELECT:
        mui.sendSelect();
        is_redraw = 1;                          // The select statement will change something: Enforce a redraw
        break;
    }
After drawing the user interface the code will check for any user button press events.
If the select button is pressed, then the select action (mui.sendSelect()) will be executed.
Usually a user interface has to check and act on multiple events, but for this minimal example only one event is sufficient.
Once the event has been detected, the is_redraw flag is set to enforce a redraw of the
user interface.
  } else {
    /* menu not active: show something else */
    u8g2.firstPage();
    do {
        u8g2.setCursor(0,20);
        u8g2.print(millis());
    } while( u8g2.nextPage() );
  } /* mui.isFormActive() */
The Select Me button will call the mui_u8g2_btn_exit_wm_fi
function. If mui_u8g2_btn_exit_wm_fi receives a select
action, then the user interface menu will be deactivated. isFormActive will return
false and the program will execute the above code.
This code will just display the current millis() forever (until next reset).
This completes the minimal MUI example. The following topics had been covered:
- How to define a MUIF (field function) list
- How to define a form with a single field
- How to connect MUI to U8g2
- How to display an initial form
- How to draw the form (user interface) and how to handle user input events
The following topics are not covered or may require more details:
- How to handle sufficient user input events for a usefull user interface
- How to build a more complex menu system
- How to connect and exchange data between the user interface and the rest of your code
- How to define a custom callback function for a MUIF entry
- More details on user interface events
- Using the style feature
- More MUIF examples
- How to re-enter the menu system
The code examples in the following sections are taken from the "MUICountDown" example.
Full Arduino code for this example
    /* handle events */
    switch(u8g2.getMenuEvent()) {
      case U8X8_MSG_GPIO_MENU_SELECT:
        mui.sendSelect();
        is_redraw = 1;
        break;
      case U8X8_MSG_GPIO_MENU_NEXT:
        mui.nextField();
        is_redraw = 1;
        break;
      case U8X8_MSG_GPIO_MENU_PREV:
        mui.prevField();
        is_redraw = 1;
        break;
    }
The user can jump from one interactive field to the next/previous interactive field with
the mui.nextField()/mui.prevField() function. An interactive field is activated by
sending the select action (mui.sendSelect()).
Additional buttons could be used to jump to a specific form
by using mui.gotoForm().
muif_t muif_list[]  MUI_PROGMEM = {
  /* normal text style */
  MUIF_U8G2_FONT_STYLE(0, u8g2_font_helvR08_tr),

  /* Leave the menu system */
  MUIF_VARIABLE("LV",&exit_code,mui_u8g2_btn_exit_wm_fi),

  /* input for a number between 0 to 9 */
  MUIF_U8G2_U8_MIN_MAX("IN", &number_input, 0, 9, mui_u8g2_u8_min_max_wm_mse_pi),

  /* MUI_LABEL is used to place fixed text on the screeen */
  MUIF_LABEL(mui_u8g2_draw_text)
};
The MUICountDown example contains several MUIF entries. MUIF entries are connected with a field macro inside FDS if both entries share the same identifier (two-char or number, see table).
| MUIF | FDS Macro | Identifier |
|---|---|---|
| MUIF_U8G2_FONT_STYLE | MUI_STYLE | single number, no double quotes |
| MUIF_VARIABLE | MUI_XYT | two chars in double quotes |
| MUIF_U8G2_U8_MIN_MAX | MUI_XY | two chars in double quotes |
| MUIF_LABEL | MUI_LABEL | no identifier required |
fds_t fds_data[] MUI_PROGMEM =
MUI_FORM(1)
MUI_STYLE(0) // select "u8g2_font_helvR08_tr" (see MUIF above)
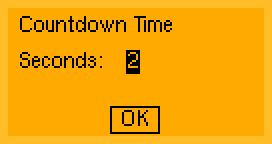
MUI_LABEL(5,12, "Countdown Time")
MUI_LABEL(5,30, "Seconds:")
MUI_XY("IN",60, 30)
MUI_XYT("LV",64, 59, " OK ")
;The form definition string defines all the forms. One form describes the position of each field on the display:
- A form always starts with the
MUI_FORM()command. Each form must have a unique number (here: 1). - Each form should be followed by
MUI_STYLE()command, which defines a suitable font for the following commands. - The
MUI_LABELwill place a read only text at the specified postion.
The function mui.isFormActive() checks whether there is an active form (menu). The arduino loop should look like this:
void loop(void) {
  if ( mui.isFormActive() ) {
    // draw the menu and handle user events
  } else {
    // display your own content, do something else
  }
The function mui.LeaveForm will close the current form.
The "LV" button (mui_u8g2_btn_exit_wm_fi MUIF) will call mui.LeaveForm to close the current form and the complete menu system.
As a result, mui.isFormActive() will return false.
However: The content on the display is not modified and probably still displays the last form. It is the responsibility of the user code to clear the display.
This could be done by checking whether the form is inactive after handling oll the user events:
void loop(void) {
  if ( mui.isFormActive() ) {
    // draw the menu and handle user events
    if ( mui.isFormActive() == false ) {
      // clear display
    }
  } else {
    // display your own content, do something else
  }
Jumping back to the menu system is simple: Just call mui.gotoForm(). mui.isFormActive() will return true after successful call to mui.gotoForm().
void loop(void) {
  if ( mui.isFormActive() ) {
    // draw the menu and handle user events
    if ( mui.isFormActive() == false ) {
      // clear display
    }
  } else {
    // display your own content, do something else
    if ( all_is_done )
      mui.gotoForm(/* form_id= */ 1, /* initial_cursor_position= */ 0);
}- How to display custom data on a form
- Form change events
- Custom MUI functions
The code examples in the following sections are taken from the "MUIStopwatch" example.
Full Arduino code for this example
Implementation of the Stopwatch:
- Two forms: Form 1 for the stopped state of the timer and form 2 for the running timer
- Transition from form 1 to 2: Start the timer
- Transition from form 2 to 1: Stop the timer
fds_t fds_data[] =
MUI_FORM(1)
MUI_AUX("SO")                      // this will stop the stop watch time once this form is entered
MUI_STYLE(0)
MUI_LABEL(5,12, "Stopwatch")
MUI_XY("CT", 5, 24)
MUI_XYAT("GO",20, 36, 2, " Start ")     // jump to the second form to start the timer

MUI_FORM(2)
MUI_AUX("ST")                      // this will start the stop watch time once this form is entered
MUI_STYLE(0)
MUI_LABEL(5,12, "Stopwatch")
MUI_XY("CT", 5, 24)
MUI_XYAT("GO",20, 36, 1, " Stop ")      // jump to the first form to stop the timer
;
There are three custom fields to implement the stopwatch:
-
MUI_XY("CT", 5, 24): A field which will draw the current stopwatch timer. -
MUI_AUX("SO"): Invisible field which will receive a form change event to stop the timer. -
MUI_AUX("ST"): Invisible field which will receive a form change event to start the timer.
The MUIF callback will receive several messages. A custom code can react on each message.
The most important messages are:
| Message | Description | Return Value |
|---|---|---|
MUIF_MSG_DRAW |
The field content should be drawn on the screen | 0 |
MUIF_MSG_FORM_START |
A new form is entered. | 0 |
MUIF_MSG_FORM_END |
A current form is closed. | 0 |
MUIF_MSG_CURSOR_SELECT |
Active fields only: "Select" button was pressed by the user. | 0 |
Here is the code, which does the timer start, stop and visualization:
long stop_watch_timer = 0;                      // stop watch timer 1/100 seconds
long stop_watch_millis = 0;                      // millis() value, when the stop watch was started
uint8_t is_stop_watch_running = 1;          // defines the current state of the stop watch: running or not running

/* draw the current stop watch value */
uint8_t mui_draw_current_timer(mui_t *ui, uint8_t msg) {
  if ( msg == MUIF_MSG_DRAW ) {
      u8g2.setCursor(mui_get_x(ui), mui_get_y(ui));
      u8g2.print(stop_watch_timer/1000);
      u8g2.print(".");
      u8g2.print((stop_watch_timer/10)%100);
  }
  return 0;
}

/* start the stop watch */
uint8_t mui_start_current_timer(mui_t *ui, uint8_t msg) {
  if ( msg == MUIF_MSG_FORM_START ) {
      is_stop_watch_running = 1;
      stop_watch_millis = millis();
      stop_watch_timer = 0;
  }
  return 0;
}

/* stop the stop watch timer */
uint8_t mui_stop_current_timer(mui_t *ui, uint8_t msg) {
  if ( msg == MUIF_MSG_FORM_START )
      is_stop_watch_running = 0;
  return 0;
}
The above custom callbacks are then registered in the MUIF table:
muif_t muif_list[] = {
  /* normal text style */
  MUIF_U8G2_FONT_STYLE(0, u8g2_font_helvR08_tr),

  /* custom MUIF callback to draw the timer value */
  MUIF_RO("CT", mui_draw_current_timer),

  /* custom MUIF callback to start the stop watch timer */
  MUIF_RO("ST", mui_start_current_timer),

  /* custom MUIF callback to end the stop watch timer */
  MUIF_RO("SO", mui_stop_current_timer),

  /* a button for the menu... */
  MUIF_BUTTON("GO", mui_u8g2_btn_goto_wm_fi),

  /* MUI_LABEL is used to place fixed text on the screeen */
  MUIF_LABEL(mui_u8g2_draw_text)
};
MUIF_RO (RO=read only) registers a simple function, which does not get any further data, but receives all the messages.
The above registered functions mui_start_current_timer and mui_stop_current_timer are placed as hidden fields on the form with MUI_AUX().
MUI_XY is used for mui_draw_current_timer to provide the x and y values for mui_draw_current_timer.
The main loop for this example is a little bit unusual: It will force a permanent screen update once the stopwatch timer runs.
void loop(void) {

  /* check whether the menu is active */
  if ( mui.isFormActive() ) {
    /* if so, then draw the menu */
    if ( is_redraw ) {
      u8g2.firstPage();
      do {
          mui.draw();
      } while( u8g2.nextPage() );
      is_redraw = 0;
    }

    /* handle events */
    switch(u8g2.getMenuEvent()) {
      ...
    }

    /* update the stop watch timer */
    if ( is_stop_watch_running != 0 ) {
      stop_watch_timer = millis() - stop_watch_millis;
      is_redraw = 1;            // always redraw the screen so that the timer gets updated
    }

  } else {
      /* the menu should never become inactive, but if so, then restart the menu system */
      mui.gotoForm(/* form_id= */ 1, /* initial_cursor_position= */ 0);
  }
}![]()