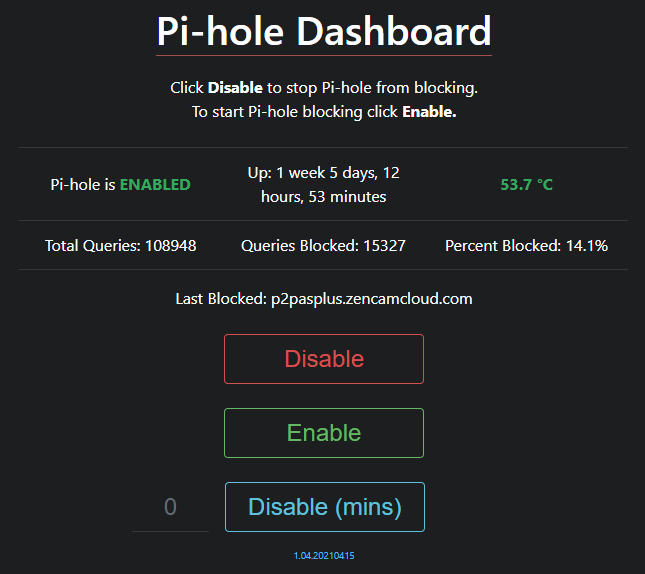
A simple web interface to quickly disable Pi-hole ad-blocking and show some basic stats. This was made with dark themes in mind.
- Raspberry Pi (this should work on other devices, but you'll need to adjust how the temperature and uptime stats are fetched for your device in the
includes.phpfile for your respecitve system) - A working Pi-hole installation. See https://pi-hole.net/
php7.3php-curlgit
You can either host this application on the same Raspberry Pi where Pi-hole is installed or set this up on a different machine. It is recommended to install alongside Pi-hole on the same Raspberry Pi. Below are the steps for both.
Note: Pi-hole already installs PHP and git, so it can be skipped.
- SSH into your Raspberry Pi enter the following to install
php-curl:sudo apt-get install php-curl. - Next type in
sudo usermod -aG video www-data. This is needed to fetch temperature data on a Raspberry Pi. - Next type in
cd /var/www/html/. - Copy the PiHoleDashboard code to your machine:
git clone https://github.com/obs0lete/PiholeDashboard.git piholedashboard. - Log into your Pi-hole (UI) and go to
Settings > API/Web Interface. - Click on the
Show API tokenbutton, thenYes, show API token. - Copy your
API token. - Edit the
includes.phpand as follows:$piHole = "";Set this to your Pi-hole URL. For example, http://pi.hole/admin$apiKey = ;Enter your API key here
- In your SSH console, edit the
/etc/lighttpd/lighttpd.confwith your editor of choice and enter the following: Note: Make sure to replacesome.serverwith the FQDN that you will use to access this application.
$HTTP["host"] == "some.server" {
    # Ensure the Pi-hole Block Page knows that this is not a blocked domain
    setenv.add-environment = ("fqdn" => "true")
    server.document-root = "/var/www/html/piholedashboard/"
}
Note: If you want to access this via HTTPS, you will need to use the following instead of the above code. You will need to adjust the values of ssl.pemfile and ssl.ca-file to point to your certificates accorrdingly.
# Pi-hole Dashboard
$HTTP["host"] == "some.server" {
  # Ensure the Pi-hole Block Page knows that this is not a blocked domain
  setenv.add-environment = ("fqdn" => "true")

  # Enable the SSL engine with a LE cert, only for this specific host
  $SERVER["socket"] == ":443" {
    ssl.engine = "enable"
    ssl.pemfile = "/certs/combined.pem"
    ssl.ca-file =  "/certs/fullchain.pem"
    ssl.honor-cipher-order = "enable"
    ssl.cipher-list = "EECDH+AESGCM:EDH+AESGCM:AES256+EECDH:AES256+EDH"
    ssl.use-sslv2 = "disable"
    ssl.use-sslv3 = "disable"
    server.document-root = "/var/www/html/piholedashboard/"
  }

  # Redirect HTTP to HTTPS
  $HTTP["scheme"] == "http" {
    $HTTP["host"] =~ ".*" {
      url.redirect = (".*" => "https://%0$0")
    }
  }
}
- Next, edit the
/etc/hostsfile and add the IP address and FQDN of your Pi-hole, for example:192.168.1.2 pi.hole - Go back to the Pi-hole UI and nvigate to
Settings > Local DNS > DNS Recordsand add entry to resolvesome.serverto the same IP address of your Pi-hole. - Next, restart lighttpd by entering
sudo systemctl restart lighttpd. - In a browser, go to http(s)://some.server and the Pi-Hole Daashboard should now be working.
- The web server setup is out of the scope of this guide. You will need to configure a working web server yourself.
- Depending on the hardware this is running on, you may need to configure the
$getTempvariable in theincludes.phpfile with the correct commands to fetch the temperature for your system. - Depending on the hardware this is running on, you may need to configure the
$upTimevariable in theincludes.phpfile with the correct commands to fetch the uptime for your system.
- Install
php7.3,php-curl,gitand a web server such asnginx.
sudo apt-get install php7.3
sudo apt-get install php-curl
sudo apt-get install git
sudo apt-get install nginx
- Copy the code to the location your web server's document root:
sudo git clone https://github.com/obs0lete/PiholeDashboard.git - Log into your Pi-hole (UI) and go to
Settings > API/Web Interface. - Click on the
Show API tokenbutton, thenYes, show API token. - Copy your
API token. - Edit the
includes.phpand as follows:$piHole = "";Set this to your Pi-hole URL. For example, http://pi.hole/admin$apiKey = ;Enter your API key here
- In a browser, access the site.
Open a web browser an navigate to the IP/address where PiholeDashboard is installed. (https://some.server)
To disable Pi-hole ad-blocking, click on Disable. This will disable ad-blocking infinitely.
To (re)enable ad-blocking, click on Enable.
You can also specify how long you want to disable ad-blocking for, in minutes. In the text box, enter the amount of minutes you want to disable as-blocking for, then click on the Disable (mins) button.