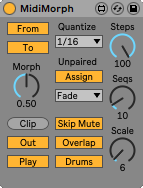
MidiMorph is a Max for Live device that allows smooth interpolation between two MIDI clips. The output can be played directly from the device, saved to a new clip, or continuously updated to a destination clip. Source and destination clips are monitored for changes.
Download under releases or at maxforlive.com
- Drag the device into a MIDI track
- Select the source clip
- Click the From button
- Select the destination clip
- Click the To button
- Adjust the Morph dial (0 is identical to source, 1 is destination, 0.5 is half-way)
Output:
- Play directly from the device (if the Play toggle is on)
- Click the Clip button to save the current state selected by the Morph dial to a new clip
- Create a new clip, select it, then click the Out button to select permanent output to the newly created clip (will be overwritten whenever a new Morph value is selected or parameters changed)
MidiMorph works by assigning pairs of notes from the source and destination clips, then interpolating between the two notes of each pair to generate the intermediate notes. The pairs are assigned so that the sum of note distances is minimal, where distance is defined as the euclidean distance in the pitch/time-plane (like in the piano roll). Finding the pairs in this way presents the classic assignment problem which is solved here using the Jonker-Volgenant algorithm implemented in https://github.com/Fil/lap-jv.
Notes that remain unpaired (because the number of notes differ between the source and destination clips) can be handled in one of two ways:
- They can be paired in additional assignment rounds, such that one note from the clip that has fewer notes then has multiple notes from the other clip assigned to it.
- They can remain unpaired and get faded or muted. Technically, they get paired with pseudo notes that are silent versions of themselves.
Selecting any of the values from the Quantize menu will quantize notes to the selected value. This applies to the endpoints as well, i.e. output at 0.0 and 1.0 is quantized, too.
Using the Assign toggle you can select what happens to notes that remain unpaired after the first assignment pass as outlined above. If it's on, the remaining notes are assigned in additional assignment rounds using the same algorithm until all notes have been paired.
If the Assign toggle is off, the remaining notes will not be assigned to notes from the other clip. Instead, they will get paired with pseudo-notes that are silent versions of themselves. This means they will stay in place and fade out or get muted (depending on the Mute/Fade selection described below).
The image below shows the transition between the same two clips as the demo at the top but with Assign enabled. The single note at the top right (F3) is now paired and converges to the note at the bottom right (A2).
Notes that remained unpaired after the first round of assignment will either fade out or get muted. You can choose either behavior from the Mute/Fade menu. In the fade case, the velocity will transition to zero and once it reaches zero, the note will be removed. When mute is selected, the note will stay at its original velocity up to half way, then get removed.
If the Skip Mute toggle is on, notes in either clip that are muted will be ignored. If it's off, muted notes will participate in the assignment and interpolation process. If they are paired with non-muted notes, intermediate notes will be unmuted at half-way.
If intermediate notes overlap and the Overlap toggle is on, the overlapping notes are merged into one note which is identical to the one that starts earliest.
If the Drums toggle is on, all notes that have the same pitch will be handled independently from those that have a different pitch, i.e. notes of one pitch will only be morphed into notes that have the same pitch.
The Steps dial selects the number of interpolation steps. The Sequences dial selects the number of "sequences" which can be thought of as sub-steps. Consider the case where you have 10 notes in both the source and destination clips and the number of steps is 100. If the number of sequences is 100 all notes will be moved 1/100 of the distance at each step. If the number of sequences is 10, only one note will be moved 1/10 of the distance at each step. The idea is to get more subtle changes at a single step in this way.
The images below show the same transition, both have steps set to 4, the first one has sequences set to 2, the second one has sequences set to 4.

The cost function used to assign note pairs calculates a distance in the pitch/time plane. The Scale dial selects the number of semitones that are equal in distance to one beat.
Whenever a parameter changes, all steps are precalculated. For immediate playback from the device, all values are saved to a coll and playback is triggered by a metro with resolution of one tick.