rustl8710 - Rust and FreeRTOS on PADI Realtek RTL8710, updated for Visual Studio Code, OpenOCD, gdb-multiarch
Original background and usage instructions at https://polyfractal.com/post/rustl8710/
Updated article on rustl8710:
https://medium.com/@ly.lee/running-rust-and-freertos-on-the-padi-iot-stamp-fb36c5ef4844
-
The rustl8710 code here has been updated to use OpenOCD instead of JLink as the JTAG tool for flashing and debugging, because JLink no longer works with the PADI SWD Debugger USB dongle. See https://forum.pine64.org/archive/index.php?thread-4579-2.html
-
Replaced
gdb-arm-none-eabi(obsolete) bygdb-multiarch -
Upgraded
freertos.rsfrom version 1.0 to 2.0 -
Build, flash and debug PADI from Visual Studio Code
Tested on:
-
Ubuntu 18.04 LTS x86 64-bit on Oracle VirtualBox 5.2.12 (hosted on Windows 10)
-
Ubuntu 18.04 LTS x86 64-bit on Intel Atom x5-Z8300 notebook PC
For Raspberry Pi, see https://github.com/lupyuen/rustl8710/blob/master/pi/README.md
You will need the following development hardware (US$ 14):
-
PADI IoT Stamp with Assembled PADI Breadboard Adapter
https://www.pine64.org/?product=assembled-padi-breadboard-adapter
-
PADI SWD Debugger: For flashing and debugging the PADI
-
PADI Serial Console: For interacting with the PADI serial console input / output
-
We assume that you are running Ubuntu 18.04 LTS x86 64-bit on a PC or on Oracle VirtualBox.
-
If you're using Oracle VirtualBox, you may download the preinstalled Ubuntu image from
https://drive.google.com/drive/folders/1Isf0lAj6otziOXYjjSrfwCW06rQEwzaG?usp=sharingIn VirtualBox, click
File → Import Applianceand select the downloaded filepadi.ova.
Start thepadivirtual machine and connect withsshtopadi.local, usernameuser, passwordpassword. -
Run the following commands on Ubuntu:
sudo apt update
sudo apt install build-essential gawk bc libc6-dev:i386 lib32ncurses5-dev
sudo apt install gcc-arm-none-eabi
sudo apt install gdb-multiarch
sudo apt install cutecom
sudo apt install openocd
-
gcc-arm-none-eabiis GNU C ARM32 cross-compiler that we shall use to generate code for the ARM 32-bit architecture (used by PADI) -
gdb-multiarchis the GNU cross-platform debugger that we shall use to debug the Rust and C code running on the PADI -
cutecomis a simple terminal emulator that connects to the PADI serial interface for console input/output -
openocdis the Open On-Chip Debugger that connects to the PADI SWD Debugger for flashing and debugging
-
Run the following command on Ubuntu:
git clone https://github.com/lupyuen/rustl8710
-
The following software modules are included:
-
Realtek Ameba RTL8710AF SDK (from the official PADI downloads): Provides the tools to build, flash and debug PADI programs written in C, excluding the SDK docs
https://github.com/lupyuen/rustl8710/tree/master/component
https://github.com/lupyuen/rustl8710/tree/master/src/c -
FreeRTOS (included in the Realtek Ameba RTL8710AF SDK)
https://github.com/lupyuen/rustl8710/tree/master/component/os/freertos -
Rust system and sample code
https://github.com/lupyuen/rustl8710/tree/master/src/rust -
freertos.rs: Rust wrapper for FreeRTOS
https://github.com/lupyuen/rustl8710/blob/master/src/rust/Cargo.toml
-
-
The
logfolder contains sample build, flash and debug logs, for your troubleshooting convenience
https://github.com/lupyuen/rustl8710/tree/master/log
-
On Ubuntu, install
rustupfrom https://rustup.rs/ (select default installation):curl https://sh.rustup.rs -sSf | sh -
Run the following commands on Ubuntu:
source $HOME/.cargo/env
cd rustl8710
rustup update
rustup override set nightly
rustup component add rust-src
cargo install xargo
-
This installs the Rust compiler and libraries, as well as Xargo the Rust cross-compiler. The nightly Rust library build is selected (instead of the stable or beta builds) because Xargo requires it.
-
Run the following command on Ubuntu:
make clean
make setup GDB_SERVER=openocd
-
This tells the Realtek Ameba RTL8710AF SDK to use OpenOCD (instead of JLink) to connect to the PADI SWD Debugger during flash and debug operations
-
This also erases any previous build of the PADI image, e.g. from the downloaded VirtualBox virtual machine
-
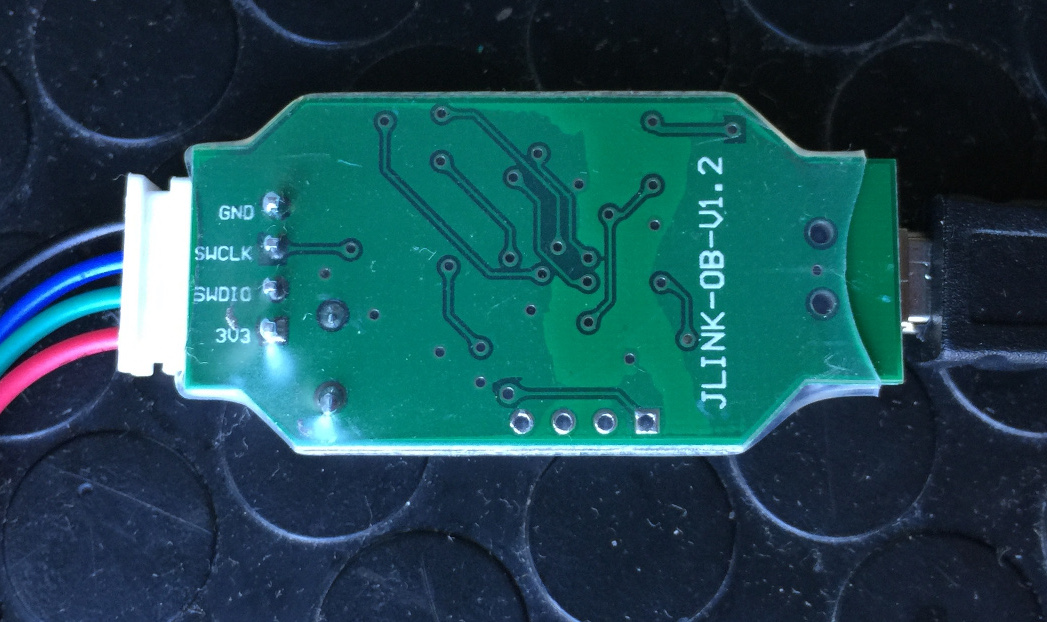
Connect the PADI to your computer via the PADI SWD Debugger USB adapter according to
http://files.pine64.org/doc/PADI/documentation/padi-jtag-swd-connections-diagram.pdfPADI IoT Stamp PADI SWD Debugger +3.3V [Red] 3V3 (SWD Pin 1) GE3 [Green] SWDIO (SWD Pin 7) GE4 [Blue] SWCLK (SWD Pin 9) GND [Black] GND (SWD Pin 4) 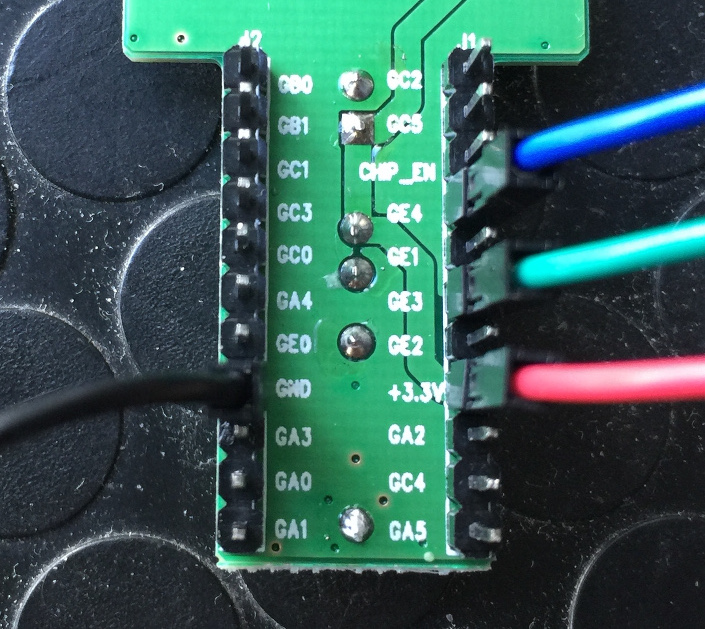
-
Although the document states that an external power supply is needed, from experience this is not necessary. The USB port of the computer should provide sufficient power to the
3V3and+3.3Vpins.
-
If you're using VirtualBox on Windows, you should configure VirtualBox to allow the Ubuntu Virtual Machine to access the USB port used by the PADI SWD Debugger. Here's how...
-
In the Virtual Machine window, click
Devices → USB → USB Settings. Add a USB Device Filter forSEGGER J-Link [0100]. This ensures that the SWD Debugger is always accessible to the Ubuntu Virtual Machine whenever the SWD Debugger is connected to the computer.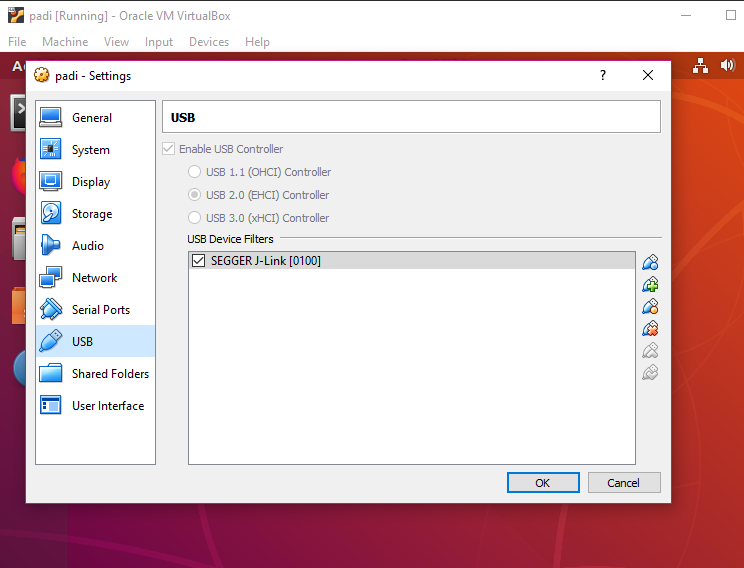
-
Alternatively, click
Devices → USB → SEGGER J-Link [0100]so that it shows a tick. This allows the Ubuntu Virtual Machine to access the SWD Debugger temporarily while the SWD Debugger is connected to the computer.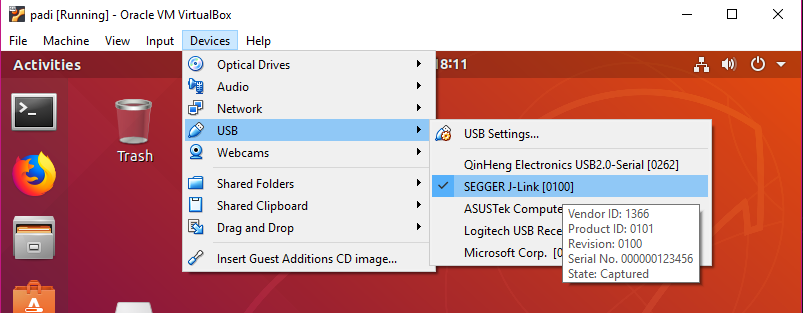
-
At the Ubuntu console, run:
make
-
Check for errors in the build. When the build is complete, you should see:
=========================================================== Image manipulating =========================================================== ... size = 286640 checksum 1bbbe7d ... make[1]: Leaving directory '/home/user/rustl8710' -
A sample build log may be found here:
https://raw.githubusercontent.com/lupyuen/rustl8710/master/log/make.log
-
Run this command in a new Ubuntu window before writing the flash image or debugging:
./start_openocd.sh
-
Keep it running while flashing or debugging. When OpenOCD has been started, you should see:
Open On-Chip Debugger 0.10.0 ... adapter speed: 4000 kHz adapter_nsrst_delay: 100 cortex_m reset_config sysresetreq rtl8710_reboot Info : No device selected, using first device. Info : J-Link ARM-OB STM32 compiled Aug 22 2012 19:52:04 Info : Hardware version: 7.00 Info : VTarget = 3.300 V Info : clock speed 4000 kHz Info : SWD DPIDR 0x2ba01477 Info : rtl8710.cpu: hardware has 6 breakpoints, 4 watchpoints -
A sample OpenOCD log may be found here:
https://github.com/lupyuen/rustl8710/blob/master/log/start_openocd.log -
If the SWD Debugger is not detected by Ubuntu, install "J-Link Software and Documentation pack for Linux, DEB installer, 64-bit" from
https://www.segger.com/downloads/jlink#J-LinkSoftwareAndDocumentationPackOr copy
99-jlink.rulesto/etc/udev/rules.d/
-
At the Ubuntu console, run:
make flash
-
Check for errors in the log. When the flashing is complete, you should see:
dump for check start addr of dumping$327 = 0x98000000 end addr of dumping$328 = 0x98050fb0 Breakpoint 3: file rtl_flash_download.c, line 556. Breakpoint 3, RtlFlashProgram () at rtl_flash_download.c:556 556 in rtl_flash_download.c make[1]: Leaving directory '/home/user/rustl8710' -
A sample flash log may be found here:
https://github.com/lupyuen/rustl8710/blob/master/log/flash.log
-
At the Ubuntu console, run:
make debug
-
Wait for the GDB prompt before entering debug commands:
target halted due to debug-request, current mode: Thread xPSR: 0x01000000 pc: 0x00000100 msp: 0x1ffffffc Breakpoint 1, main () at src/c/src/main.c:16 16 main_entry(); (gdb) -
The GDB Debugger has now paused the execution of the PADI at the
main()function inmain.c, the point just before our Rust code begins. Enter thestepcommand to continue to the first line of our Rust code:(gdb) step main_entry () at src/lib.rs:23 23 pub extern fn main_entry() { (gdb) -
To step through each line of the Rust code, keep entering the
stepcommand:(gdb) step 24 let mut s = Serial::new(); (gdb) step rustl8710::serial::Serial::new () at src/serial.rs:12 12 pipe: serial_t::default() (gdb) -
Common GDB commands:
-
step: Execute the current source line, step into functions if present. Same as thestep intocommand in Visual Studio Code. -
next: Execute the current source line, don't step into functions. Same as thestep overcommand in Visual Studio Code. -
where: Show stack trace. -
where full: Show stack trace with local variables. -
More commands: https://darkdust.net/files/GDB%20Cheat%20Sheet.pdf
-
-
A sample debug log may be found here:
https://github.com/lupyuen/rustl8710/blob/master/log/debug.log -
You may ignore the following messages in the
start_openocdconsole:Info : accepting 'gdb' connection on tcp/3333 undefined debug reason 7 - target needs reset Info : SWD DPIDR 0x2ba01477 Error: Failed to read memory at 0xfffff000 ... target halted due to debug-request, current mode: Thread xPSR: 0x01000000 pc: 0x00000100 msp: 0x1ffffffc Warn : Receiving data from device timed out, retrying. Info : dropped 'gdb' connection
-
Set the Voltage jumper of PADI Serial Console USB adapter to 3V3
-
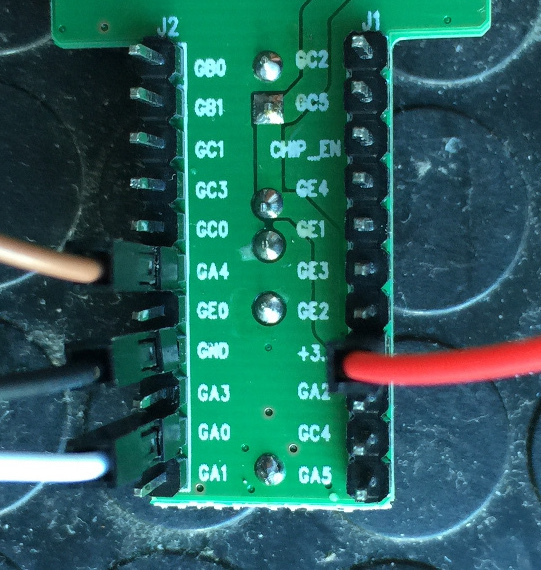
Connect the PADI to your computer via the PADI Serial Console USB adapter according to Page 2 of
http://files.pine64.org/doc/PADI/quick-start-guide/padi-iot-stamp-qsg.pdfPADI Serial Console PADI IoT Stamp GND [Black] GND 3V3 [Red] VDD RxD [Brown] GA4 (UART2_OUT) TxD [White] GA0 (UART2_IN) 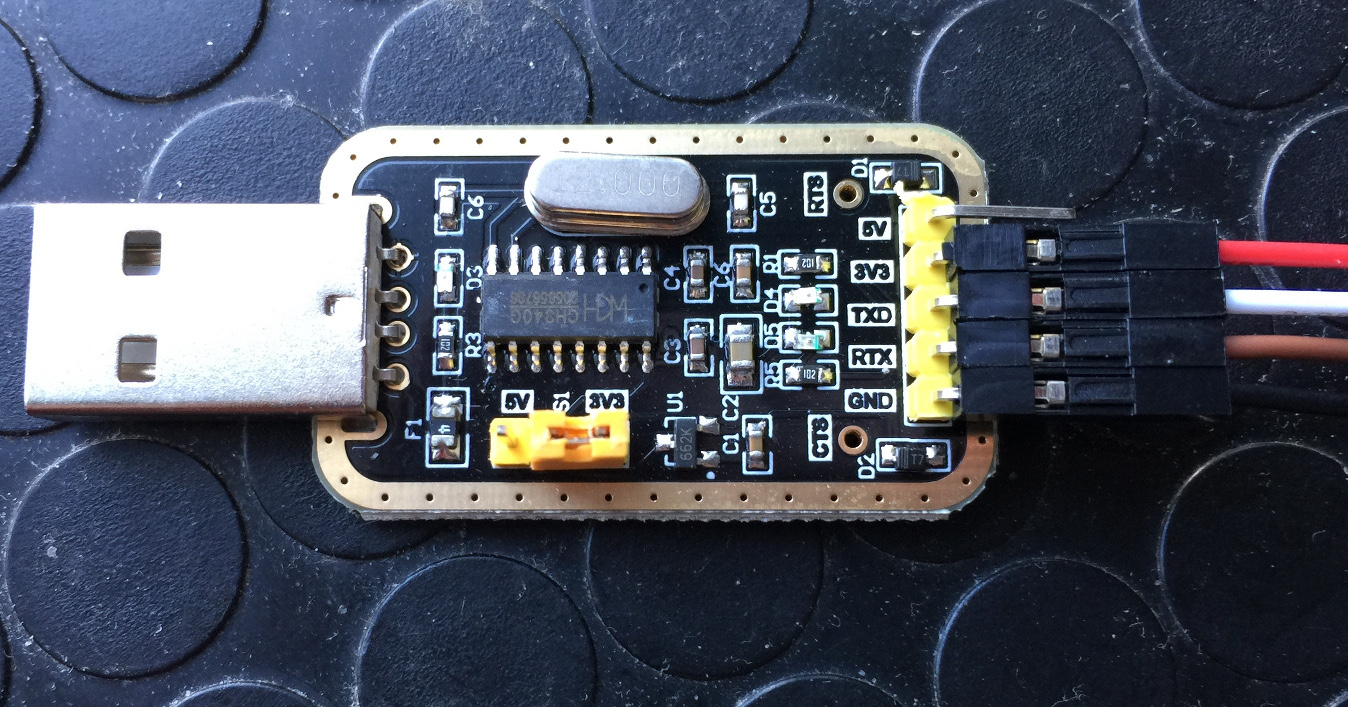
-
Connect PADI Serial Console to the USB port of your computer to power up the PADI IoT Stamp
-
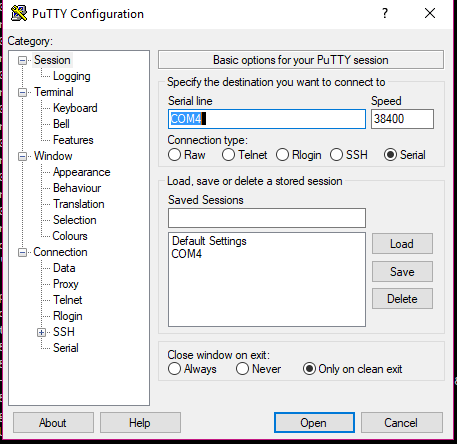
For Windows: Install and run
puttyfrom
https://www.chiark.greenend.org.uk/~sgtatham/putty/latest.html
Look for the COM port of the PADI in Device Manager, descibed in Page 4 of
http://files.pine64.org/doc/PADI/quick-start-guide/padi-iot-stamp-qsg.pdf
It should look likeCOM4,COM5, ... -
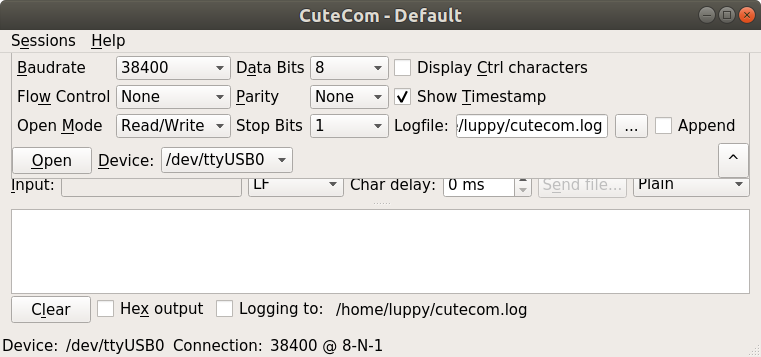
For Ubuntu: Run
sudo cutecom
-
In
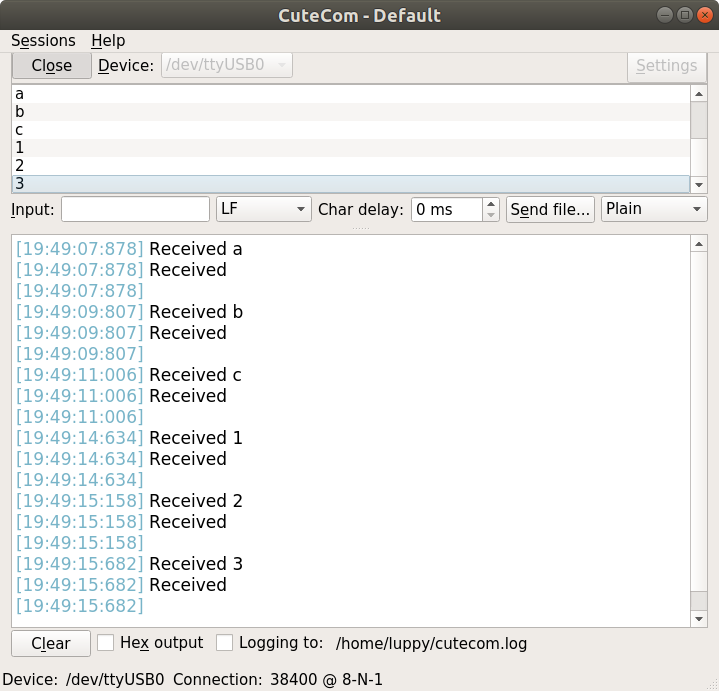
puttyorcutecom, connect to the Windows COM port or Ubuntu serial port (e.g./dev/ttyUSB0,/dev/ttyUSB1) with these settings:- Speed: 38400
- Data Bits: 8
- Parity: None
- Stop Bits: 1
-
You are now connected to the UART Serial Console for the PADI. Press a few keys like
a b c 1 2 3and you'll see that the PADI responds with:Received: a Received: b Received: c Received: 1 Received: 2 Received: 3
The sample source code is located here:
https://github.com/lupyuen/rustl8710/blob/master/src/rust/src/lib.rs
pub extern fn main_entry() {
    let mut s = Serial::new();
    s.tx_string("Hello from Rust!\n");
    loop {
        let data = s.rx_i32();
        s.tx_string("Received: ");
        s.tx_i32(data);
        s.tx_string("\n");
    }
}
The Rust program reads one character at a time from the UART Serial Console.
For every character received, the program prints the character preceded by Received:.
The message Hello from Rust! appears as soon as the PADI powers on. Since the serial console is not connected to putty or cutecom during power on, we can't see the first message.
Open the Visual Studio Code workspace:
-
On Ubuntu, install Video Studio Code from
https://code.visualstudio.com/download -
Launch Video Studio Code on Ubuntu with the command:
code
-
Click
File → Open Workspace -
Browse to the
rustl8710folder. Selectworkspace.code-workspace
Install the following Visual Studio Code extensions:
-
Better TOML (bungcip)
https://marketplace.visualstudio.com/items?itemName=bungcip.better-toml -
C/C++ (Microsoft)
https://marketplace.visualstudio.com/items?itemName=ms-vscode.cpptools -
GitLens - Git supercharged (Eric Amodio)
https://marketplace.visualstudio.com/items?itemName=eamodio.gitlens -
markdownlint (David Anson)
https://marketplace.visualstudio.com/items?itemName=davidanson.vscode-markdownlint -
Native Debug (WebFreak)
https://marketplace.visualstudio.com/items?itemName=webfreak.debug -
Rust (kalitaalexey)
https://marketplace.visualstudio.com/items?itemName=kalitaalexey.vscode-rust -
Rust (rls) (rust-lang)
https://marketplace.visualstudio.com/items?itemName=rust-lang.rust -
Tcl (sleutho)
https://marketplace.visualstudio.com/items?itemName=sleutho.tcl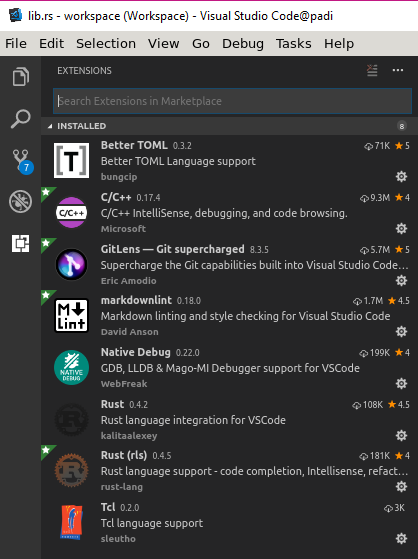
-
Click
Tasks→Run Build Task -
Check for errors in the
Build PADI Imageterminal window. When the build is complete, you should see:=========================================================== Image manipulating =========================================================== ... size = 286640 checksum 1bbbe7d ... make[1]: Leaving directory '/home/user/rustl8710' Terminal will be reused by tasks, press any key to close it. -
A sample build log may be found here:
https://raw.githubusercontent.com/lupyuen/rustl8710/master/log/make.log
-
Before flashing or debugging, start OpenOCD in the background:
Click
Tasks→Run Task→Start OpenOCD -
Keep it running while flashing or debugging in Visual Studio Code. Check for errors in the
Start OpenOCDterminal window. When OpenOCD has been started, you should see:Open On-Chip Debugger 0.10.0 ... adapter speed: 4000 kHz adapter_nsrst_delay: 100 cortex_m reset_config sysresetreq rtl8710_reboot Info : No device selected, using first device. Info : J-Link ARM-OB STM32 compiled Aug 22 2012 19:52:04 Info : Hardware version: 7.00 Info : VTarget = 3.300 V Info : clock speed 4000 kHz Info : SWD DPIDR 0x2ba01477 Info : rtl8710.cpu: hardware has 6 breakpoints, 4 watchpoints -
A sample OpenOCD log may be found here:
https://github.com/lupyuen/rustl8710/blob/master/log/start_openocd.log -
If the SWD Debugger is not detected by Ubuntu, install "J-Link Software and Documentation pack for Linux, DEB installer, 64-bit" from
https://www.segger.com/downloads/jlink#J-LinkSoftwareAndDocumentationPack
-
Check that OpenOCD has been started.
-
Click
Tasks→Run Task→Flash PADI -
Check for errors in the
Flash PADIterminal window. When the flashing is complete, you should see:dump for check start addr of dumping$327 = 0x98000000 end addr of dumping$328 = 0x98050fb0 Breakpoint 3: file rtl_flash_download.c, line 556. Breakpoint 3, RtlFlashProgram () at rtl_flash_download.c:556 556 in rtl_flash_download.c make[1]: Leaving directory '/home/user/rustl8710' Terminal will be reused by tasks, press any key to close it. -
A sample flash log may be found here:
https://github.com/lupyuen/rustl8710/blob/master/log/flash.log
-
Check that OpenOCD has been started.
-
Click
Debug→Start Debugging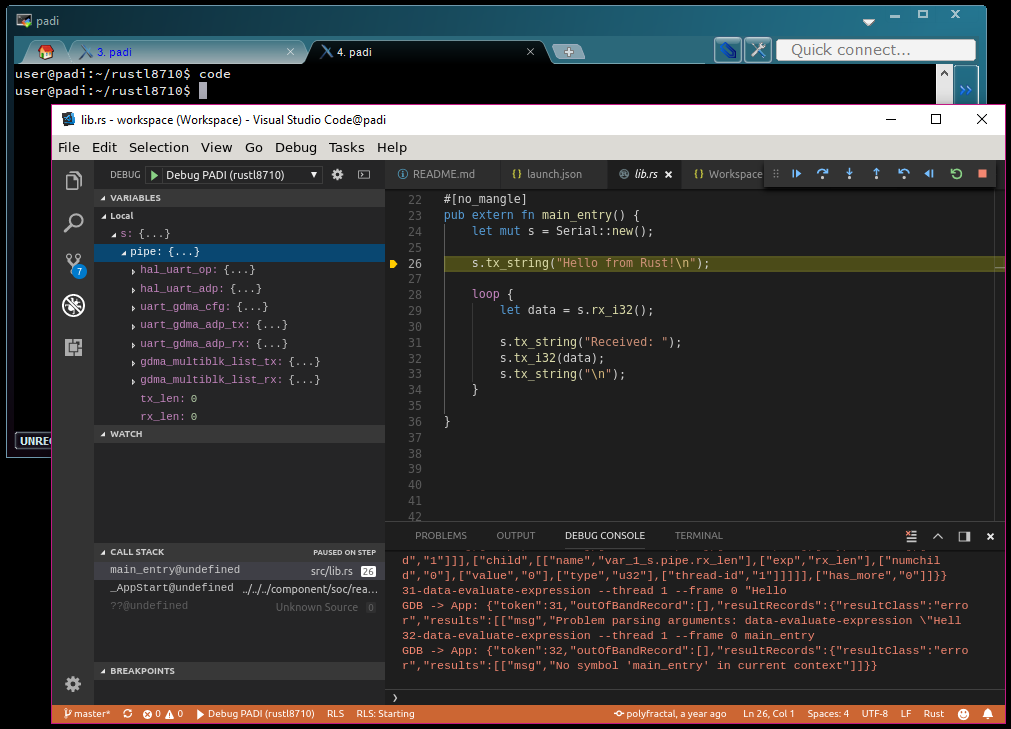
-
You may click the debugger toolbar at top right to debug your Rust program:

Continue Step
OverStep
IntoStep
OutStep
BackReverse Restart Stop -
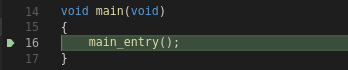
The debugger has now paused the execution of the PADI at the main() function in main.c, the point just before our Rust code begins:
-
Click the
Step Intobutton to continue to the first line of our Rust code: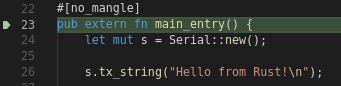
-
To step through each line of the Rust code, keep clicking the
Step Intobutton: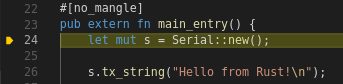
-
You may ignore the following messages in the
Start OpenOCDterminal window:Info : accepting 'gdb' connection on tcp/3333 undefined debug reason 7 - target needs reset Info : SWD DPIDR 0x2ba01477 Error: Failed to read memory at 0xfffff000 ... target halted due to debug-request, current mode: Thread xPSR: 0x01000000 pc: 0x00000100 msp: 0x1ffffffc Warn : Receiving data from device timed out, retrying. Info : dropped 'gdb' connection
Use the same instructions as "Run Flash Code From Console" above.
The following commands are useful for creating a full flash image backup (e.g. the factory-installed image) and for restoring the image.
openocd -f interface/jlink.cfg -f rtl8710.ocd \
        -c "init" \
        -c "reset halt" \
        -c "rtl8710_flash_read_id" \
        -c "rtl8710_flash_read dump.bin 0 1048576" \
-c "shutdown"openocd -f interface/jlink.cfg -f rtl8710.ocd \
-c "init" \
-c "reset halt" \
-c "rtl8710_flash_auto_erase 1" \
-c "rtl8710_flash_auto_verify 1" \
-c "rtl8710_flash_write dump.bin 0" \
-c "shutdown"-
A sample build log may be found here:
https://raw.githubusercontent.com/lupyuen/rustl8710/master/log/make.log -
The build begins with Xargo compiling the Rust programs and libraries for the PADI.
thumbv7m-none-eabitargets the ARM Cortex M3 platform used by PADI.... cd src/rust && xargo build --target thumbv7m-none-eabi -v ... cp src/rust/target/thumbv7m-none-eabi/debug/librustl8710.rlib application/Debug/rust_obj/librustl8710.o cp src/rust/target/thumbv7m-none-eabi/debug/deps/libfreertos_rs*.rlib application/Debug/rust_obj/libfreertos_rs.o cp ~/.xargo/lib/rustlib/thumbv7m-none-eabi/lib/libcore*.rlib application/Debug/rust_obj/libcore.o cp ~/.xargo/lib/rustlib/thumbv7m-none-eabi/lib/liballoc*.rlib application/Debug/rust_obj/liballoc.o cp ~/.xargo/lib/rustlib/thumbv7m-none-eabi/lib/libcompiler_builtins*.rlib application/Debug/rust_obj/libcompiler_builtins.o
-
TODO: Xargo is no longer needed for compiling
thumbv7m-none-eabiprograms:
https://users.rust-lang.org/t/psa-you-no-longer-need-xargo-to-do-arm-cortex-m-development/16703 -
The Realtek Ameba RTL8710AF SDK then builds the complete flash image by compiling all the necessary system and library files, including drivers and protocols for wifi and all other interfaces:
===========================================================
Build application
===========================================================
...
arm-none-eabi-gcc ... -c component/soc/realtek/8195a/cmsis/device/system_8195a.c -o component/soc/realtek/8195a/cmsis/device/system_8195a.o
arm-none-eabi-gcc ... -c component/common/api/at_cmd/atcmd_ethernet.c -o component/common/api/at_cmd/atcmd_ethernet.o
arm-none-eabi-gcc ... -c component/common/api/at_cmd/atcmd_lwip.c -o component/common/api/at_cmd/atcmd_lwip.o
arm-none-eabi-gcc ... -c component/common/api/at_cmd/atcmd_sys.c -o component/common/api/at_cmd/atcmd_sys.o
...
-
The Realtek Ameba RTL8710AF SDK links the compiled files into a single image
application.axfarm-none-eabi-gcc -mcpu=cortex-m3 -mthumb -g ... -o application/Debug/bin/application.axf application/Debug/obj/system_8195a.o application/Debug/obj/atcmd_ethernet.o application/Debug/obj/atcmd_lwip.o application/Debug/obj/atcmd_sys.o application/Debug/obj/atcmd_wifi.o ... application/Debug/rust_obj/librustl8710.o application/Debug/rust_obj/libfreertos_rs.o application/Debug/rust_obj/libcore.o application/Debug/rust_obj/liballoc.o application/Debug/rust_obj/libcompiler_builtins.o application/Debug/obj/ram_1.r.o ... -
The SDK generates the flash image
ram_all.binby manipulatingapplication.axf:=========================================================== Image manipulating =========================================================== arm-none-eabi-nm application/Debug/bin/application.axf | sort > application/Debug/bin/application.nmap arm-none-eabi-objcopy -j .image2.start.table -j .ram_image2.text -j .ram_image2.rodata -j .ram.data -Obinary application/Debug/bin/application.axf application/Debug/bin/ram_2.bin arm-none-eabi-objcopy -j .sdr_text -j .sdr_rodata -j .sdr_data -Obinary application/Debug/bin/application.axf application/Debug/bin/sdram.bin ... component/soc/realtek/8195a/misc/iar_utility/common/tools/pick 0x`grep __ram_image2_text_start__ application/Debug/bin/application.nmap | gawk '{print $1}'` 0x`grep __ram_image2_text_end__ application/Debug/bin/application.nmap | gawk '{print $1}'` application/Debug/bin/ram_2.bin application/Debug/bin/ram_2.p.bin body+reset_offset+sig b:268460032 s:268460032 e:268746656 size 286624 copy size 286624 component/soc/realtek/8195a/misc/iar_utility/common/tools/pick 0x`grep __ram_image2_text_start__ application/Debug/bin/application.nmap | gawk '{print $1}'` 0x`grep __ram_image2_text_end__ application/Debug/bin/application.nmap | gawk '{print $1}'` application/Debug/bin/ram_2.bin application/Debug/bin/ram_2.ns.bin body+reset_offset b:268460032 s:268460032 e:268746656 size 286624 copy size 286624 component/soc/realtek/8195a/misc/iar_utility/common/tools/pick 0x`grep __sdram_data_start__ application/Debug/bin/application.nmap | gawk '{print $1}'` 0x`grep __sdram_data_end__ application/Debug/bin/application.nmap | gawk '{print $1}'` application/Debug/bin/sdram.bin application/Debug/bin/ram_3.p.bin body+reset_offset b:805306368 s:805306368 e:805306368 size 0 copy size 0 component/soc/realtek/8195a/misc/iar_utility/common/tools/padding 44k 0xFF application/Debug/bin/ram_1.p.bin total 44 k, padding data ff, name application/Debug/bin/ram_1.p.bin Original size 15032 Padding size 45056 cat application/Debug/bin/ram_1.p.bin > application/Debug/bin/ram_all.bin cat application/Debug/bin/ram_2.p.bin >> application/Debug/bin/ram_all.bin if [ -s application/Debug/bin/sdram.bin ]; then cat application/Debug/bin/ram_3.p.bin >> application/Debug/bin/ram_all.bin; fi cat application/Debug/bin/ram_2.ns.bin > application/Debug/bin/ota.bin if [ -s application/Debug/bin/sdram.bin ]; then cat application/Debug/bin/ram_3.p.bin >> application/Debug/bin/ota.bin; fi component/soc/realtek/8195a/misc/iar_utility/common/tools/checksum application/Debug/bin/ota.bin || true size = 286640 checksum 1bbbe85
Official PADI docs and downloads, including Realtek Ameba RTL8710AF SDK and its docs:
https://www.pine64.org/?page_id=946
Original rustl8710 article:
https://polyfractal.com/post/rustl8710/
JLink no longer works with the PADI SWD Debugger USB dongle:
https://forum.pine64.org/archive/index.php?thread-4579-2.html
Alternative OpenOCD config (rtl8710.ocd):
https://bitbucket.org/rebane/rtl8710_openocd/src
Using OpenOCD with SWD Transport:
http://openocd.org/doc-release/html/Debug-Adapter-Configuration.html#SWD-Transport
Rust wrapper for FreeRTOS:
https://github.com/hashmismatch/freertos.rs
Xargo cross compiler for Rust:
https://github.com/japaric/xargo
Concurrency and safety in Rust:
https://blog.rust-lang.org/2015/04/10/Fearless-Concurrency.html