


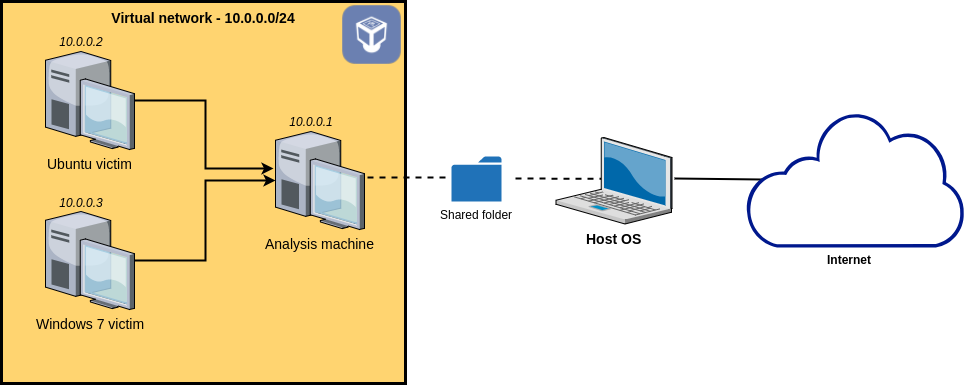
This repo follows this blog and creates a group of VMs in such an isolated virtual network:
Use INetSim (for HTTP/DNS) and Burp (for HTTPS) on Analysis Machine to simulate the malicious traffic hijack and transfer TeslaCrypt (which is a malware) to Windows Victim, which finally makes it infected.
During transferring TeslaCrypt, Loki can detect one of the TeslaCrypt samples, which means it works but is not so useful for scanning malware, even weaker than built-in Windows Defender.
Anyway, the structural VM group we built can leave for other malware analysis in the future.
- An Advanced Persistent Threat Simulation Example under Loki Detection
Download the image of Ubuntu 16.04-64-bit (Burp can only run on 64-bit machines) from osboxes. Extract the .vdl file by 7-zip. Create a new VM named "Analysis Machine" in Virtualbox using this image.
Power on and log in with user osboxes and default password: osboxes.org.
Change the password as whatever you like in a terminal:
$ passwd osboxes
Update packages:
$ sudo apt-get update
$ sudo apt-get upgrade
Install the guest additions. Devices -> Insert guest additions CD image. If you are in scaled mode, press Right Ctrl + C to exit and the menu bar appears. if asked password, type in the password you set right now. When finishing the process, power off this VM (Analysis Machine).
Clone Analysis Machine as Victim 1, Choose Generate new MAC address for all network adapters for MAC address policy. Use Full clone.
Download a Windows 10 VM (Choose VirtualBox as VM platform) from Microsoft official site and extract the .ova file.
Setup a Windows 10 VM in VirtualBox:
- Select File > Import Appliance, import the
.ovafile extracted above - Assign at least 1024 MB of RAM for it
- Choose
Generate new MAC address for all network adapters

- After import finishes, Rename it as "Victim 2" and power it on
- Log-in with username
IEUserand default passwordPassw0rd!, Check if anything abnormal. - Power off
Install the guest additions:
- For this VM, Settings -> Storage, add a new drive:

- Confirm all default settings, power on and log in
- Devices -> Insert guest additions CD image
- Open the file manager in VM, enter the CD drive (
VBoxGuestAddition.iso) and then double clickVBoxWindowsAdditions.exe. - Follow the guide and finish installing.
Now, the VM can be powered off.
By the way, for convenience, all VM's general setting can choose Bidirectional for shared clipboard and Drag'n'Drop.
Loki: https://github.com/Neo23x0/Loki
- Download the whole release
.zipfile of the last version from here. - Extract the file to a directory.
- Enter the folder
- Right-click
loki.exeand select "Run as Administrator"

Note: To download the last version from release and then extract is not a feasible approach on Ubuntu, .exe cannot be executed directly on Linux.
First, install the last version of yara (built with OpenSSL), which may require root user privilege sometimes, or you will get the same error as mines. Follow yara's documentation and adjust by your environment:
$ git clone https://github.com/VirusTotal/yara.git
$ cd yara
$ sudo apt-get install automake libtool make gcc pkg-config libssl-dev
$ sudo apt-get install flex bison
$ bash ./bootstrap.sh
$ ./configure --with-crypto
$ make
$ sudo make install
Run test cases to check if building is Okay:
$ make check
Check if yara is installed correctly:
$ yara version
4.0.1
If it prints:
yara: error while loading shared libraries: libyara.so.4: cannot open shared object file: No such file or directory
Do:
$ su
# sudo sh -c 'echo "/usr/local/lib" >> /etc/ld.so.conf'
# sudo ldconfig
Make sure that yara is installed properly and then we are going to install loki.
Download allloki source codes and enter the folder:
$ git clone https://github.com/Neo23x0/Loki.git
$ cd ./Loki
Since loki.py should be interpreted by Python 2.7, first, we need to install some dependencies:
$ pip install psutil netaddr colorama pylzma pycrypto yara-python rfc5424-logging-handler setuptools==19.2 pyinstaller==2.1
After installed, Run loki to complete a simple IOC scan:
$ python loki.py

All following works in this section are done on Ubuntu Analysis.
First, install git, pip and curl:
$ sudo apt install git
$ sudo apt install python-pip
$ sudo apt install curl
It can simulate a bunch of standard Internet services on a machine.
Follow this instruction
$ su
# echo "deb http://www.inetsim.org/debian/ binary/" > /etc/apt/sources.list.d/inetsim.list
# echo "deb-src http://www.inetsim.org/debian/ source/" >> /etc/apt/sources.list.d/inetsim.lis
# wget -O - https://www.inetsim.org/inetsim-archive-signing-key.asc | apt-key add -
# apt update
# apt install inetsim
Make up for the limitation of INetSim's SSL supports.
Download last release of Brup (suppose in ~/Downloads), then execute it by
$ bash ~/Downloads/burpsuite_community_linux_v2020_5.sh
As it mentioned in the original post:
As a reminder, we want to set up an isolated network containing our three VMs. This network will not be able to access the Internet. Also, we want the analysis machine to act as a network gateway to the victim machines in order to easily be able to intercept the network traffic and to simulate various services such as DNS or HTTP.
First, we open the Settings -> Network of those 3 VMs, change their Adapter 1 -> Attached to to Internal Network, fill Name field with apt-network.
To make Analysis Machine serve as a gateway, on it:
type ifconfig and get its Ethernet interface name as enp0s3. Open and edit its config by:
$ sudo gedit /etc/network/interfaces
Append those lines to the ending:
auto enp0s3
iface enp0s3 inet static
 address 10.0.0.1
 netmask 255.255.255.0
Save and exit gedit.
Update:
$ sudo ifup enp0s3
Now it has a static IP address as 10.0.0.1, we can verify it via:
$ ifconfig
Keep this VM alive for validation later.
Similarly, edit /etc/network/interfaces, with the following lines appended:
auto enp0s3
iface enp0s3 inet static
 address 10.0.0.2
 gateway 10.0.0.1
 netmask 255.255.255.0
 dns-nameservers 10.0.0.1
Which indicates that Victim 1 regards Analysis Machine as its gateway and DNS server.
Update the config:
$ sudo ifup enp0s3
$ sudo service networking restart
Keep this VM alive for validation later.
Similar to Victim 1, Open its network settings:

Change the network adapter properties as

Finally, ping each other by IP address using cmd or terminal on each VM. If all VMs are reachable but unable to connect with external addresses, the isolated network is set.
Note: If Victim 2 cannot be pinged by other VMs, try to turn off its Windows built-in firewall.
Now, both 2 victim VMs are in a clean (uninjected) state. We can power them off and create snapshots of current states for back-up:
Take snapshots for 2 victims and name snapshots as clean state:

On Analysis Machine: Create a directory analysis to store INetSim configurations for each analysis (in a separate subdirectory):
$ mkdir analysis
Start an example (test-analysis) for testing:
$ mkdir analysis/test-analysis
Use the default configuration:
$ cp /etc/inetsim/inetsim.conf analysis/test-analysis
$ sudo cp -r /var/lib/inetsim analysis/test-analysis/data
$ cd analysis/test-analysis
$ sudo chmod -R 777 data
Edit inetsim.conf, replace the lines
#service_bind_address 10.10.10.1 (any address possible)

#dns_default_ip    10.10.10.1 (any address possible)

#https_bind_port 443
with
service_bind_address  0.0.0.0

dns_default_ip    10.0.0.1

https_bind_port 8443
and save.
Now, INetSim will update configurations as:
- listen on local ports -> all reachable machine in virtual network
- resolve all domain names to
127.0.0.1->10.0.0.1 - Bind HTTP server to port
443->8433(for thatINetSim's SSL supports is too limited, leave SSL traffic forBurplater)
we need to disable
systemd-resolved, which is a local DNS server shipped by default with Ubuntu and will conflict withINetSim's DNS server.
$ sudo systemctl disable systemd-resolved.service
$ sudo service systemd-resolved stop
Now, let's start INetSim:
$ sudo inetsim --data ./data --conf inetsim.conf
INetSim 1.3.2 (2020-05-19) by Matthias Eckert & Thomas Hungenberg
Using log directory:      /var/log/inetsim/
Using data directory:     data/
Using report directory:   /var/log/inetsim/report/
Using configuration file: /home/osboxes/analysis/test-analysis/inetsim.conf
Parsing configuration file.
Configuration file parsed successfully.
=== INetSim main process started (PID 2717) ===
Session ID:     2717
Listening on:   0.0.0.0
Real Date/Time: 2020-06-11 04:23:03
Fake Date/Time: 2020-06-11 04:23:03 (Delta: 0 seconds)
 Forking services...
  * time_37_tcp - started (PID 2734)
  * ntp_123_udp - started (PID 2730)
  * irc_6667_tcp - started (PID 2729)
  * time_37_udp - started (PID 2735)
  * daytime_13_tcp - started (PID 2736)
  * ident_113_tcp - started (PID 2732)
  * echo_7_tcp - started (PID 2738)
  * discard_9_tcp - started (PID 2740)
  * quotd_17_tcp - started (PID 2742)
  * daytime_13_udp - started (PID 2737)
  * finger_79_tcp - started (PID 2731)
  * syslog_514_udp - started (PID 2733)
  * discard_9_udp - started (PID 2741)
  * dns_53_tcp_udp - started (PID 2719)
  * dummy_1_udp - started (PID 2747)
  * echo_7_udp - started (PID 2739)
  * quotd_17_udp - started (PID 2743)
  * chargen_19_udp - started (PID 2745)
  * chargen_19_tcp - started (PID 2744)
  * tftp_69_udp - started (PID 2728)
  * dummy_1_tcp - started (PID 2746)
  * ftps_990_tcp - started (PID 2727)
  * pop3_110_tcp - started (PID 2724)
  * pop3s_995_tcp - started (PID 2725)
  * smtp_25_tcp - started (PID 2722)
  * ftp_21_tcp - started (PID 2726)
  * smtps_465_tcp - started (PID 2723)
  * http_80_tcp - started (PID 2720)
  * https_8443_tcp - started (PID 2721)
 done.

Some issues you may meet when starting INetSim:
If you come across the error:
PIDfile '/var/run/inetsim.pid' exists - INetSim already running?
Just "kill" it and the restart INetSim:
sudo rm /var/run/inetsim.pid
If you are sure that there is really an INetSim in background (check by top), stop it
$ service inetsim stop
If some services fail to start, try to edit service_bind_address as 10.0.0.1 then restart. If the solution works, it means some processes block the ports associated with 0.0.0.0. See another answer by me. List all those process candidates with their pid in the last column:
sudo netstat -tulpn
Kill those suspicious processes:
sudo kill -9 <pid>
Power on Victim 1:
Open Firefox, Preferences -> Cookies and Site Data -> Clear data, check Cookies and Site Data and Cached Web Content to clear all history content data in it. Then open a website, for instance, google.com :

Apparently, it is hijacked by INetSim. This fake page, which is the default HTML sample file contained in INetSim, is hosted in Analysis Machine's data/http/fakefiles/sample.html..
Return to Analysis Machine.
Stop INetSim by Ctrl + C. It will print the location of report/log file. Open the file with sudo gedit or display it with sudo cat. We can find relevant network traffics with:

Burp will run as a transparent proxy in front of INetSim.
It is the role Burp plays in an SSL interception attack:
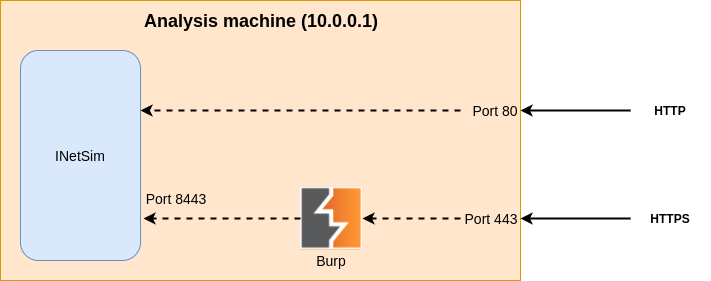
Start Burp with root privilege, otherwise, it cannot access port 443:
$
$ su
# sudo ./BurpSuiteCommunity
- Create a Temporarily project (no other available options)
- Check "Use Burp defaults"
- Start Burp
Enter Proxy -> Options panel, Edit the row in Proxy Listeners:
- Binding tab
- Bind to port: 443
- Bind to address: all interfaces
- Request handling tab:
- Redirect to host: localhost
- Redirect to port: 8443
- Check Support invisible proxying
Check Running, if it fails because port 443 is occupied, see Issue 1.
By default, Burp intercepts the incoming requests and waits for you to explicitly let them pass through. To avoid this, go to the Intercept tab and click the button Intercept is on to disable it. Since Burp Free doesn’t allow you to save a project, you can export the settings we just made in order to import them next time you start Burp. To do this, use
Burp> Project options > Save project options.
Save the options as test in /root.
Start INetSim
$ sudo inetsim --data data --conf inetsim.conf
Keep it running, meanwhile, test:
$ curl --insecure https://localhost
We will get:
<html>
  <head>
    <title>INetSim default HTML page</title>
  </head>
  <body>
    <p></p>
    <p align="center">This is the default HTML page for INetSim HTTP server fake mode.</p>
    <p align="center">This file is an HTML document.</p>
  </body>
</html>
It is what we see in previous subsection.
Power on Victim 2 (Win 10), try to open https://github.com/ (or any HTTPS link) on Edge browser, it alerts:

This is because Burp generates a SSL certificate signed by its own CA certificate, which our victim machine doesn’t trust for now.
Back to Analysis Machine. In Brup, enter Proxy -> Options -> Add , add a new proxy listener on port 8080 and all interfaces.
Now, from Victim 2, open http://10.0.0.1:8080/

Click on CA Certificate to download Burp’s CA certificate. Save and open the file, Install Certificate:
Choose the field
- Place all certificates in the following store: Trusted Root Certification Authorities
Then open https://github.com/ on Edge Browser or IE, the fake page is trusted with SSL:

On Victim 1, similarly, visit http://10.0.0.1:8080/ on browser and download Burp’s CA certificate (Suppose it is saved as ~/Downloads/cacert.der).
Convert the certificate to the appropriate format (.crt)
$ openssl x509 -in ~/Downloads/cacert.der -inform DER -out burp.crt
Copy it to /usr/local/share/ca-certificates
$ sudo cp burp.crt /usr/local/share/ca-certificates/
Run
$ sudo update-ca-certificates
1 added, 0 removed; done.
Running hooks in /etc/ca-certificates/update.d...
done.
Firefox by default doesn't use the system's certificate store. If you want the SSL connection to work properly in Firefox as well, go to the Firefox settings into Advanced > Certificates > Import. Choose
burp.crt, check Trust this CA to identify websites
In Firefox, Search for "Certificates" in the Preferences page, View Certificates ->Authorities Panel - > Import Button -> Select burp.crt -> check "Trust this CA to identify websites".
It works:

Now, power off and take new snapshots for both 2 victims, name the state as "clean state with burp CA".
To create such a folder on a Ubuntu Analysis, Choose it in VirtualBox:
Settings -> Shared Folder -> Create new folders
For example:

Select a folder in our local machine,Check "Make Permanent".
Now, on current VM, run:
$ mkdir ~/analysis-src
$ sudo mount -t vboxsf -o uid=$UID,gid=$(id -g) analysis-src ~/analysis-src
In my case, the link between C:\lab\apt-loki-simulate\src\analysis-src on local host machine and /home/osboxes/analysis-src on Ubuntu Analysis is set.
It's not a good idea to create shared folders on victim VMs, because we should keep them in sandboxes in case our local machine environment suffers from malware.
So we have to compromise to send files to them via Ubuntu Analysis and the virtual network.
Listen on a local TCP port by netcat:
$ nc -lvp 4444 > file.exe
Listening on [0.0.0.0] (family 0, port 4444)
Once it receives anything, it will export what it receives to file.ex.
For testing, we send a file from Ubuntu Analysis to file.exe:
$ echo "test" > test.exe
$ cat test.exe | nc 10.0.0.2 4444
We can check if we get the file on Victim 1:
$ cat file.exe
test
For windows, we can download files from INetSim server hosted by Ubuntu Analysis.
Edit inetsim.conf, Replace:
http_fakefile exe sample_gui.exe x-msdos-program
By
http_fakefile exe test.exe x-msdos-program
put test.exe in ./data/http/fakefiles, for example:
$ cp cp test.exe ~/analysis/test-analysis/data/http/fakefiles/
And then start INetSim.
Browser any link with suffix .exe (e.g.google.com/test.exe) on Victim 2 to download test.exe. Or run cmd:
> curl google.com/test.exe > test.exe
> type test.exe
test
Download tooZoo in zip format to the shared folder in host machine.
Note: Be careful to play with malware on your physical machine. Remove the package after transferred to VMs in case of misoperations.
On Analysis Machine, run:
$ sudo mount -t vboxsf -o uid=$UID,gid=$(id -g) analysis-src ~/analysis-src
Sync the files in ~/analysis-src if you can't see it immediately. Copy it to any other folder.
Extract all files:
$ unzip theZoo-master.zip
All files (including some malware instances in theZoo) are now in ./theZoo-master. Enter the path of loki, try to scan the directory to find if malware exists:
$ sudo python loki.py -p ~/Downloads/theZoo-master
Of course, nothing found.

Find the TeslaCrypt ransomware
$ cd ~/Downloads/theZoo-master/malwares/Binaries/Ransomware.TeslaCrypt
$ unzip Ransomware.TeslaCrypt.zip
password (injected) is in ~/Downloads/theZoo-master/malwares/Binaries/Ransomware.TeslaCrypt/Ransomware.TeslaCrypt.pass. It contains three different files that can be used as exe.
Now, restart loki to scan this subdirectory:
$ sudo python loki.py -p ~/Downloads/theZoo-master/malwares/Binaries/Ransomware.TeslaCrypt
It found out that one of them is suspicious by matching the hash value:

Copy one undetected extracted file to INetSim server's data folder:
$ cp 51B4EF5DC9D26B7A26E214CEE90598631E2EAA67 ~/analysis/test-analysis/data/htt
p/fakefiles/file.exe
Edit the corresponding line in its inetsim.conf as
http_fakefile exe file.exe x-msdos-program
Start INetSim.
Turn to Victim 2, turn off all defenses and firewalls on it.
Broswer any HTTP address with suffix .exe (e.g. http://google.com/something.exe), download it:

Use loki to scan the directory where the downloaded files store:
> ./loki.exe -p C:/Users/IEUser/Downloads
No alerts at all.

Execute it!
Somehow, it cannot infect any file in Win 10 like Win 7, maybe the lastest version has patched up the vulnerability. It will be suspended automatically after executing.

When we host the alerted file 3372c1edab46837f1e973164fa2d726c5c5e17bcb888828ccd7c4dfcc234a370 on INetSim server on Analysis Machine and Use Victim 2 to download it, loki can detect it:

Run the dangerous exe. It works. After a few seconds, files are infected and encrypted:

As expected, loki cannot run now.
Check INetSim logs on Analysis Machine, we found the malware do the following DNS lookups:
2020-06-15 01:33:09  DNS connection, type: A, class: IN, requested name: 7tno4hib47vlep5o.tor2web.org
2020-06-15 01:33:11  DNS connection, type: A, class: IN, requested name: 7tno4hib47vlep5o.tor2web.blutmagie.de
2020-06-15 01:33:12  DNS connection, type: A, class: IN, requested name: 7tno4hib47vlep5o.tor2web.fi
2020-06-15 01:33:12  Last simulated date in log file
We see similar requests are made to
tor2web.org,tor2web.blutmagie.deandtor2web.fi. Those services allow to access the Tor network without having to install Tor Browser or a similar tool.
It asks to pay to the bitcoin address 17ojq6Bo8PGSEtUF9xuELqfh5o4Ppj4sJy.
t seems like the malware generates a unique bitcoin address for each infected computer, since the address didn’t receive or send out any money.
Now, you can recover the Victim 2 by restoring its previous clean-state snapshot.
[1] https://www.usenix.org/legacy/event/lisa09/tech/slides/daly.pdf
[2] https://en.wikipedia.org/wiki/Advanced_persistent_threat
[3] https://blog.christophetd.fr/malware-analysis-lab-with-virtualbox-inetsim-and-burp/