![]()
PID Control project of Udacity Self-Driving Car Nanodegree (cf. repo).

- Unity3D: 3D game engine used for our simulation.
- make (>= 4.1 on Linux, Mac, >= 3.81 on Windows): the buildsystem of the project.
- Linux: make is installed by default on most Linux distros
- Mac: install Xcode command line tools to get make
- Windows: Click here for installation instructions
- cmake 3.5 (or newer): buildsystem generator.
- gcc/g++ 5.4 (or newer): to compile the C++ code.
- Linux: gcc / g++ is installed by default on most Linux distros
- Mac: same deal as make - install Xcode command line tools
- Windows: recommend using MinGW
- uWebSockets 0.13.0: to handle our web-server.
- Linux/Mac: click here for installation instructions
- Windows: use either Docker, VMware, or even Windows 10 Bash on Ubuntu to install uWebSocketIO
- json: to interact with JSON files (header-only).
- Any OS: place the file in the
include/folder
- Any OS: place the file in the
- Catch: for unittests (header-only)
- Any OS: place the file in the
lib/folder
- Any OS: place the file in the
- spdlog: for console logging (header-only)
- Any OS: extract the archive and place the
include/spdlogdirectory in theinclude/folder
- Any OS: extract the archive and place the
Note: If you are running a Unix system, the installation scripts in the folder scripts/ will install all the requirements apart from Unity3D. From the repository's main directory, run bash scripts/install-linux.sh for Linux or run bash scripts/install-mac.sh for MacOS to install those dependencies.
Your folder hierarchy should look like below:
.
├── CMakeLists.txt
├── include
│   ├── json.hpp
│   └── spdlog
├── lib
│   └── catch.hpp
├── LICENSE
├── README.md
├── scripts
│   ├── format-project.sh
│   ├── install-cppdeps.sh
│   ├── install-linux.sh
│   └── install-mac.sh
├── src
│   ├── helpers.cpp
│   ├── helpers.h
│   ├── main.cpp
│   ├── PID.cpp
│   └── PID.h
├── static
│   └── images
└── test
    ├── helpers_test.cpp
    └── main_test.cpp
Now you can build the project:
mkdir build && cd build
cmake .. && make && cd ..After installing Unity3D, you will need an environment build to run the simulation. Download the appropriate build for your OS and extract it:
If you encounter an issue with the above builds, please refer to the "Available Game Builds" section of this readme.
By compiling the project previously, you created 2 executables. One of them is here to run unittests using Catch2. In order to run the tests, use the following command:
build/testswhich should yield something similar to:
===============================================================================
All tests passed (4 assertions in 2 test cases)Run the recently built project using the following command:
build/pid
The compiled program is now listening to events on port 4567 using a web server. We just need to run our Unity3D environment to see the results.
- Run the
term2_simexecutable after extracting the environment archive (you might have to make it executable on Unix systems). - Select the Resolution and Graphics settings for your setup.
- Click on
Nextuntil you reachProject 4: PID Controller - Click on
SELECT
## Approach
This project involves an agent (vehicle on a highway) exposed to continuous state and action spaces. The environment is not interactive for the user, the only accepted input is the predicted steering angle of the vehicle.
This Unity environment offers a car driving experience on a single track.

The autonomous mode lets the developer plug a C++ program through a web server that handles the car controls.
Please refer to this repository for further details.
We follow the description of a PID control unit
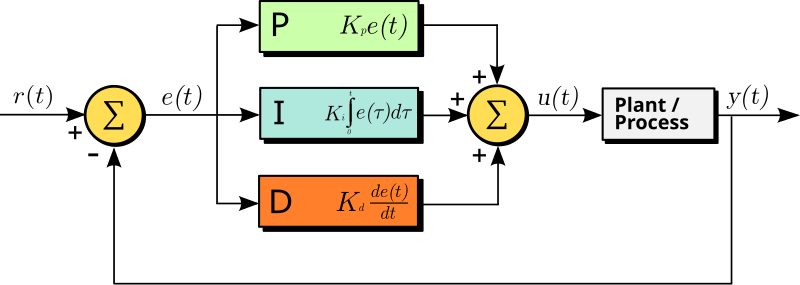
Here we consider mainly the cross-track error (CTE) for our controller. The PID controller works as follows:
- the
Kpcoefficient scales the steering proportional to CTE. If this is only a P-controller, we would get strong oscillations. - the
Kdcoefficient adds a component scaling with the variations of CTE, which smooths the proportional correction. If this is only a PD controller, our system would easily be disturbed by imperfect control. - the
Kicoefficient adds the last component that scales with the primitive of CTE (sum of CTE values for discrete signals), which normalizes our error in regards to control noise.
In the src folder, you will find:
main: reads measurement data from Unity3D and runs the PID controller.PID: handles the PID error computation.Monitor: handles performance evaluation.helpers: unit conversion and data reading.
After a few manual iterations, by tweaking the coefficients to reduce oscillations, the following values were selected:
Kp = 0.15Ki = 0.004Kd = 3.0
The previously mentioned implementation yields an acceptable driving behaviour in regards to lane keeping as shown below.
The implementation is evaluated using two metrics: the CTE to make sure the vehicle stays on target, and the mean angular acceleration that reflects the passenger comfort.
| avg CTE | avg angular acceleration |
|---|---|
| 0.5777326 | 0.11831327 |
The full-length lap recording in third-person view is available for download in the release attachments:
Currently, the implementation feels a bit shaky and could be improved further. Here are a few leads to investigate:
- Automatic hyperparameter tuning: run on a different track to tune gains in regards to average CTE.
- Further than PID: taking a step back to proportional correction, the CTE might not be the best error to look at. If we aim at getting a CTE of zero within 5m, then the interesting value would be
atan(cte / 5). While for small values, the first order Taylor expansion makes it equivalent to CTE near 0, it is not true for the entire range of values.
This implementation is vastly based on the following methods:
Distributed under the MIT License. See LICENSE for more information.