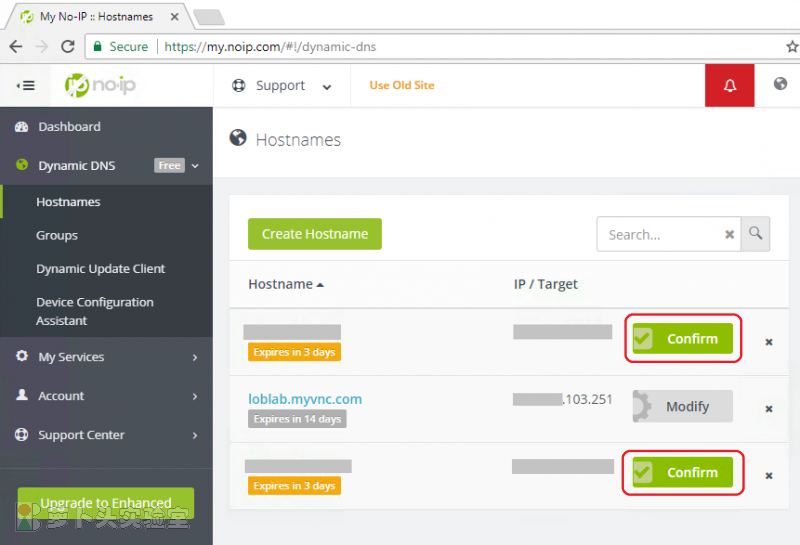
noip.com free hosts expire every month. This script auto clicks web pages to renew the hosts, using Python/Selenium with Chrome headless mode.
- Platform: Debian/Ubuntu/Raspbian/Arch Linux, no GUI needed (tested on Debian 9.x/10.x/Arch Linux); python 3.6+
- Ver: 1.3
- Ref: Technical explanation for the code (Chinese)
- Updated: 29 December 2021
- Created: 11/04/2017
- Author: loblab
- Fork Mantainer: eliabntt
- Contributor: IDemixI
- Clone this repository to the device you will be running it from. (
git clone https://github.com/eliabntt/noip-renew.git) - Run setup.sh and set your noip.com account information,
- Run noip-renew-USERNAME command.
For information on how to set up Notifications, please read the Notifications section.
As a suggestion, run setup.sh root to save everything as root. In the current version of the code the password is store "encrypted" in a file which would be readable by anyone that has access to the pc if you do not do so. Alternatively, create a specific user for this purpose.
Check confirmed records from multiple log files:
grep -h Confirmed *.log | grep -v ": 0" | sortFor docker users, run the following:
my_username='add username here'
my_password='add password here'
my_host_num='add number of hosts here'
debug_lvl=2
docker build -t loblab/selenium:debian .
echo -e "$(crontab -l)"$'\n'"12  3  *  *  1,3,5  docker run --network host loblab/selenium:debian ${my_username} ${my_password} ${my_host_num} ${debug_lvl}" | crontab -
To check script version, use command: noip-renew-username --version
The script is not designed to renew/update the dynamic DNS records, though the latest version does have this ability if requested. Check noip.com documentation for that purpose. Most wireless routers support noip.com. For more information, check here. You can also check DNS-O-Matic to update multiple noip.com DNS records.
Discord:
-
Sign up on the Discord website.
-
After creating an account, create a server.

- Once this is done, right click on server > server settings > webhooks

- Create a new webhook with a name of choice. Mine is "No-IP Host Monitor" and assign it to a channel.

- Copy the Webhook URL and enter this during setup.
Pushover:
-
Create an account over at https://pushover.net/signup.
-
After signing up and confirming your account, you should see a User Key. This is required during setup.

- Create a new application/API Token. I've named mine "No-IP Host Monitor".

- Once you've created your new App, you will see an API Token/Key. This is also required during setup.

-
Make sure you have the Pushover Application installed on your device of choice.
-
When running setup.sh, insert your pushover details when prompted.
Slack:
-
Create an account over at https://slack.com/get-started#/create and set up your Team.
-
Once you're all set up, you will need to create a new app

- The next step is to set up the correct permissions so that we can send a message with an image to Slack.

- The required scopes are chat:write & files:write. These can be added by clicking "Add an OAuth Scope"

- Once the scopes have been added, make sure you Reinstall App to reflect these changes.

- Make a note of your Bot User OAuth Access Token as this is used during setup.

- Now you must make sure that you add the bot to your channel of choice. This channel will be used during setup.

- Install the script, entering your Access Token and Channel when prompted.
Telegram:
-
Create a Telegram account by downloading the App to your device https://telegram.org/.
- Please note, for Telegram you need to use your mobile number.
-
After you have an account set up, I recommend setting the bot up using a browser on a device you can copy and paste from.
-
Navigate to https://telegram.me/BotFather and set up a new bot. I did this using
/startfollowed by/newbot.

-
Follow the steps through, naming your bot. Finding a free username was tricky.
-
You will now be given an access token. This will be needed for setup so make a note of this.

-
Click the link to your bot in order to open a chat window with it. Keep this window open for now.
-
Run setup.sh and select Telegram. When prompted to enter an access token, enter the token you received earlier.
-
You should now be given a 5 digit code which you must send via Telegram to your bot. Setup of Telegram is now complete.

- 1.3 (29/12/2021): eliabntt edits for noip and selenium changes
- 1.2 (06/11/2020): Added Notification support for Pushover, Slack & Telegram.
- 1.1 (06/05/2020): Fixed error when attempting to update an expired host.
- 1.0 (05/18/2020): Minor fixes to an xpath & a try catch pass to avoid an exception. Also fixed versioning.
- 1.0 (04/16/2020): Catches "Would you like to upgrade?" & stops script correctly. Manual intervention still required.
- 0.9 (04/13/2020): Complete refactor of code, more stability & automatic crontab scheduling.
- 0.8 (03/23/2020): Added menu to repair/install/remove script along with ability to update noip.com details.
- 0.7 (03/21/2020): Code tidyup and improved efficiency (Removed number of hosts and automatically get this)
- 0.6 (03/15/2020): Improved support for Raspberry Pi (Raspbian Buster) & Changes to setup script.
- 0.5 (01/05/2020): Support raspberry pi, try different "chromedriver" packages in setup script.
- 0.4 (01/14/2019): Add num_hosts argument, change for button renaming; support user agent.
- 0.3 (05/19/2018): Support Docker, ignore timeout, support proxy, tested on python3.
- 0.2 (11/12/2017): Deploy the script as normal user only. root user with 'no-sandbox' option is not safe for Chrome.
- 0.1 (11/05/2017): Support Debian with Chrome headless.
- Improve logging process to allow user to modify log level efficiently
- Further tidy the script and improve installation & uninstallation process. Make this more streamline.
- Change the way the script sets "noip-renew-user" to call it. Make it noip-renew --noipaccountname
- Set up command parameters (
--configure --help --version --uninstall --repair --upgrade --logs)