This is the repository for Codeaholics meetup on 2017 January, presented by William Wong.
| Device name | Description |
|---|---|
bridge |
Bridge for device discovery and health check |
powerStrip1 |
Power strip controller |
- Install Arduino IDE
- Install Sparkfun ESP8266 Thing Dev board by following these steps
- Create Azure Iot Hub, write down the connection string for
iothubowner - Log into IoT hub
iothub-explorer login HostName=<iot hub name>.azure-devices.net;SharedAccessKeyName=iothubowner;SharedAccessKey=<iot hub key>
- Create
bridgedeviceiothub-explorer create bridge
- Create
powerStrip1deviceiothub-explorer create powerStrip1
- Run Arduino IDE
- Open
arduino/StandardFirmataWiFi/StandardFirmataWiFi.ino - Modify
arduino/StandardFirmataWiFi/wifiConfig.h - Upload the sketch to your Sparkfun ESP8266 Thing Dev
AWS Lambda is required for using Alexa Smart Home Skill API.
- Follow Alexa instructions to setup Alexa app and AWS Lambda
- Compress the folder lambda and upload it to AWS Lambda
- Modify
bridge/lib/config.jsto provide connection strings - Modify
bridge/lib/powerStrip1.jsif you are using different pin for control and status, default is pin 15 and 4 respectively - Under
bridge/, runnpm start
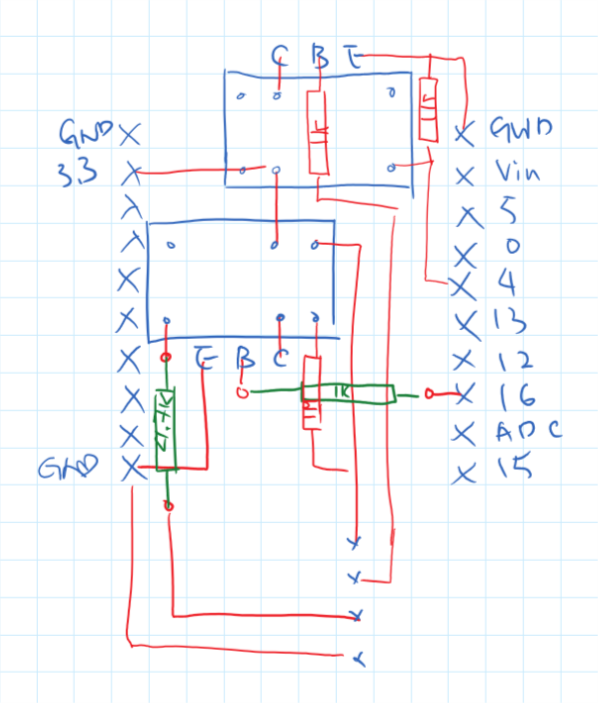
- The board is 3.3V logic
- Pins are very limited, some numbered pins has special feature
- Prefer leaving [boot up pins] alone, pin 0, 2, 15(http://www.forward.com.au/pfod/ESP8266/GPIOpins/index.html), otherwise, the ESP8266 may not boot up
- Pin 5 will flash on device boot
- Make sure all dependencies are in
lambda/package.json
- Set environment variable
DEBUGtodevice*for debugging
Currently iothub-explorer is buggy and does not work with device methods, we wrote some CLI scripts to invoke device methods for testing.