
PongDome is Busbud's revolutionary ping pong setup.
- Challenge your teammates from the company's chat.
- Count the points and current serving on a TV screen using push buttons.
- Track all the games played and display a leaderboard with the players' Elo.
| App | Dependencies | devDependencies |
|---|---|---|
| Shared |  |
 |
| API |  |
 |
| Chat |  |
 |
| Gamepad |  |
 |
| GPIO |  |
 |
| Web |  |
 |
- A Raspberry Pi. Current instructions are tested with the Raspberry Pi 3 Model B, with Raspbian Buster Lite.
- A screen.
- An arcade kit compatible with more or less generic USB gamepad protocol as supported by the gamepad module. We used this one (not affiliated).
- Likely 12 wires to extend the included wires to fit the table.
- A breadboard.
- A T-Cobbler.
- 4 push buttons (ideally 2 green and 2 red).
- 8 wires to connect the buttons, size should allow to connect the buttons (on the ping pong table) to the breadboard.
- 4 resistors, 2.2k ohm 5%.
- Usually the arcade kit comes with slightly short wires as it's not meant for a ping pong table, so you're gonna have to extend each of them using electrical wire. Since the kit I used came with more than twice more buttons that I needed, I leveraged the connectors of the buttons I won't use to neatly fit the electrical wire extension.
- Wire the gamepad buttons as per documentation of the kit you're using, and plug USB.
- Plug the Raspberry PI and the screen to a power outlet.
- Plug the T-Cobbler to the breadboard (make sure the ribbon cable is plugged in the right way, the ribbon should be to the outre side of the Raspberry PI).
- Wire the 3V to the
+column on the outer side of the breadboard, and the ground one to the-column. - Wire one connector of each button to this same
+column. - The other connector of each button should go in a unique line not covered by the T-Cobbler on the breadboard. Then on that line, wire a resistor to the GPIO of your choice for that button, and another resistor to the ground.
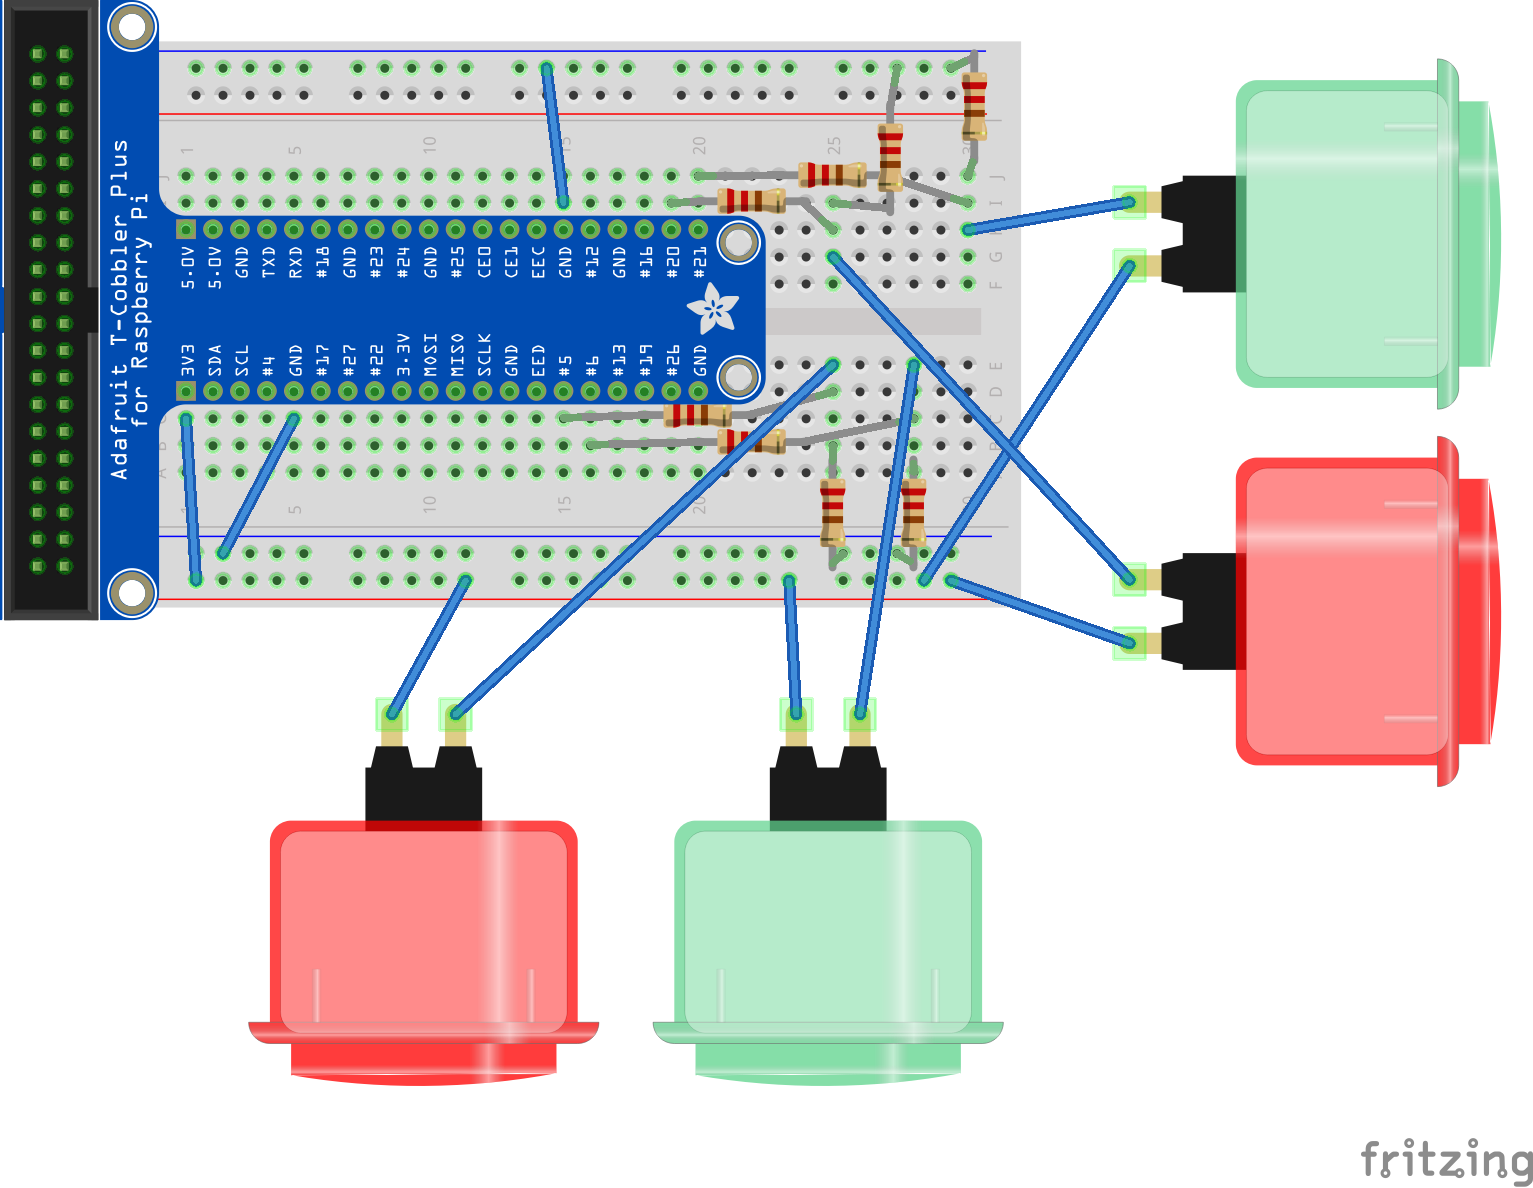
Diagram made using Fritzing with the AdaFruit Library.
This way of wiring button is from the onoff module documentation.
In that example, the buttons GPIO mapping is the following:
- Player one red: #5
- Player one green: #6
- Player two red: #20
- Player two green: #21
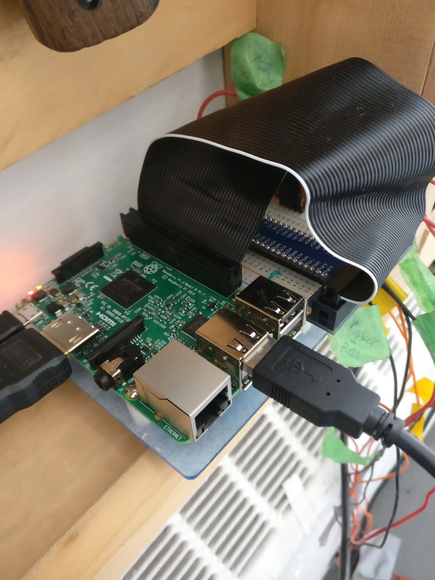
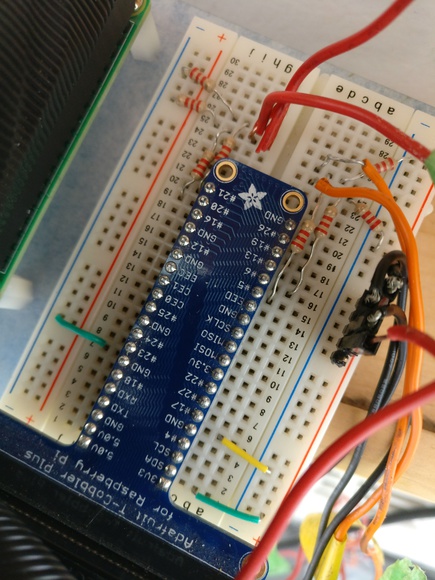
Here's what it looks like on our side (approximately respecting the diagram):
Use the following script to watch the status of all GPIOs in near real time:
watch -d -n 0.5 gpio readallThis will display a table of all GPIOs, their mode (input/output) and current value.
When the value of a GPIO change, it will be highlighted so it's easier to notice.
So you can just run this, and mess with the connections and buttons and see how it affects the value read from GPIOs.
First install Raspbian Buster Lite following the official instructions.
Since it's gonna be a headless Raspberry Pi, we can skip the manual setup with a screen and keyboard by automatically enabling SSH and configuring Wi-Fi.
According to this page, we need to put an empty ssh
file on the boot partition of the SD card to enable SSH automatically,
and a wpa_supplicant.conf with the Wi-Fi settings to automatically
connect to a Wi-Fi network.
Here's what wpa_supplicant.conf can look like:
# I used to not need those but had to add it, not sure if it was because
# of using a newer Raspbian version or changes in the WiFi router
# configuration we're using.
country=US
ctrl_interface=/var/run/wpa_supplicant

network={
	ssid="your-network"
	psk="your-password"
}
Then, put the SD card in the Raspberry Pi and boot it.
From your machine on the same Wi-Fi network, you can find all the
Raspberry Pi devices connected to the Wi-Fi network with the following
command (assuming you're on the 192.168.1.0/24 local network):
nmap -sP 192.168.1.0/24 | grep -B2 RaspberryThis will perform a host discovery on your network and filter only the hosts whose MAC address match the Raspberry Pi Foundation address pattern.
That should be enough information for you to know what IP has your
Raspberry PI. You can then SSH in with default user pi and password
raspberry.
sudo apt install tmux vim git wiringpi postgresql xserver-xorg xserver-xorg-legacy xinit chromium-browser unclutterwiringpiis not needed for PongDome to run but is useful for manipulating GPIOs from the shell using thegpiocommand.- Don't install
postgresqlif you want to use an external database. - We use
xserver-xorg-legacyto be able to runxinitas user instead ofroot.
If you want to start PongDome from a SSH session, run the following as root to allow SSH users to start a X11 session:
sed -i '/allowed_users/s/console/anybody/' /etc/X11/Xwrapper.configTo prevent black borders on the screen, run the following as root
(uncomments the disable_overscan=1 line in /boot/config.txt):
sed -i '/disable_overscan/s/#//' /boot/config.txtSource: http://www.opentechguides.com/how-to/article/raspberry-pi/28/raspi-display-setting.html
To make sure Chromium takes up the whole screen, set the screen size in its preferences (set your proper resolution):
echo '{"browser":{"window_placement":{"bottom": 1080,"left": 0,"maximized": true,"right": 1920,"top": 0}}}' > ~/.config/chromium/Default/PreferencesIn more recent versions of Chromium the above doesn't work anymore, you need to start Chromium once to let it create its configuration file, then merge the existing contents with the above configuration so it takes it into account. I did that directly in Vim, didn't bother writing a script to do it automatically.
Source: https://askubuntu.com/questions/124564/google-chrome-kiosk-screen-does-not-maximize
First, clone the repository:
git clone https://github.com/busbud/pongdome
cd pongdome
We'll install the required Node.js version using nvm:
git clone https://github.com/creationix/nvm ~/.nvm
echo 'source ~/.nvm/nvm.sh' >> ~/.bashrc # To persistently have nvm in your shell.
source ~/.nvm/nvm.sh # To load nvm now.
nvm install 10 # To install the Node.js version needed by PongDome.
Then install the npm dependencies, run build steps, copy default configuration:
./installUpdate api/config.json to set your DATABASE_URL. Also setup the
schema with:
createdb pongdome
psql pongdome < api/sql/schema.sql
Update chat/config.json to use and configure your stdbot
adapter. You'll need to npm install the stdbot adapter of your choice
before. For example:
npm install --no-save stdbot-slackIf using the gamepad module, update gamepad/config.json to associate
the button numbers.
If using the GPIO module, update gpio/config.json to associate GPIO
pins to buttons.
If you plug the player one green, player one red, player two green, player two red respectively as 0, 1, 2, 3, you have nothing to change.
For the diagram shown earlier, it would look like:
{
  "API_URL": "http://localhost:4242",
  "GPIO_P1_GREEN": "5",
  "GPIO_P1_RED": "6",
  "GPIO_P2_GREEN": "20",
  "GPIO_21_RED": "21"
}
You can then start everything in a kiosk Chromium instance with:
xinit ./start-appTo simulate a game, you can call the following functions in the development tools console.
The thread ID is the UID for a every game. It's gotta change for every game you simulate otherwise you'll start getting database errors when saving matches.
api.emit('match', {
  id: '1234',
  challenger: {
    id: '1234',
    name: 'Player One'
  },
  challengee: {
    id: '4567',
    name: 'Player Two'
  }
})api.emit('increment-player-one')
api.emit('increment-player-two')
api.emit('decrement-player-one')
api.emit('decrement-player-two')Ends a match and/or game depending on the score.
api.emit('end-game')You can do this with an @reboot entry in the crontab:
crontab -e@reboot /home/pi/pongdome/start-sessionThe start-session script starts an app tmux session and runs the app
inside, so you can attach to it when you connect.
First SSH in the Raspberry PI (default is user pi and password
raspberry).
Using tmux ls you can see what session the app is running in. It's
usually app. The session is by default started in the busbud-pingpong
directory where start-app exists.
Then attach the session, kill the currently running app, pull the latest version, and restart it:
tmux attach -t app
^C
git pull
./install
xinit ./start-app
^B DThis project was initially developed in two days, during the summer 2015 Busbud hackaton, by Dustin and Cole.
At this time, it was only working for our Flowdock, our managed database, our TV, and was nearly totally undocumented. While it was not portable, it was perfect for us!
PongDome was continuously improved at our lost hours with new contributors in the company, Simon, Chris, Tim and Val.
Val always believed that PongDome ought to be open source, and surrounded himself with Pec, Dorian, Daniel and Issam during the spring 2016 hackaton to achieve this.
The new version featured a brand new responsive design, a Hubot integration and challenge/accept system rewrite to allow usage with any chat system, adaptations to configure the database, a complete documentation and code cleaning (even there is still a lot of room for improvement on both points), and a presentation video by Legato Productions.
We then squashed everything in a new public repository, with a MIT license, and here begins the new free and open source life of PongDome!