This document is a step-by-step guide on configuring a Debian 11 PXE server. The guide will show all steps necessary to allow BIOS and UEFI PCs to use the network to boot the Ubuntu and Arch Linux live environments as well as the Debian installer.
These are the requirements:
- The TFTP and PXE server are the same
- The DHCP server can be a dedicated server or integrated into the PXE server
- The NFS server can be a dedicated server or integrated into the PXE server
- The HTTP server can be a dedicated server or integrated into the PXE server (optional)
- All of the above servers have static IP addresses
- An internet connection
This guide focuses on Dnsmasq for DHCP, TFTP, PXE, and DNS. You may choose to use to use another daemon, but you will have to configure DHCP options 1, 3, 6, 60, 66, 67, 93, and possibly more. If you are not able to modify them, then you will likely not be able to set up PXE. Furthermore, you will have to research the syntax for your DHCP server. Alternatively, you can simply use Dnsmasq as a DHCP proxy.
PXE booting will be enabled for both BIOS and UEFI devices. If you only have BIOS or if you only have UEFI, you can simplify your DHCP, PXE, and TFTP configuration.
Lastly, HTTP is entirely optional. Some Ubuntu-based distros will allow you to boot with TFTP and HTTP instead of TFTP and NFS. This is likely the case with Arch Linux as well. You may choose whichever configuration you want, but as far as I am aware, NFS works with all Ubuntu-based distros.
You will need to install these apt packages on their respective server:
- dnsmasq (PXE)
- pxelinux (PXE)
- syslinux (PXE)
- syslinux-efi (PXE)
- nfs-kernel-server (NFS)
- apache2 (HTTP)
Generally useful packages to have:
- htop
- neofetch
- tree
- ufw (or other firewall)
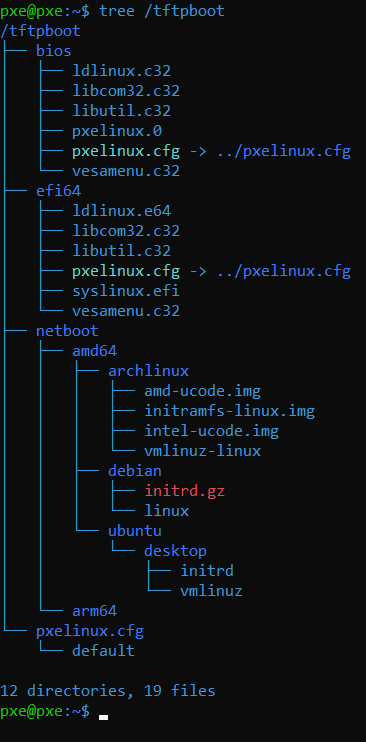
The TFTP root will be located in /tftpboot/. Create the following directories:
sudo mkdir -p /tftpboot/{bios,efi64,netboot,pxelinux.cfg}
sudo mkdir -p /tftpboot/netboot/amd64/{archlinux,debian,ubuntu}
sudo mkdir /tftpboot/netboot/amd64/ubuntu/desktop
sudo mkdir /tftpboot/netboot/arm64

The structure is almost entirely arbitrary. The only directory that is not is pxelinux.cfg. The directory must be named this, and it must be in the TFTP root.
Notice that there is a directory for arm64. PXE booting ARM devices requires an entirely separate configuration, and as such it is outside the scope of this document. However, the option is available to do so. Furthermore, you may choose to add an option for Ubuntu Server, Kubuntu, Xubuntu, etc. in the Ubuntu directory.
The required files will be placed in /nfs/nfsboot/. Create the following directories:
sudo mkdir -p /nfs/nfsboot/{archlinux,ubuntu}
sudo mkdir -p /nfs/nfsboot/ubuntu/desktop
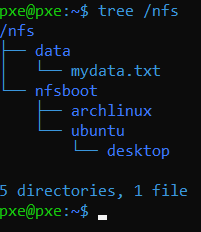
Note that there is no directory for Debian. This is intentional: Debian cannot boot via NFS.
The HTTP root is located in /var/www/html/ by default. Create the following directories:
sudo mkdir -p /var/www/html/httpboot/{archlinux,ubuntu}
sudo mkdir -p /var/www/html/httpboot/ubuntu/desktop
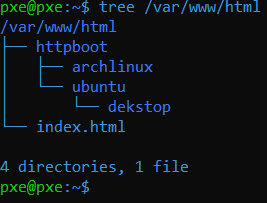
Note that there is no directory for Debian. This is intentional: Debian cannot boot with HTTP.
First, download the ISOs of the distros you want via wget or transfer them from your PC (Debian is not necessary). Then, do the following (separately):
sudo mount archlinux-latest.iso /mnt
sudo cp -r /mnt/. /nfs/nfsboot/archlinux
sudo umount /mnt
sudo mount ubuntu-desktop-latest.iso /mnt
sudo cp -r /mnt/. /nfs/nfsboot/ubuntu/desktop
sudo umount /mnt
IMPORTANT:
Copy /mnt/. and NOT /mnt/* to the destination. There are hidden files that need to be copied.
Edit line 12 of /etc/default/nfs-kernel-server so that it looks like this:
RPCMOUNTDOPTS="--port 40000"
The port is arbitrary, but you should use one that is unused.
Edit /etc/exports. Use the exports file in Github as a template. Export the shares with this command:
sudo exportfs -av
For Ubuntu, all you need to do is place the Ubuntu ISO in its respective directory in the web root. For Arch, you must copy the contents of the iso and put it in its respective directory like with NFS.
Backup the file /etc/dnsmasq.conf. Then modify it, using the dnsmasq.conf file in Github as a template.
If you already have a DNS or DHCP server, the file provides the syntax to disable DNS and put DHCP into proxy mode.
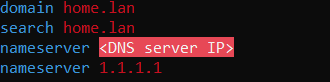
Otherwise, edit /etc/resolv.conf. It should look something like this:
BIOS:
sudo cp /usr/lib/syslinux/modules/bios/{ldlinux,vesamenu,libcom32,libutil}.c32 /tftpboot/bios
sudo cp /usr/lib/PXELINUX/pxelinux.0 /tftpboot/bios
UEFI:
sudo cp /usr/lib/syslinux/modules/efi64/ldlinux.e64 /tftpboot/efi64
sudo cp /usr/lib/syslinux/modules/efi64/{vesamenu,libcom32,libutil}.c32 /tftpboot/efi64
sudo cp /usr/lib/SYSLINUX.EFI/efi64/syslinux.efi /tftpboot/efi64
Create /tftpboot/pxelinux.cfg/default. Use the default file in Github as a template. Please take special care to follow to the smallest detail. Arch is especially picky about its parameters (notice the HTTP download link ends with an extra "/").
You will also have to link the /tftpboot/pxelinux.cfg directory:
sudo ln -rs /tftpboot/pxelinux.cfg /tftpboot/bios
sudo ln -rs /tftpboot/pxelinux.cfg /tftpboot/efi64
You will need two files for each distrobution: the kernel (look for something like "vmlinuz" or "linux") and the initial ramdisk (look for something like "initrd" or "initramfs"). If the PXE and NFS server are the same, you can copy them directly from /nfs/nfsboot/. Otherwise, download and mount the ISO for each.
Ubuntu:
sudo cp /nfs/nfsboot/ubuntu/desktop/casper/{vmlinuz,initrd} /tftpboot/netboot/amd64/ubuntu/desktop
Arch:
sudo cp /nfs/nfsboot/archlinux/arch/boot/{amd-ucode,intel-ucode}.img /tftpboot/netboot/amd64/archlinux
sudo cp /nfs/nfsboot/archlinux/arch/boot/x86_64/{vmlinuz-linux,initramfs-linux.img} /tftpboot/netboot/amd64/archlinux
Note that Arch has more than one ramdisk file (*.img). This is simply for your convinience when the live environment boots. Technically, you only need the last of the three, but you should include them all anyways.
Debian:
You will need to download the kernel (linux) and initial ramdisk (initrd.gz) from Debian.
The link to the kernel is here.
The link to the initial ramdisk is here.
Recall that there is no option to boot Debian along with NFS or HTTP. This is because Debian can only boot with TFTP. It will use the internet to download all the necessary packages.
In the end, the TFTP root should look like this:
If you have a firewall enabled, there are several ports you need to enable. These are the ports you need allowed on their respective servers:
REMEMBER TO ALLOW 22/TCP BEFORE ENABLING THE FIREWALL!!!
- 80 (HTTP)
- In on [interface] from any port 68 (DHCP)
- 69 (TFTP)
- 4011 (PXE)
- 53 (DNS)
- 111 (NFS)
- 2049 (NFS)
- 40000 (NFS, replace this if you chose a different port)
Lastly, there is one last step. When testing a UEFI VM in Proxmox, I received an access denied error:

If this is also the case for you, secure boot may be preventing the computer from booting. In my setup, this was solved by disabling the pre-enroll keys before VM creation:

At this point, everything should be ready. Reboot the server or restart dnsmasq, nfs-kernel-server, and apache2. Upon setting the boot priority on a PC to IPv4, you should see this screen:


Make sure the distros boot properly. Also feel free to add more distros to your PXE server. Furthermore, archinstall is extremely unstable when netbooting Arch (at the time of me writing this guide). In testing, it took 3 attempts before it installed successfully.
This guide is a combination of these:
- https://linuxconfig.org/how-to-configure-a-raspberry-pi-as-a-pxe-boot-server
- https://etesami.github.io/2021/01/03/install-ubuntu-20-04-uefi-pxe.html
- https://wiki.archlinux.org/title/Preboot_Execution_Environment
- https://www.youtube.com/watch?v=U3RC20ANomk
- https://www.youtube.com/watch?v=Sa_7AA9w06o
- https://github.com/webees/ubuntu-dnsmasq-pxe-autoinstall