
Converted to Kotlin from the Java version of the WatBot
BUILT USING Android Studio 3.0 Canary 3
WatBot is an IBM Watson powered ChatBot running on Android and using Conversation Service on IBM Bluemix (an open standards, cloud platform for building, running, and managing apps and services).

Check this blog post for step-by-step instructions and also to see it in action.
Android Studio is the Official IDE for Android. Android Studio provides the fastest tools for building apps on every type of Android device.Clone the repo and import the code in Android Studio,
git clone https://github.com/VidyasagarMSC/WatBot-Kotlin.git
Watson Conversation combines a number of cognitive techniques to help you build and train a bot - defining intents and entities and crafting dialog to simulate conversation.

- Log in to Bluemix and navigate to the Conversation service:
- In the Service name field, type a unique name for your new instance of the Conversation service. Check the “Pricing Plans” for data limits for the Conversation service
- Click Create. You’ll see details about your new instance in the “Service Details” page.
- If the Service Details page is not already open, click your Conversation service instance on the Bluemix console. (When you create a service instance, the Service Details page displays.)
- On the “Service Details” page, scroll down to Conversation tooling and click Launch tool.
- Click Create to create a new workspace.
- Specify the details for the new workspace:
- Name: A name no more than 64 characters in length. This value is required.
- Description: A description no more than 128 characters in length.
- Language: The language of the user input the workspace will be trained to understand. The service supports Brazilian Portuguese, English, French, Italian, and Spanish.
- Click Create. The new workspace is created and now appears as a tile on the Workspaces page.
Create some intents.
- In the Conversation tool, open your workspace and then click the Intents tab.
- Click Create new.
- In the Intent name field, type a descriptive name for the intent. The intent name can contain letters (in Unicode), numbers, underscores, hyphens, and dots. Intent names cannot contain spaces and must not exceed 128 characters. The following are examples of intent names:
#weather_conditions#pay_bill#escalate_to_agent
#character in the intent names when you create them in the Conversation tool. - In the User example field, type the text of a user example for the intent. An example can be any string up to 1024 characters in length. The following might be examples for the
#pay_billintent:I need to pay my bill.Pay my account balancemake a payment
Press Enter or click + to save the example.
- Repeat the same process to add more examples. Provide at least 5 examples for each intent. The more examples you provide, the more accurate your application can be.
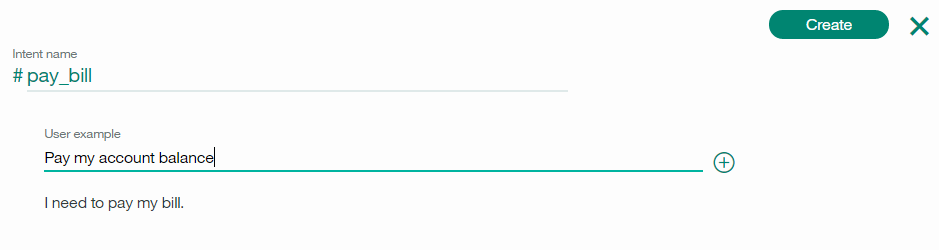
- When you have finished adding examples, click Create to finish creating the intent.
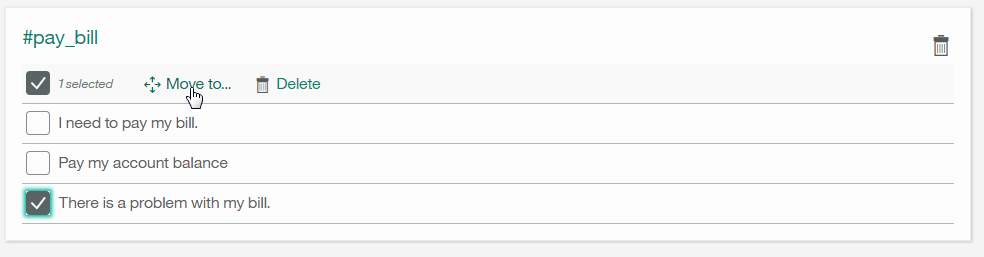
You can click any intent in the list to open it for editing. You can make the following changes:
- Rename the intent.
- Delete the intent.
- Add, edit, or delete examples.
- Move an example to a different intent.
- In the Conversation tool, click the
 icon.
icon. - In the Try it out panel, enter a question or other text string and press Enter to see which intent is recognized. If the wrong intent is recognized, you can improve your model by adding this text as an example to the correct intent.Tip: If you have recently made changes in your workspace, you might see a message indicating that the system is still retraining. If you see this message, wait until training completes before testing:
The response indicates which intent was recognized from your input.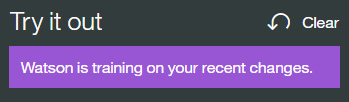
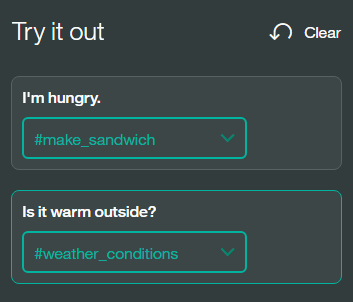
- If the system did not recognize the correct intent, you can correct it. To correct the recognized intent, click the displayed intent and then select the correct intent from the list. After your correction is submitted, the system automatically retrains itself to incorporate the new data.
If your intents are not being correctly recognized, consider making the following kinds of changes: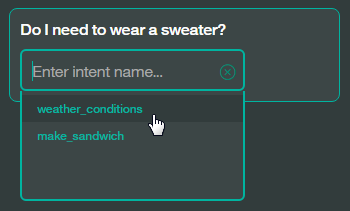
- Add the unrecognized text as an example to the correct intent.
- Move existing examples from one intent to another.
- Consider whether your intents are too similar, and redefine them as appropriate.
- In the Conversation tool, open your workspace and then click the Entities tab.
- Click Create new.
- In the Add the entity name field, type a descriptive name for the entity.The entity name can contain letters (in Unicode), numbers, underscores, and hyphens. For example:
@location@menu_item@product
- Don’t include the
@character in the entity names when you create them in the Conversation tool. - Entity names can’t contain spaces or be longer than 64 characters. And entity names can’t begin with the string
sys-, which is reserved for system entities.
- In the Value field, type the text of a possible value for the intent. An entity value can be any string up to 64 characters in length.Important: Don’t include sensitive or personal information in entity names or values. The names and values can be exposed in URLs in an app.
- In the Synonyms field, type any synonyms for the entity value. A synonym can be any string up to 64 characters in length. Press Enter to save each synonym.
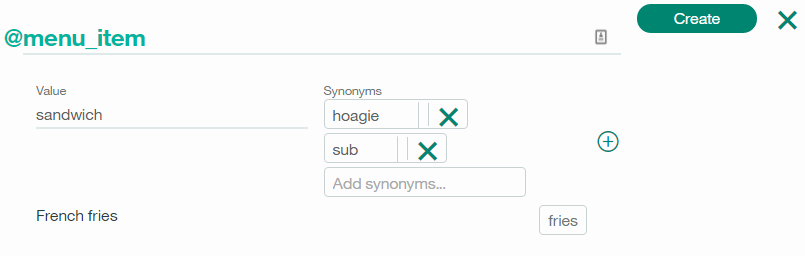
- Click + and repeat the process to add more entity values.
- When you are finished adding values and synonyms, click Create.
Post branching Intents and entities, this is how my Conversation Dialog on Bluemix looks like

To configure the App you need to get the Watson Conversation service Username, PassWord and WorkSpaceId
-
In the MainActivity class locate the method named sendMessage().
ConversationService service = new ConversationService(ConversationService.VERSION_DATE_2017_02_03); service.setUsernameAndPassword("Your Watson service UserName", "Your watson service PassWord"); MessageRequest newMessage = new MessageRequest.Builder().inputText(inputmessage).build(); MessageResponse response = service.message("Your Workspace Id", newMessage).execute(); -
Go to the Conversation service , and select the Service Credentials tab. Select password and username.

service.setUsernameAndPassword("Your Watson service UserName", "Your watson service PassWord");
- Next is to get the workspace Id.
Launch the conversation service workspace and from the options select the View details.


Get the Workspace ID: and add it in the below code,
MessageResponse response = service.message("Your Workspace Id", newMessage).execute();
Gradle Entry
compile 'com.ibm.watson.developer_cloud:conversation:3.8.0'
- Build and Run your app.
- Create a Watson Text to Speech(TTS) service on Bluemix
- Navigate to Service Credentials tab and click on "View Credentials".
On Line 68 of MainActivity.kt, replace the username and password placeholders with the TTS service credentials
service.setUsernameAndPassword("Your Text-to-Speech service username", "Your Text-to-Speech password");
- Build and Run your app.
Now when you TAP on any message, the text will be heard via a Voice (Voice.EN_LISA). You can change the voice formats in the code of MainActivity.kt
Note: The required gradle entries for TTS is already included in the build.gradle file
compile 'com.ibm.watson.developer_cloud:text-to-speech:3.8.0'
compile 'com.ibm.watson.developer_cloud:android-sdk:0.2.3'
- Create a Watson Speech-To-Text (STT) service on Bluemix
- Navigate to Service Credentials tab and click on "View Credentials".
- Add the credentials to config.xml
- Build and Run your app.
Note: The required gradle entries for STT is already included in the build.gradle file
compile 'com.ibm.watson.developer_cloud:speech-to-text:3.8.0'
compile 'com.ibm.watson.developer_cloud:android-sdk:0.2.3'
compile 'com.squareup.okhttp3:okhttp-ws:3.4.2'
If you have followed all the above instructions, you should be happily chatting with your Wat(son)Bot.
** Remember your bot will be talking to your Conversation Service (Intents, Entities and Dialog).**