AdditionalDetails
To use RoboClerk the following steps should be taken:
- Pull or create RoboClerk Docker Container
- Create RoboClerk directory structure and check it into source control with the project source code
- Configure RoboClerk
- Configure Plugins
- Edit item templates for your organization
- Edit the document templates
- Run RoboClerk (could be set up to run automatically with certain builds)
- Perform post-processing on the asciidoc files. Tip: development platforms like GitHub and GitLab can render asciidoc natively.
- Obtain AI Document Feedback
- Perform document reviews
Pull the RoboClerk docker container for the release you want to use:
docker pull ghcr.io/meindertn/roboclerk:latest
That is it, nothing else to do. If you want to build your own version of the container, the next section explains how.
RoboClerk is written in .NET6 and is fully cross platform. The easiest way to build the software is using Visual Studio (Community). Open the solution file and build the entire solution in build configuration "ReleasePublish" that will create a Publish directory inside the RoboClerkDocker directory into which the RoboClerk application and plugins will be published. The easiest, and best way to run RoboClerk is inside a docker container. A docker file is included in the repo. To create the docker container run the following docker command in the directory where the DockerFile is located:
docker build -t roboclerk .
This also pulls a couple of other software packages into the container that are very convenient to use together with RoboClerk to construct a complete documentation pipeline. These are:
- AsciiDoctor-(kroki) - processes asciidoc documents into a wide variety of output formats. Supports the Kroki! server that enables the use of a wide variety of diagram from text formats.
- PanDoc - specialist tool to convert one document format into another.
- Python3 - this should not need any introduction, Python is an excellent general purpose programming language.
- Python3 libraries - I have found a number of Python libraries very useful in my own documentation pipelines.
- Python-docx - manipulate Microsoft Word files
- Openpyxl - manipulate Microsoft Excel files
Once you have the RoboClerk container installed, you can have it create the directory structure RoboClerk needs. Change to the directory where you want to generate the RoboClerk directory structure and enter the following command:
At the command prompt, in the directory where you want to create a RoboClerk documentation scaffold, use the scaffold demo command to generate a set of demo directories containing templates and everything you need to run RoboClerk for the first time. The precise command to use depends on what commandline you are using:
Linux shell:
docker run -v $(pwd):/mnt --rm ghcr.io/meindertn/roboclerk:latest scaffold
Windows Powershell:
docker run -v ${PWD}:/mnt --rm ghcr.io/meindertn/roboclerk:latest scaffold
Windows Commandline:
docker run -v %cd%:/mnt --rm ghcr.io/meindertn/roboclerk:latest scaffold
The default directory structure is as follows:
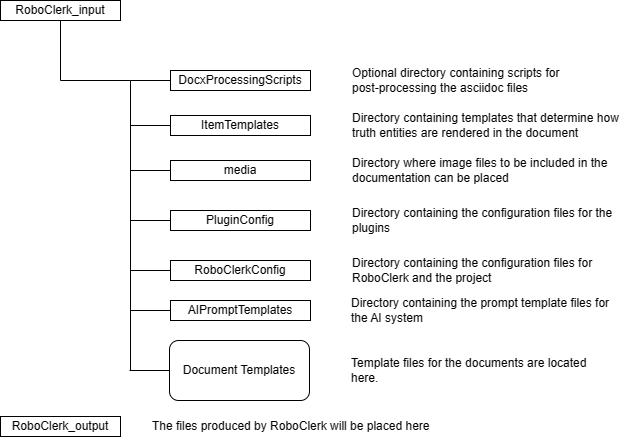
Through the configuration file, this directory structure can be changed but to keep things simple and to facilitate running RoboClerk in a Docker container, ensuring that these directories exist and are mounted inside the container is important.
It is recommended to check the directories shown above into a repo. The best place to put these directories depends on the project and the way the source code of the medical device is managed. One solution that seems to work well and provides a lot of flexibility is to create a separate repo for the documentation and add the main source code project repo as a submodule. In this way documentation can still be linked to a particular version of the source code but changes to the documentation do not result in a changed source code repo.
There are two configuration files in RoboClerk, one general one named "RoboClerk.toml" and a project specific one named "projectConfig.toml". Both configuration files have extensive comments in them to explain the various parameters. Below we will do a high level walk-through of the different options that need to be configured.
Edit the general project file to indicate what data source plugins should be loaded. The following options are available:
- AzureDevOpsSLMSPlugin - a plugin that interfaces with the Azure DevOps SLMS
- RedmineSLMSPlugin - a plugin that interfaces with the Redmine SLMS
- DependenciesFilePlugin - a plugin that extracts dependencies from a text file produced during the build process
- UnitTestFNPlugin - a plugin that extracts unit test documentation from the test function name in the source code. Note that the test function names need to follow a configurable pattern.
- AnnotatedUnitTestPlugin - a plugin that reads the unit test documentation from source code where unit test documentation is provided through a function annotation.
More detailed documentation about each of the plugins is provided in the plugin overview. Next, indicate the directories where plugins are located, the output directory where the output files will be placed and the logging level.
Edit the project specific configuration file. This file must contain a list of all documents that RoboClerk needs to know about. Instructions are in the example project configuration file. Some organizations use names different than ISO62304 for certain important entities (e.g. System Requirement, Software Requirement, etc.). RoboClerk needs to know about these differences in order to provide output that is understandable in the project context. Not every organization wants to organize their traceability in the same way. RoboClerk's traceability is highly configurable. The configuration file contains an explanation of how to set up the trace config. If you want to use a previously generated checkpoint file, instead of pulling all information into RoboClerk through the plugins, set the CheckpointFile variable to the location of the checkpoint file. Note that this file must be located in the template directory. The item identifiers of any updated entries that should be pulled in via the plugins should be entered in the appropriate list. This allows you to update only a specific set of trace items while keeping everything else the same as in a previously produced set of documents. The final set of parameters in the project configuration file is the ConfigValues table. This table contains sets of values that can be substituted across the documentation. Using this mechanism, it is possible to create templates that are quickly customizable for different projects. For example, one of the values could be SoftwareName, this would substitute the SoftwareName tag across all templates with the value provided in this configuration file. Changing the name of the software in the documents now could occur in seconds instead of through a search and replace process. Adding more configuration values is simple, just expand the list as needed.
The plugin mechanism is how RoboClerk retrieves the information that it includes in the document templates. Each plugin has its own configuration file. Look in the "Configuration" subdirectory of the plugins directory to find the configuration files. Generally, only the plugins that have been selected as active in the RoboClerk configuration file need to have their configurations edited. Use the comments in the configuration files of the individual plugins to understand how to make the edits.
Depending on the organization or even the project, the way in which trace entities should be rendered in asciidoc could be different. For example, the System Requirement item in RoboClerk has various pieces of information with it, not all of which might be of interest. Rather than hard-coding the way this item is rendered, instead it has an item template (a C# script file) that can be used to customize the rendering without recompiling RoboClerk. A standard set of item templates is included with RoboClerk. You can learn more about the details of how to edit the templates here.
The document templates form the basis on which RoboClerk builds the medical device documentation. If some documents are re-used across projects with only minor changes, you should consider making a set of master templates that can be shared among projects. This is pretty common with larger documents that describe the Software Development Life Cycle (SDLC), configuration management and risk management approach followed in the project. These tend to be similar across projects. This is where using the parameters from the ConfigValues section of the project configuration file in your templates starts to pay off as customization becomes very quick. Just change the values in the configuration files and these types of documents are close to complete. In step 2 at the top of this page, the directory structure was checked into a repo and this included the templates. You can have as many templates as you want, as long as you register the template with RoboClerk in the project configuration file. The project configuration file has more information about how to register templates with RoboClerk. In the templates, RoboClerk tags are used to indicate where in the templates RoboClerk should insert the information it has collected through its plugins. More detailed information about the RoboClerk tags and how to use them is provided here. After processing the templates, RoboClerk outputs the final asciidoc documents in the output directory.
There are two options to run RoboClerk from the RoboClerk container or directly from the command line. Running from the container is the superior option since the container will have all dependencies included with it. To run RoboClerk from the container use the following command:
Linux shell:
docker run -v $(pwd):/mnt --rm ghcr.io/meindertn/roboclerk:latest generate
Windows Powershell:
docker run -v ${PWD}:/mnt --rm ghcr.io/meindertn/roboclerk:latest generate
Windows Commandline:
docker run -v %cd%:/mnt --rm ghcr.io/meindertn/roboclerk:latest generate
Note that this assumes that you are running this command from the directory that contains the RoboClerk_input and RoboClerk_output directories. It also assumes a standard RoboClerk directory layout as described earlier in this document. There are a number of commandline options:
- The
-coption points RoboClerk to the general configuration file - The
-poption points RoboClerk to the project configuration file. - The
-ooption can be used to override simple string parameters from any of the configuration files. Each parameter and its value is in a space separated list. This commandline parameter is useful if you need to provide certain parameters as part of your Continuous Integration pipeline. For example, you may not want to store API tokens in configuration files in your repo:
-o RedmineAPIKey=1234fdsa MagicWords="one two three"
This would set the RedmineAPIKey parameter value to 1234fdsa regardless of what it was set to in the configuration file. The MagicWords parameter would be set to one two three. Make sure that if your parameter value has spaces that you use " to group the values together.
If preferred, the application can be ran outside of a container too. The Publish directory produced in the RoboClerkDocker directory when building in the "ReleasePublish" configuration is a good starting point. In order to run the application standalone the .NET runtime needs to be installed on your machine. See here for instructions. Make sure that each of the applicable configuration files is edited so that any paths match the appropriate setup for your system. Simply call the executable directly when running on windows or use the dotnet RoboClerk.dll command on linux.
RoboClerk produces an extensive log file while it is running which is critical to getting it to complete a run successfully. This log file, RoboClerkLog.txt is produced in the configured output directory. Generally, when RoboClerk encounters an error, it will log it and then throw an exception which stops the run. This is done so that it becomes harder to produce faulty documentation with hidden errors. Always start your troubleshooting with the log file. Usually the error is at the bottom of the file but sometimes you may find warnings earlier in the file that can help identify issues.
The asciidoc produced by RoboClerk can be processed in any way you want to achieve the desired output format. The docker container comes with two excellent tools to process asciidoc documents. The first is AsciiDoctor, this is the official asciidoc processor and allows conversion from asciidoc to HTML5, DocBook 5, man page and with plugins to PDF and EPUB 3. To further expand the range of document formats that can be produced, the Pandoc tool can be used. This tool accepts the DocBook 5 format and can convert it to a wide range of other formats. One format that is of interest to many organizations is Microsoft Word. Unfortunately, this is still the default business tool for document manipulation. The demo of RoboClerk contains a simple document pipeline that produces Microsoft Word documents to show how such a pipeline could work. Two options to process the asciidoc documents produced by RoboClerk are:
- Within your build pipeline.
- Through RoboClerk itself.
What is the best solution depends on your process. For option 1 you can simply call the post processing tools and scripts from your build pipeline. For option 2 you need to specify your pipeline in the project configuration file. Additional detailed information on how to set up the pipeline for each document is provided in the project configuration file. Let's take a high level look at how it works here:
[Document.SoftwareSystemLevelTestPlan]
	title = "System Level Test Plan"
	abbreviation = "SLTP"
	identifier = "DOC005"
	template = "SystemLevelTestPlan.adoc"
	[[Document.SoftwareSystemLevelTestPlan.Command]]
		executable = "docker"
		arguments = "run -a stdout -a stderr -v \"{DOCUMENTATIONROOT}\":/mnt --rm roboclerk asciidoctor -r asciidoctor-kroki /mnt/Roboclerk_output/%OUTPUTFILE% --backend docbook"
		workingDirectory = ""
		ignoreErrors = "False"
	[[Document.SoftwareSystemLevelTestPlan.Command]]
		executable = "docker"
		arguments = "run -a stdout -a stderr -v \"{DOCUMENTATIONROOT}\":/mnt --rm roboclerk pandoc --from docbook -s /mnt/Roboclerk_output/%OUTPUTFILENOEXT%.xml --reference-doc=/mnt/Roboclerk_input/DocxProcessingScripts/General_DOCX_template.docx --resource-path=.:/mnt/RoboClerk_output/ -o /mnt/Roboclerk_output/%OUTPUTFILENOEXT%-%DATE%.docx"
		workingDirectory = ""
		ignoreErrors = "False"
	[[Document.SoftwareSystemLevelTestPlan.Command]]
		executable = "docker"
		arguments = "run -a stdout -a stderr -v \"{DOCUMENTATIONROOT}\":/mnt -- rm roboclerk python /mnt/Roboclerk_input/DocxProcessingScripts/SystemLevelTestPlan.py %OUTPUTDIR%/%OUTPUTFILENOEXT%-%DATE%.docx %OUTPUTDIR%/%OUTPUTFILENOEXT%-%DATE%.docx"
		workingDirectory = ""
		ignoreErrors = "False"
In this example, the template SystemLevelTestPlan.adoc is registered with RoboClerk. This means that when RoboClerk runs, it will find the template file in the template directory, load it, replace all RoboClerk tags with information it has gathered and then write the completed document in asciidoc format to the output directory. RoboClerk then executes the table entries [[Document.SoftwareSystemLevelTestPlan.Command]] in order. So, for this example, first asciidoctor is called, then pandoc and finally a custom python script (SystemLevelTestPlan.py). Note that this example assumes you have the RoboClerk Docker container available on your system. Without docker, you'd have to specify where to find asciidoctor, pandoc and python on your system unless these are all in your path. For each executable a working directory can be specified as well as whether to ignore errors that occur. The variables between %% are substituted by RoboClerk as it runs. More details are in the configuration file. The final end result is one or more files in the formats you need for your project and organization.
One important thing to understand about the example above is that this assumes you have the RoboClerk docker installed but you are not running RoboClerk inside the docker. As you can see, this example is calling tools from within the docker container (using docker). If you try to run this example configuration and RoboClerk is running inside its docker container, RoboClerk will try to call docker and since docker is not installed inside the container, the call will fail. Instead, when running RoboClerk inside its own container the configuration entry would look like this:
[Document.SoftwareSystemLevelTestPlan]
	title = "System Level Test Plan"
	abbreviation = "SLTP"
	identifier = "DOC005"
	template = "SystemLevelTestPlan.adoc"
	[[Document.SoftwareSystemLevelTestPlan.Command]]
		executable = "asciidoctor"
		arguments = "-r asciidoctor-kroki %OUTPUTDIR%/%OUTPUTFILE% --backend docbook"
		workingDirectory = ""
		ignoreErrors = "False"
	[[Document.SoftwareSystemLevelTestPlan.Command]]
		executable = "pandoc"
		arguments = "--from docbook -s %OUTPUTDIR%/%OUTPUTFILENOEXT%.xml --reference-doc=%INPUTDIR%/DocxProcessingScripts/General_DOCX_template.docx --resource-path=.:%OUTPUTDIR%/ -o %OUTPUTDIR%/%OUTPUTFILENOEXT%-%DATE%.docx"
		workingDirectory = ""
		ignoreErrors = "False"
	[[Document.SoftwareSystemLevelTestPlan.Command]]
		executable = "python3"
		arguments = "%INPUTIDR%/DocxProcessingScripts/SystemLevelTestPlan.py %OUTPUTDIR%/%OUTPUTFILENOEXT%-%DATE%.docx %OUTPUTDIR%/%OUTPUTFILENOEXT%-%DATE%.docx"
		workingDirectory = ""
		ignoreErrors = "False"
At the moment RoboClerk supports interfacing with OpenAI or the Azure Open AI APIs. It is possible to obtain feedback on the quality of your requirements. In this setup, RoboClerk will send your requirements to the configured Open AI API with context. You can control the context that is submitted via the prompt template. Currently the only feedback that can be retrieved is regarding your requirements. All different requirement types are supported. For each requirement type a separate prompt can be created and these are stored in the AIPromptTemplates directory in the RoboClerk_input directory.
The prompt files themselves are in toml format and contain model parameters as well as conversational context. Within the conversational context there are several roles available, similar to the OpenAI playground. The roles are system, user and assistant. The system role is used to set the starting condition. The user role speaks for itself and the assistant is the LLM. What these roles allow you to do is to provide context for your query. You can provide examples to the LLM of the type of response you are looking for. I've included an example prompt for receiving feedback on the quality of requirements.
model = "gpt-3.5-turbo"
temperature = 0.2
max_tokens = 256
top_p = 1
frequency_penalty = 0
presence_penalty = 0

  [[messages]]
  role = "system"
  content = """You are a very helpful, expert business analyst in a medical device software company reviewing a requirements document. You always aim to answer questions precisely and in a professional manner. Your audience is the project manager and developers of a medical device software product."""

  [[messages]]
  role = "user"
  content = """You will be analyzing and reviewing documentation requirements for the following product, please indicate that you are ready to analyze requirements: "@@Config:ProductDescription()@@" """

  [[messages]]
  role = "assistant"
  content = """I am ready to analyze requirements."""

  [[messages]]
  role = "user"
  content = """Imagine that the quality of requirements are measured along two axes, these are ambiguity and clarity. Your task is to assign a clarity and an ambiguity label to requirements. The clarity label of a requirement can either be "very clear", "somewhat clear","somewhat unclear" or "unclear". The ambiguity label of a requirement can either be "unambiguous", "somewhat unambiguous", "somewhat ambiguous", "ambiguous".  Provide an explanation for each of the assigned labels and an improved requirement text (when possible) that is both clear and unambiguous. Provide your answer in JSON format. The requirement to analyze is: "Users should be able to view past result data when they need to.""""

  [[messages]]
  role = "assistant"
  content = """{
  "clarity":{
  "label":"Clear",
  "explanation":"The intent to provide historical data is clear."
  },
  "ambiguity":{
  "label":"Somewhat ambiguous",
  "explanation":"\"When they need to\" is ambiguous as it doesn't specify any conditions or triggers."
  },
  "better_requirement":"The user interface shall provide a dedicated section for viewing historical result data, allowing users to select and view data from specific dates and times."
  }"""

  [[messages]]
  role = "user"
  content = """The requirement to analyze is: "Patient data backups should be done at appropriate intervals." """

  [[messages]]
  role = "assistant"
  content = """{
  "clarity":{
  "label":"Somewhat clear",
  "explanation":"The intent to backup data is clear."
  },
  "ambiguity":{
  "label":"Ambiguous",
  "explanation":"\"Appropriate intervals\" is ambiguous as it doesn't specify the frequency."
  },
  "better_requirement":"The software shall automatically backup patient data to the cloud server every 24 hours."
  }"""

 [[messages]]
 role = "user"
 content = """The requirement to analyze is: "%{RequirementDescription}%" """
As you can see in this example, the system role is used to set the system up as a business analyst. Since these prompt templates are processed similarly to the asciidoc templates you can use RoboClerk tags in this toml file and RoboClerk will insert information in exactly the same way. Use this to pull context information into the prompt. This is shown in the first "user" role message in the example where context information about the product is pulled into the prompt through @@Config:ProductDescription()@@. The way RoboClerk now uses these prompts requires inserting information extracted from a truth item, in this case the truth item is a requirement. You can directly refer to the properties of the RequirementItem object and pull them into the prompt. This is done using the %{}% tags.
This is shown in the last line of the prompt example where the description field of the RequirementItem is pulled into the prompt. As you can see, the prompt conversation primes the LLM to produce output in JSON. The prompt is run for each requirement and the result is written into a JSON file. At the same time RoboClerk inserts a tag into the document so that it is clear what text the comment applies to. The python post processing scripts included with RoboClerk insert the comments into the word documents that the standard RoboClerk pipeline produces.
Note that these comments are only produced if you enable the AI plugin in the RoboClerk configuration file:
# Indicate what AI system plugin you'd like to use (if any). Provide "" for no AI plugin.
# If you have an OpenAI key, you can use "OpenAIPlugin"
AISystemPlugin = "OpenAIPlugin"
Next you should configure the OpenAIPlugin configuration file:
# This is the RoboClerk OpenAI plugin configuration
# This plugin allows RoboClerk to provide intelligent
# feedback to the documentation elements it is using
# to build the documentation.

# Set to true to use the Azure version of the openAI API
# If set to false, the regular openAI API is used

UseAzureOpenAI = "false"

# If you are using the regular openAI API, the following
# API key must be set

OpenAIKey = "SUPERSECRETKEYDONOTSHARE"

# If you are using the Azure version of the openAI API the
# Azure openAI resource URI and the Azure openAI resource
# API key must be provided

AzureOpenAIUri = ""

AzureOpenAIResourceKey = ""

# Here you can define what prompt template files to use for
# the various truth items.
SystemRequirement = "/AIPromptTemplates/OpenAI/SystemRequirement.toml"
SoftwareRequirement = "/AIPromptTemplates/OpenAI/SoftwareRequirement.toml"
DocumentationRequirement = "/AIPromptTemplates/OpenAI/DocumentationRequirement.toml"
With both of these items configured you are ready to proceed and the AI comments JSON file will be written in the RoboClerk_output directory the next time you run RoboClerk.
Document review is an essential part of any ISO62304 compliant process. Different organizations perform document review in different ways. Generally, there are a number of stakeholders that will participate in the document review. Some of these stakeholders may have a hard time working with a documentation as code setup. Here are a few observations that have helped me over the years:
- Over time, the content of the templates will stabilize. This means that you will get less and less comments and edits for those sections of the templates that are not inserted by RoboClerk. Porting back comments from a word file with edits back to your source documents is tedious but this is largely a temporary issue.
- RoboClerk can be configured to include hyperlinks back to the source systems in some of the items it inserts into the documentation. For example, a requirement item will have a hyperlink back to the SLMS. By training your stakeholders to utilize the hyperlinks instead of making edits in the document, you can save time.
- Try to direct the focus of the stakeholders away from Word to a different format, more conductive to electronic review and publishing. The success of this effort depends on how entrenched the Microsoft Office suite of tools is in your organization.
- When reviewing in a document format that is not the same as your source document format, it is important to make stakeholders feel that their comments are addressed. The concept of generating new documents with every build is strange to many people. One way to make stakeholders feel heard is to be explicit. For example, by putting a response in every comment box and then making the requested changes in the source document.
Switching over to a documentation as code approach, especially in an organization that has been working with a more traditional business document process will take some time and a little goodwill from all involved. The pay-off is significant in time and money saved, when stakeholder see this they usually become more enthusiastic.