ArduinoGotchi is a real Tamagotchi P1 emulator running in Arduino UNO hardware. The emulation core is based on TamaLib with intensive optimization to make it fit into UNO's hardware that only comes with 32K Flash 2K RAM.

- Git - command line tool, please follows Getting started installing Git
- Arduino IDE - Download and Install
- Java 8 Runtime - Download and install
- Parts
- Arduino UNO (also compatible with Arduino Micro, Arduino Nano, Arduino Mega)
- 1K resistor x 3
- Push button x 3
- Buzzer
- SSD1306 I2C OLED 128x64
- Tamagotchi P1 ROM - ArduinoGotchi being an emulator, it requires a compatible Tamagotchi P1 ROM named rom.bin and place it in the project folder. Due to the copyright issue, Rom file is not provided, you have to find it yourself
- Clone this repository from Github into your PC, run the following commands:
git clone https://github.com/GaryZ88/ArduinoGotchi
cd ArduinoGotchi
- Put the rom.bin in the project folder, i.e. /ArduinoGotchi/
- Run the below commands, if success, it will generate a file named "rom_12bit.h" in the project folder
cd ArduinoGotchi
java TamaRomConvert rom.bin
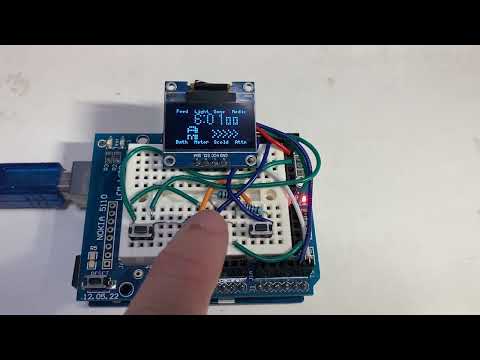
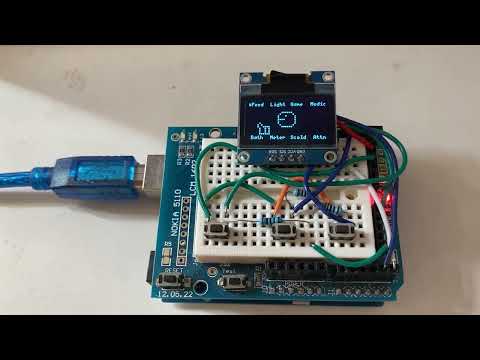
- Compose the electronic parts, please follow the circult diagram below
- Launch Arduino IDE
- Open "ArduinoGotchi.ino" in the project folder
- Connect your Arduino UNO to PC/Mac with USB cable
- Select your board
- Main Menu -> Tools -> Board -> Arduino AVR Boards -> Arduino UNO
- Install U8g2 library
- Main Menu -> Sketch -> Include Library -> Manage Libraries
- Search "U8g2" and install
- Click the "Upload" button


- To activate your pet, you have to configure the clock by pressing the middle button. Otherwise, your pet will not alive.
- The emulator will save the game status for every 60 mintues.
- The speed of the emulator is a bit slower than the actual Tamagotchi device, still, it is fun.
- There are a few settings in the main program (ArduinoGotchi.ino) that you can adjust to fit your need:
/***** U8g2 SSD1306 Library Setting *****/
#define DISPLAY_I2C_ADDRESS 0x3C
#define SCREEN_WIDTH 128 // OLED display width, in pixels
#define SCREEN_HEIGHT 64 // OLED display height, in pixels
/****************************************/

/***** Tama Setting and Features *****/
#define TAMA_DISPLAY_FRAMERATE  3   // 3 is optimal for Arduino UNO
#define ENABLE_TAMA_SOUND
#define ENABLE_AUTO_SAVE_STATUS
#define AUTO_SAVE_MINUTES 60    // Auto save for every hour (to preserve EEPROM lifespan)
#define ENABLE_LOAD_STATE_FROM_EEPROM
//#define ENABLE_DUMP_STATE_TO_SERIAL_WHEN_START
//#define ENABLE_SERIAL_DEBUG_INPUT
//#define ENABLE_LOAD_HARCODED_STATE_WHEN_START
/***************************/

/***** Set display orientation, U8G2_MIRROR_VERTICAL is not supported *****/
#define U8G2_LAYOUT_NORMAL
//#define U8G2_LAYOUT_ROTATE_180
//#define U8G2_LAYOUT_MIRROR
/**************************************************************************/

ArduinoGotchi is distributed under the GPLv2 license. See the LICENSE file for more information.