🚧 this page is currently under construction! 🚧
A page to get you started in using Echo.
Table of Contents
Welcome to Echo documentation! Currently, the documentation is divided four four big files, each detailing a component that can help you understand and use Echo:
- If you are just starting and want to get something working, continue reading this Getting Started!
- If you want to learn more about Echo and how it works internally, and you are already familiar with the basics, head on over to Core Systems to see how the code is structured.
- All currently implemented materials and how to use them are documented in Material.
- Finally, to construct beautiful scenes that you can render with Echo, you need the simple Echo Description Language to communicate your cool ideas to the renderer and let it help you realize them!
If you are simply interested in rendering with Echo, and would like to use a nice graphical dashboard do to so (who doesn't?), Echo has a convenient user interface (developed in Echo.UserInterface) to help you see your renders. This interface also extremely useful when working with code to visualize any error or performance regression.
You can download the latest version of the user interface in the Release tab. Running the universal Echo.UserInterface.dll file requires at least .NET 6, or you can directly launch a platform-specific prepackaged version like any other application. The interface window is divided into areas, most of which are empty by default. The first area that you will interact with is the Scheduler, located at the bottom of your screen:
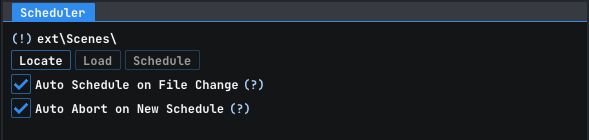
The Locate button opens up a file dialogue for you to find the .echo file you want to render. You can learn more about .echo files in the Echo Description Language section. For now, let us select ext/Scenes/Simple/cornell.echo by double clicking it, which should immediately schedule and begin a render of Echo's version of the Cornell Box. The Load button loads the .echo file from disk and the Schedule button queues it for rendering, but because Auto Schedule on File Change is checked, these actions are automatically performed. You can also change the quality (defined in the .echo file) of the rendering by switching Profile.
Once you are satisfied with the result, click one of the Save buttons in the Render area to save your image as a file. Obviously, there are many more things happening with the interface, but this is ultimately an introductory guide, and you are free to play around to explore all its features!
If you are not satisfied with only using the interface and want to tinker with the internals of Echo or use it in your project, this next section will get you started!
When you got the Echo.Core package all setup (through NuGet, git, or however you desire) and ready to begin, copy and execute the following little snippet of code:
using Echo.Core.Common.Compute;
using Echo.Core.Common.Packed;
using Echo.Core.Processes;
using Echo.Core.Scenic;

using (Device device = new Device())
{
    Scene scene = new CornellBox();
    RenderProfile profile = new StandardPathTracedProfile(scene, 15)
        { Resolution = new Int2(256, 256) };

    ScheduledRender render = profile.ScheduleTo(device);

    render.Monitor();
    render.texture.Save("render.png");
}
You should see some stuff printed to your standard output stream, reporting the progress of operations. If it is taking too long, I highly suggest changing to Release mode (if you know how) which might speed up the rendering by more than 10x! After everything settles and the printing has finished, see if you can find the output image in your working directory (the directory where Echo was built and ran). If you see a little room with two cubes, Congratulations! you have just rendered your first scene with Echo using code. I hope that was fun! Next up we will be looking into the details of the code we just used and how you can customize and improve it.
The code starts off like any other C# file with four using directives. Echo has lots of components, so these directives can get a bit long, but hopefully your IDE automatically writes them for you. Let's breakdown the rest of the code step by step:
- A new
Deviceobject is created, which encapsulates the computing capabilities of your computer. By default, it will try to take advantage of as much compute resources as possible. Note that ausingstatement is used here to ensure proper disposal of theDeviceobject. Be careful to not confuse thisusingwith the previous four; this statement has a different purpose. - A
Sceneobject contains all information about the world we want to render, including things like geometry, materials, textures, and lights. There are two main ways of creating aScene. The first is through code like the example above, and is as straightforward as creating any C# object. The second way is through the Echo Description Language; both ways have their uses and advantages. TheCornellBoxobject created here inherits fromSceneand instead of an empty scene, it has the goodies needed to render the Cornell Box. - The final object we need before start rendering is the
RenderProfile. Besides the targetScene, it also contains configuration variables related to the render such as the resolution, the sampling count, the evaluators used, the composition stack, etc.. To simply this process, Echo provides aStandardPathTracedProfilewhich inherits fromRenderProfilethat should be sufficient for basic path traced renderings. Its constructor takes in two parameters, the targetSceneand a number representing the overall "quality" of the render. The dimension of the output image is assigned to theResolutionusing object initializers. We keep this small for the example so you don't get bored waiting! - Now it is time to begin the rendering, which we will do by simply invoking the
ScheduleTomethod on theRenderProfileto appoint it to theDevice. This method returns aScheduledRenderobject that we can use to keep track of the rendering process. After this invocation, theDevicewill manage allOperationrelated to the render and begin dispatching them to available workers. - Finally, we use the
Monitormethod onScheduledRenderto observe its process. If you do not want logs printed to the standard output, use theAwaitmethod instead to simply block the calling thread until the render completes. The last line saves the rendered image torender.pngin your working directory.
I hope that was fun! Please reach out if you are confused on anything. This has been a high level introduction of Echo, and check out Core Systems or Echo Description Language to learn more about the technical details of Echo!