This is an Alexa controlled alarm system with an ESP32-CAM and a HC-SR501 PIR motion detection module.


- The infrared module is used to detect motion in a room
- Extendable with external window/door alarm sensors
- The Espalexa library (Hue emulation) is used to switch On/Off motion detection via Alexa voice commands
- The www.virtualsmarthome.xyz URL trigger service is used to start Alexa routines in case of an alarm
- A web interface can be used to see the video stream and control the activation status
- It can call (mobile)phones via AVM Fritzbox TR-064 API (only on certain routers)
- It can send e-mail notifications with a picture to your e-mail account
- Last activation state is stored in EEPROM and restored after reboot (e.g. after a power loss)
- Option: Integration of a CCS811 air quality sensor
The alarm system is mainly created for Alexa integration, but it works also without Alexa. You can control it then via the web interface.
Just place the alarm module somewhere in your home where it can detect suspicious movements with the infrared sensor.

Then activate the alarm system with an Alexa voice command: "Alexa, Alarm On". There is a 60 seconds arm delay time before the detector is activated. This shall allow leaving home before the motion detector is activated. The device name can be changed in the settings section. Set the device name from "Alarm" to something special, to ensure an intruder is not guessing the device name to switch off the alarm.
To avoid false alarms, the detector is programmed to wait for two detected motions within 30 seconds.
If a (double)motion is detected while the detector is activated, then a alarm notification is done (phone call, e-mail). You can also trigger Alexa routines in case of an alarm. You can for example let Alexa play an alarm sound, speak a text or switch on/off lights. It's totally up to you.
A picture from the time of the second movement trigger is sent as e-mail attachment. The web interface (e.g. via VPN connection from phone to router) can be used to see the current video stream from camera.
You can also use Alexa's drop in function to listen to the room or even speak to the intruder.
To allow disarming of the detector when coming back home, there is an alarm delay time of 15 seconds defined. During this 15 seconds you can switch the module off with an "Alexa, Alarm Off" command.
After an alarm, there is a wait time defined of 5 minutes before a next alarm can be raised. The wait time can be stopped with any On/Off command.
In addition to Alexa commands, the system can be controlled also with a web interface. Use IP-address:90 to start the interface. Port 80 is used for the Espalexa service. The IP address is shown during the start of the sketch in the serial monitor of the IDE. The video stream is provided via a websocket connection to the client. Only one stream is supported. An error message is diplayed for additional web clients trying to connect. If the client is supporting the Bonjour protocol (mDNS), you can also use alarmsystem.local:90 in the browser.
The current camera view is shown in the browser. In case of an alarm, you can check who is moving in the room (e.g. via VPN connection from phone to router).
You can use On/Off commands to arm/disarm the system. When armed with the web interface, the system is directly activated without an arm delay time.
The "Active (0)" state also shows the trigger counts for single PIR triggers.
The IP-address:90/uptime web request, shows the current time, the uptime (in hours), the remaining memory heap of the system and single/double PIR counters. The maximum picture rate is also shown.
Time: 09:16:03
Uptime: 13 (hours)
Free Heap: 27728
Single=6 Double=2
Max FPS=5
The counters shall support the setting of the sensitivity of the PIR module. If the sensitivity is too high, then false triggers are happening. An On/Off command is setting the values to zero.
The frame rate is set to 5 pictures/second (can be changed with the variable fps in the code). Higher frame rates can disturb the Espalexa Hue communication while a web client is connected. The Alexa App shows then a problem with the device and control via voice command is not possible then. The problem is vanisihing in any case (independent of frame rate) as soon as the web client disconnects.
With the URL IP-address:90/test you can test the URL trigger function with Alexa. The "Ping" trigger is requested and you should hear the define notification tone from Alexa.
With the URL IP-address:90/alarm_trigger?s=Sensorname external (ESP12) alarm sensors can trigger an alarm. The provided parameter "Sensorname" is shown within the notification e-mail.
The whole alarm system consists of three components only. The 5 Volt power supply, an ESP32-CAM and the HC-SR501 PIR sensor (less then 20 Euro). See Parts section for order details.
The HC-SR501 PIR motion detection sensor is connected to the ESP32-CAM with three wires. And the ESP32-CAM has to be connected to 5V and GND.
| ESP32-CAM | HC-SR501 | Power supply 5V |
|---|---|---|
| 5V | VCC | 5V |
| GND | GND | GND |
| IO2 | OUT |
Just solder the wires or you can use jumper cables if using a breadboard.

To minimise interference of WLAN with the PIR motion detection, the three wires to the HC-SR501 module are moved through a ferrite ring. It might be necessary to reduce the TX (send) power for WLAN to minimize the interference further:
// Parameter for send power is in 0.25dBm steps. Allowed range is 8 - 84 corresponding to 2dBm - 20dBm.
  esp_wifi_set_max_tx_power(60);        // Set TX level to 15dBm
A setting to 60 = 15dbM was sufficient for my system to nearly avoid any false positives.
A nice 3D print housing can be found here at Thingiverse.
The software is created to be used within the Arduino IDE (tested with version 1.8.15 to 1.8.19). For the ESP32-CAM, the ESP32 board support has to be installed in the IDE (version 1.0.6 is tested).
To install the board add "https://dl.espressif.com/dl/package_esp32_index.json" to "Menue: File -> Preferences -> Additional Boards Manager URLs". Then open "Tools -> Board: -> Boards Manager..." and put "esp32" in search field and press Install.
ESP32 version 2.x.x is compiling with warnings and it seems that the EMailSender Library has problems witih the updated version (emails not sent).
In the IDE you have to select:
- Board: ESP32 Wrover Module
- Partition scheme: Default 4MB with spiffs...
The following external libraries are used:
- ArduinoWebsockets (https://github.com/gilmaimon/ArduinoWebsockets)
- EMailSender (https://github.com/xreef/EMailSender)
- Espalexa (https://github.com/Aircoookie/Espalexa)
- ArduinoJson (https://arduinojson.org/v6/doc/)
- TR-064 (https://github.com/Aypac/Arduino-TR-064-SOAP-Library)
All libraries can be installed via the IDE Library Manager. Search for the libraries with the name in the search field (e.g. ArduinoWebSockets) and select Install.
You need an external (FTDI) programmer to install the (initial) sketch on the ESP32-CAM module. You have to set the voltage of the adapter to 5 Volt.

For programming you have to connect IO0 to GND, RX/TX (crossed) and 5V/GND. If you have the power supply already connected, then do not connect the 5V cable from the adapter.
Caution: The 5V connection shown in an earlier version of this project was wrong (CTS instead of VCC connection).
Then press the "RST" button on the ESP32-CAM. After that, you can start the upload process within the Arduino IDE (with FTDI USB-Serial port selected).
For normal start open IO0 from GND and press "RST" again.
After the initial sketch upload via USB (and after setting the right WLAN credentials), you can also do "Over the Air" uploads via WLAN. The OTA device name is set to "AlarmSystem". Sometimes it is necesssary to press the "RST" button after the OTA process is finished, to start the sketch. Alternatively you can disconnect the power for a few seconds if ESP32CAM is hidden in the housing.
After uploading the sketch to the ESP32-CAM you can start the device detection with Alexa (use "Other devices" not "Philips Hue").
To use the sketch, just change the relevant settings in the code:
// Change credentials, Alexa device name and Trigger URLs !!!
//*******************************************************************************
#define CALL_PHONE On                   // Call phone On/Off
#define SEND_MAIL On                    // Send mail On/Off
#define USE_ALEXA On                    // Alexa service On/Off
#define SILENT_ALARM Off                // On means no internal LED blink and no Alexa notification sound
You can switch individually the notification methods on or off. Phone calls are only possible with special kind of routers (Fritzbox from AVM). You can also switch silent alarm on. That means, no internal LED is blinking and no Alexa notification sound is played.
The WiFi credentials has to be set according to your local needs.
// WLAN credentials
char* ssid = "ssid";
char* password = "password";
The Espalexa Philips Hue emulation service is emulating a device that can be discovered and controlled from Alexa.
The alarm system can be armed/disarmed with Alexa voice commands (device on/off) or with the Alexa App. Just define the device name to be used with Alexa. When activated via Alexa command, there will be 60 seconds arm delay time until the alarm system is activated. That shall allow to leave the house before the system is activated.
// Alexa device name
char* AlexaName = "Alarm";              // Define your Alexa device name
The TR-064 API allows to place calls as alarm notification. But this works only for certain WLAN routers with telephone support. Mainly AVM Fritzbox and some Zyxel models.
To use TR-064 on a Fritzbox, you have to create a user on the Fritzbox and enable the "dial support" function (Wählhilfe). See details within the library documentation.
The TR-064 credentials have to be configured in this section of the sketch:
// Fritzbox credentials for TR064
char* FB_NUMBER = "0123456789";         // Phone number to dial
char* FB_USER = "user";                 // Fritzbox user name
char* FB_PASSWORD = "password";         // Password for user
char* FB_IP = "192.168.0.1";            // IP of Fritzbox
int  FB_PORT = 49000;
Email alert notification can be used with the EMailSender library. The library might be usable also with other providers. But the easiest way is to use a Google mail account for sending e-mail notification.
Just create a new gmail account for SMTP notifications and place the credentials here. Important: Allow less secure connections in gmail security settings.
With "[email protected]" you can define the e-mail destination address. In case of an alarm, a notification is sent to this e-mail address with the subject "Intruder Alert!" and a text "time stamp: Movement detected!".
// Mail credentials for gmail account. Create new gmail alert account if needed.
// Allow access for less secure clients in gmail security settings.
char* M_USER = "[email protected]";   // Mail user name
char* M_PASSWORD = "password";          // Mail password
char* M_DEST = "[email protected]"; // Destination e-mail address
To start Alexa routines, you have to register on the www.virtualsmarthome.xyz web site with your Amazon account and also enable the "URL Routine Trigger" skill in Alexa. In Alexa, the URL triggers are shown as virtual doorbells.
Then define two URL triggers as shown in the screenshot:

The URLs have to be copied to the sketch below.
// Trigger URLs: 1. Alexa alarm routine. 2. Ping notification sound
const char *URL[] PROGMEM = {"https://www.virtualsmarthome.xyz/url_routine_trigger/activate.php?trigger=",
                             "https://www.virtualsmarthome.xyz/url_routine_trigger/activate.php?trigger="
                            };
The first URL is the alarm routine trigger and the second the notification routine trigger. Use the JSON variant (short response). But all three variants will work.
For security reasons the Root CA certificate is stored in the code (certificate.h). The certificate is used to authenticate the identity of the web server.
The old root certificate "DST Root CA X3" has expired end of September 2021.
According To Let's Encrypt, the issuer of the Virtualsmarthome.xyz certificate, it is necessary to use the new "ISRG Root X1" certificate instead. The certificate is available here: https://letsencrypt.org/certs/isrgrootx1.pem and is valid until year 2035.
The current code is already using the new Root CA certificate and the program is working well with it.
In the Alexa App you can then create two routines. One is the routine for alarm activities (play sound, speak text etc.). And the second is a notification tone, as a reminder to disarm the alarm system when coming back home. There is 15 seconds alarm delay until the alarm is raised.


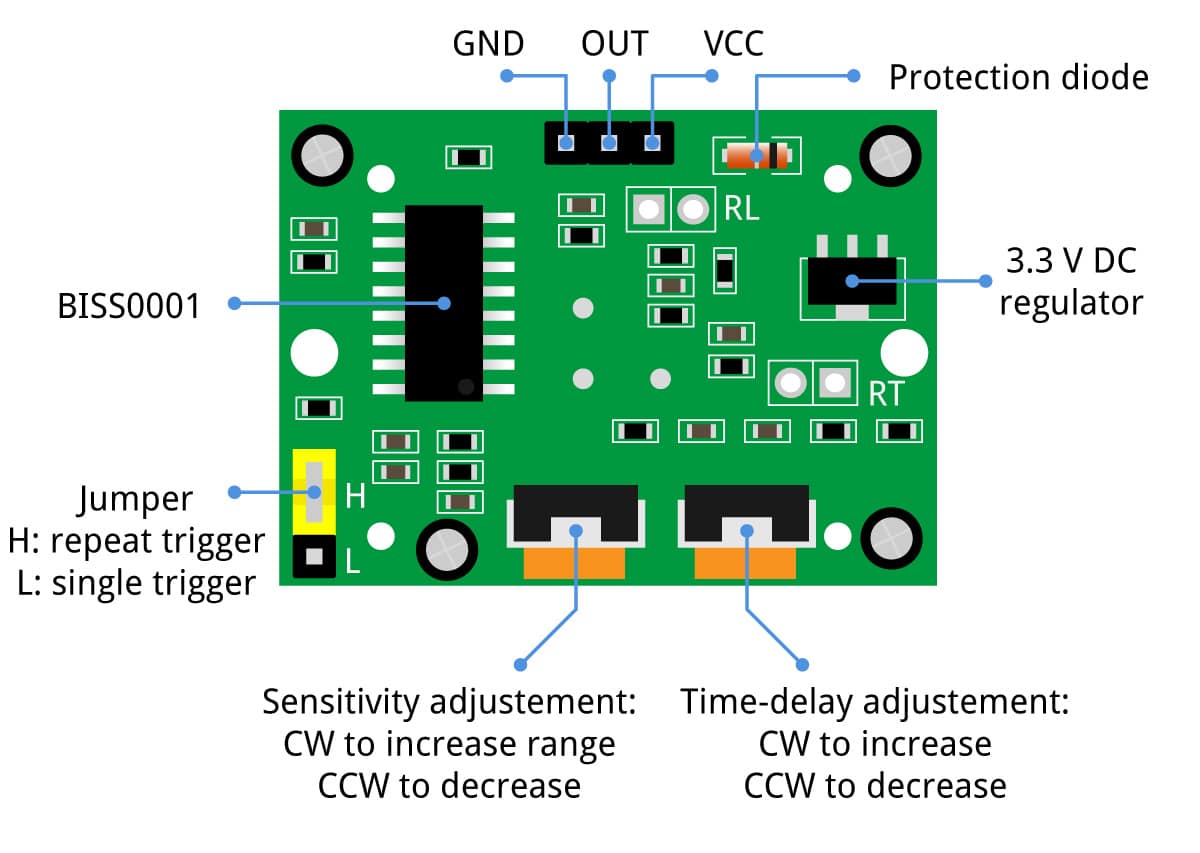
To adjust the sensitivity on the HC-SR501 module, you have to change the left potentiometer. Turn counter clockwise to reduce the sensitivity. Reduce the sensitivity so far, to ensure that there are not too many wrong PIR triggers (e.g. because of normal temperature changes). The right potentiometer is defining the delay time. Keep this a the shortest time (about 3 seconds). And leave the standard setting for single triggers (jumper to the outside).
If you still get false positives, you should have a look to WLAN interference section in the code details.
A nice tutorial for the HC-SR501 can be found here.
It is possible to extend the alarm system with external door/window alarm contacts. The description is detailled here.
If you are interested in code details and explanations please read here further.
It is easy to extend the ESP32-CAM alarm system with an additional CCS811 air quality sensor. The CCS811 sensor from AMS is a gas sensor that can detect a wide range of Volatile Organic Compounds (VOCs) and is intended for indoor air quality monitoring. I use here the eCO2 sensor value which is an eqivalent to the CO2 concentration. The sensor can't directly measure the CO2 concentration but it calculates internally the usual CO2 concentration in living rooms based on the concentration of other VOCs.
The extended programm is stored here. An additional library (Adafruit_CCS811) has to be installed in the Arduino IDE.
The CCS811 is connected to 3,3V, GND, SDA (IO 14) and SCL (IO15). The WAKE-pin on the CCS811 has to be connected to GND. The sensor can be screwed on the backside of the housing.
That's all. The air quality (eCO2) is shown in the web interface.

The internal LED will go on if a defined level (#define BAD_AIR 2300) is reached. If BAD_AIR + 200 is reached, an Alexa alarm notification can be played. Just create an additional URL trigger on the VSH web site and store the new URL in the code. Then add an Alexa notification routine in the Alexa App for the new trigger.
The CCS811 requires a special burn-in time and baseline handling. According to the datasheet, the sensor should first run permanently for about 48 hours. After that time the sensor values should stabilize. The CCS811 maintains internally a beseline to calculate the good air level over time. The baseline should be saved regularly in non volatile memory and restored after a restart of the CCS811 sensor, but after a heat-up time of 20 minutes. The restore is maintained automatically in the code.
But storing a new baseline is requested with an URL: IP-address:90/set_baseline
According to the datasheet and application note, storing of a new baseline should be done on a dayily basis during the first week and then on a monthly basis. The currently calculated baseline and the stored value is shown in the "uptime" request.
Time: 16:22:37
Uptime: 72 (hours)
Free Heap: 165984
Single=0 Double=0
Max FPS=5
Baseline=0xa9bd, Stored=0xa9bd
Accessing the web interface securely from the outside requires a VPN connection from the smartphone to the ESP32CAM in the home network. If you are using a Fritzbox router with an IPv4 address, then setting up a VPN connection fom your phone (iPhone/Android) is straight forward. Just follow the instructions on the AVM web site for Android and Apple devices.
Due to availability issues for IPv4 addresses most user will now have an IPv6 connection and DS-Lite from their internet service provider. Then a VPN connection to the own network is more difficult. But you can use an OpenVPN server on a Raspberry Link1, Link2 device in your local network together with an commercial portmapper service (e.g. feste-ip.net). On the phone you can install one of the available OpenVPN client apps.
OpenVPN will also work with an IPv4 router without a VPN solution integrated.
- ESP32-CAM Link
- HC-SR501 PIR Sensor Link
- Ferrite Ring Link
- USB to Serial Adapter Link1 or Link2
- Power Supply 5 Volt Link
- Power Connector Link
- Housing Link
- Option: CCS811 Air Quality Sensor Link
- 16.02.21: Version 1.2: Avoid millis() rollover problem (which occurs every 50 days).
- 26.11.21: Version 1.1: Store picture to SPIFFS only when active.
- 21.08.21: Version 1.0: Initial version.