computer vision mechanical arm combined with Patrol car contribute to visional grab as the car keep moving
| K210 | mechanical arm | Patrol car | IoT |
|---|---|---|---|
| Sipeed_Maix | STM32f103c8t6 | STM32c8t6 | ESP32 |
| Python | C++ | C++ | C |
| Computer vision and Yolov8 | Keil uVsion5 | STM32Cube MX | Visual Studio Code |
 |
- boot.py: code to run on maixpy
- *.kmodel or *.smodel: training model file (smodel is an encrypted model)
- labels.txt: category labels
- startup.jpg: startup icon
- report.jpg: training report, including loss and accuracy reports, etc.
- warning.txt: training warning message, if you have this file, be sure to read it as it may cause training loss!
- Follow the documentation(maixpy.sipeed.com) to update to the latest firmware If the new firmware is buggy, you can use this firmware to test it (choose minimum_with_ide_support.bin): https://api.dl.sipeed.com/shareURL/MAIX/MaixPy/release/master/maixpy_v0.6.0_2_g9720594
- Prepare an SD card, copy the files from this directory to the root of the SD card.
- insert SD card into development board
- Development board power-up
- Aim the camera at the training object,
The top left corner of the screen will show Object labels and probability.
The bottom left corner of the screen shows the time in milliseconds it takes to run the model.
- Burn the model to flash as described in the documentation(maixpy.sipeed.com)
- Modify the parameters of the main boot.py call: model's address in flash.
- Other resource files, such as startup.jpg can be sent to the development board through the tool file system, or no matter, no will automatically skip the display
- Run boot.py
- If you don't understand the above steps, then you should follow the maixpy.sipeed.com documentation to learn how to use it!
Questions about MaixPy go here( https://github.com/sipeed/MaixPy/issues ) to ask questions,Search before asking if the same question has been asked maixhub related questions please mail: [email protected], every day a lot of mail, pay attention to the mail format is very important, otherwise you may not be able to reply in time, please understand! Subject: [maixhub][Troubleshooting/suggestions] The subject of the message, a concise description of the problem, not a question like "I need help" or "Why is it not working". Email content: If there is a problem or bug, please make sure to include the error phenomenon and a detailed reproduction process in order to help you solve the problem faster and better. You can also discuss at bbs.sipeed.com
 An open-source project for a versatile robotic arm capable of performing various tasks such as pick-and-place operations, object manipulation, and more.
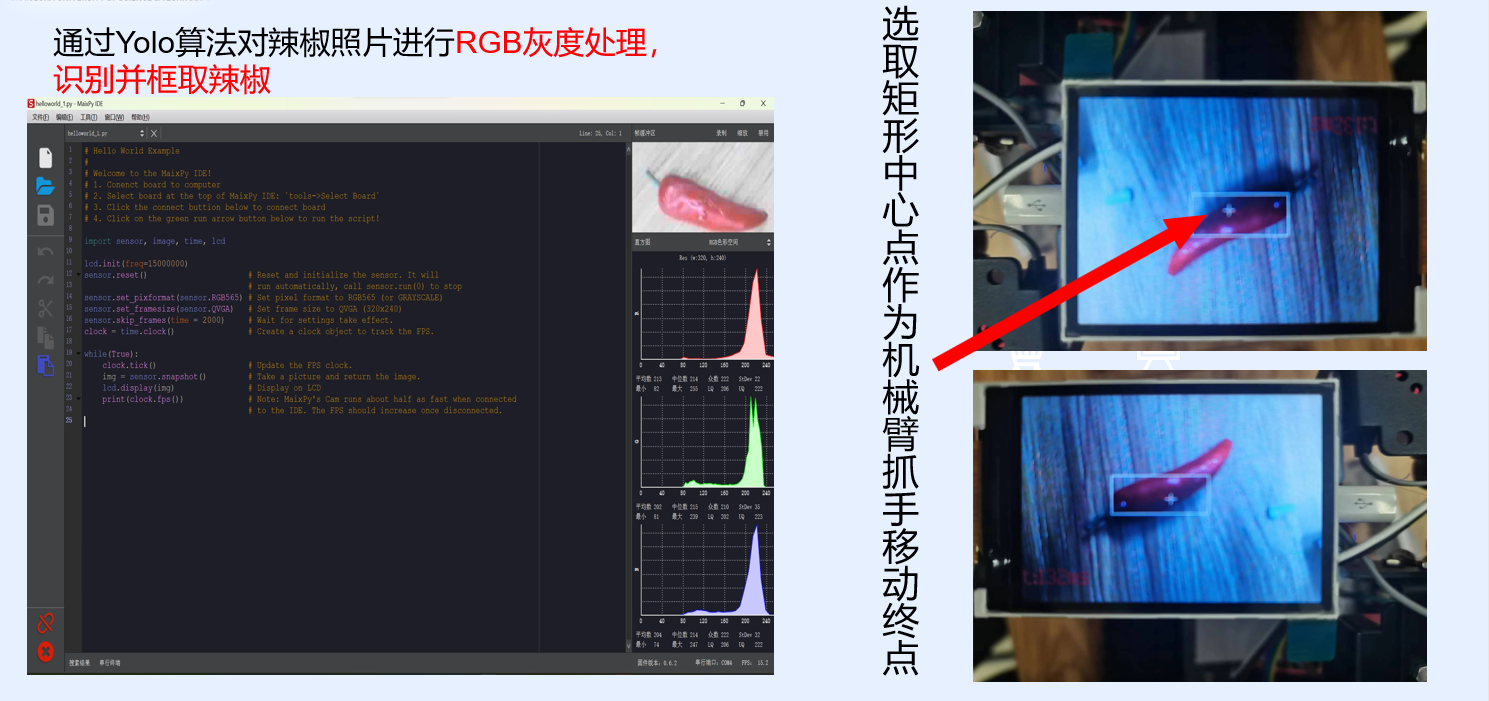
- When k210 recognized object the microcontroller send a message to stop the car with PID adjust system.
- Then k210 utilize pre-trained model to estimate the precentage of the possibility of recognization,if obtained recognize resuit over the number you set befor,k210 will send the location imformation to the microcontroller so that mircocontroller could according to that to control the mechanical arm
- If successfuly grabed,it will continue going on patrol.If not it will try again
This robotic arm is designed to be controlled via a remote interface and can be integrated with different sensors and end-effectors to suit a range of applications.
- Microcontroller (e.g., Arduino, Raspberry Pi)
- Servo motors with appropriate drivers
- Robot arm frame (3D printed or custom made)
- Power supply (compatible with the microcontroller and servo motors)
- Optional: Sensors (e.g., distance, touch, vision)
- A compatible Integrated Development Environment (IDE) for coding (e.g., Arduino IDE, VSCode with the PlatformIO extension)
- Programming language support (typically C++ for Arduino or Python for Raspberry Pi)
- Assemble the physical components of the robotic arm according to the provided schematics.
- Connect the servo motors and sensors to the microcontroller.
- Power up the system and ensure all components are functioning correctly.
- Install the necessary libraries and dependencies using your IDE's package manager.
- Open the main control sketch or script in your IDE.
- Customize the movement sequences or control algorithms as needed.
- Upload the code to the microcontroller.
- Use the remote interface to operate the robotic arm.
- Ensure all connections are secure and components are powered correctly.
- Check the code for any syntax errors or logical issues.
- Consult the documentation for your specific microcontroller and sensors for common troubleshooting steps.
We welcome contributions to this project. Please follow these guidelines:
- Review the contributing guidelines.
- Fork the repository and create a new branch for your changes.
- Make your changes and commit them with a clear message.
- Open a pull request with a detailed description of your changes.
This project is licensed under the GPLv3 License. You are free to use, modify, and distribute this software, but you must adhere to the terms specified in the license.
For any questions or support, please contact us at [email protected].
A comprehensive system for managing and simulating the operations of a patrol car, including navigation, incident reporting, and communication features.
The Patrol Car Project is designed to enhance the efficiency and effectiveness of law enforcement patrol operations. It includes a user interface for officers, a tracking system for command centers, and an incident reporting module.
- Computer with a minimum of 4 GB RAM
- GPS receiver (for real-world navigation)
- Optional: Mobile data terminal for in-car use
- Operating System: Windows 10, macOS Catalina, or later
- Node.js and npm (for running the application)
- A code editor such as Visual Studio Code
- Clone the repository to your local machine:
git clone https://github.com/1716775457damn/K210_machanical-arm.git
- Navigate to the project directory:
`cd patrol-car-project`
-
Install the required packages:
npm install
-
Start the application:
npm start -
Access the patrol car dashboard through your web browser at
http://localhost:3000.
- Navigation System: Plan routes and receive real-time traffic updates.
- Incident Reporting: Quickly document incidents with a streamlined reporting tool.
- Communication: Interact with the command center and other units through a built-in messaging system.
We welcome contributions to the project. Please follow these steps:
- Review the contributing guidelines.
- Fork the repository and create a new branch for your changes.
- Make your changes and commit them with a clear message.
- Open a pull request with a detailed description of your changes.
If you encounter any issues:
- Check the FAQ for common problems and their solutions.
- Consult the documentation for detailed information on configuration and setup.
This project is licensed under the*MIT License* You are free to use, modify, and distribute this software, but you must adhere to the terms specified in the license.
For any questions or support, please contact us at [email protected].
This system utilizes sensors and actuators to collect data about the home environment and processes it through a cloud platform for device control. Capabilities include, but are not limited to, temperature control, lighting control, and security monitoring.
- Python 3.8 or higher
- MQTT protocol support
- At least one MQTT-capable smart home device
- Clone the project to your local machine:
git clone https://github.com/1716775457damn/K210_machanical-arm.git
- Navigate to the project directory:
`cd your-repo`
- Set up a virtual environment (optional but recommended):
python -m venv venv source venv/bin/activate # On Windows use `venv\Scripts\activate`
Configure your MQTT broker settings in the config.ini file.
Run the main application:
python main.py
We welcome contributions to the project. Please follow these steps:
- Fork the repository.
- Create a new branch for your changes.
- Commit your changes and push to the new branch.
- Open a pull request.
For bug reports or feature requests, please use the issue tracker
This project is licensed under the MIT License
For any questions or inquiries, contact us at [email protected].