| title | description | published | date | tags | editor | dateCreated |
|---|---|---|---|---|---|---|
Self Hosting-on-AWS |
true |
2023-06-16 16:11:41 UTC |
markdown |
2020-09-23 00:34:51 UTC |
NOTE: The AWS Free Tier provides 1GB of RAM. This is below the minimum requirements for a dedicated Foundry server. You run the risk of running out of RAM and Foundry crashing, especially on heavier game systems, using many modules, or importing a lot of content into a world. {.is-warning}
While the official KB provides some useful information for setting up Foundry VTT on AWS, a complete guide to doing so is outside its scope. However, a guide to doing so that also outlines some best practices for the use of Amazon Web Services seems like it would be handy to help others along and make their setup process a little smoother. This guide is intended as an outline of the basic infrastructure needed and how to set it up on AWS. It is not intended as a guide for setting up and configuring the server itself. The excellent Linux installation guide here more than adequately documents how to set up the actual webserver and Foundry server. I'll relink it again at the appropriate point in this guide, but you might want to keep it open in a separate tab. Also, while this guide is intended to be approachable by people with little to no experience with the AWS platform, it is not intended as a general introduction to it.
I personally selected AWS in particular because it offers a very robust cloud hosting platform with a deep list of options and services at a competitive price. Additionally, for those who haven't used AWS before, they offer new accounts a number of services free for the first year, which covers most of the expense of self-hosting Foundry in the cloud, and the fees for hosting are nominal thereafter. AWS is by default pay as you go for all services, and only a certain level of usage is covered under the free tier. If you are concerned about the potential charges involved, I highly suggest setting up a billing alert using AWS Cloudwatch after setting everything up. Amazon will automatically notify you when it projects you'll go over your limits. Do note that as the author of this guide, I do not take responsibility for any overage charges accidentally incurred. I will do my best to keep everything within the free tier, however.
Requirements for this guide are a web browser, a notepad app, and possibly some patience. The Ubuntu server setup guide requires an SSH client and some familiarity with the Linux command line.
If you already have an AWS account, please feel free to skip this section. Everyone else, the first thing you'll need is an AWS account -- go to aws.amazon.com and click the Create an AWS Account button in the top right. Fill out the forms as listed, setting up a Personal account. Do note that when it asks you for a payment method, you must provide a valid payment method. Even on the free tier, they will test the card with a nominal $1 charge to test to see if it's valid. This charge will be credited back to your account after 3-5 days. When they ask you to select a support plan, pick Basic, and you're done. After you receive confirmation via email that the account is set up, you can log into the console and proceed.
Now that we have created an AWS account, we're going to create a couple of sub-accounts for the actual setup and management. When you set up your AWS account, you created what they call a "root account", which has the keys to the entire castle. Ideally, you'd use a less privileged account for the actual day to day tasks.
We're going to set up two accounts:
- An admin account to set up and manage the services we'll be using.
- A system account to let Foundry VTT access an S3 bucket for static hosting and object storage.
Locate the Services menu at the top of the AWS console.

Then on the menu that drops down, select IAM.
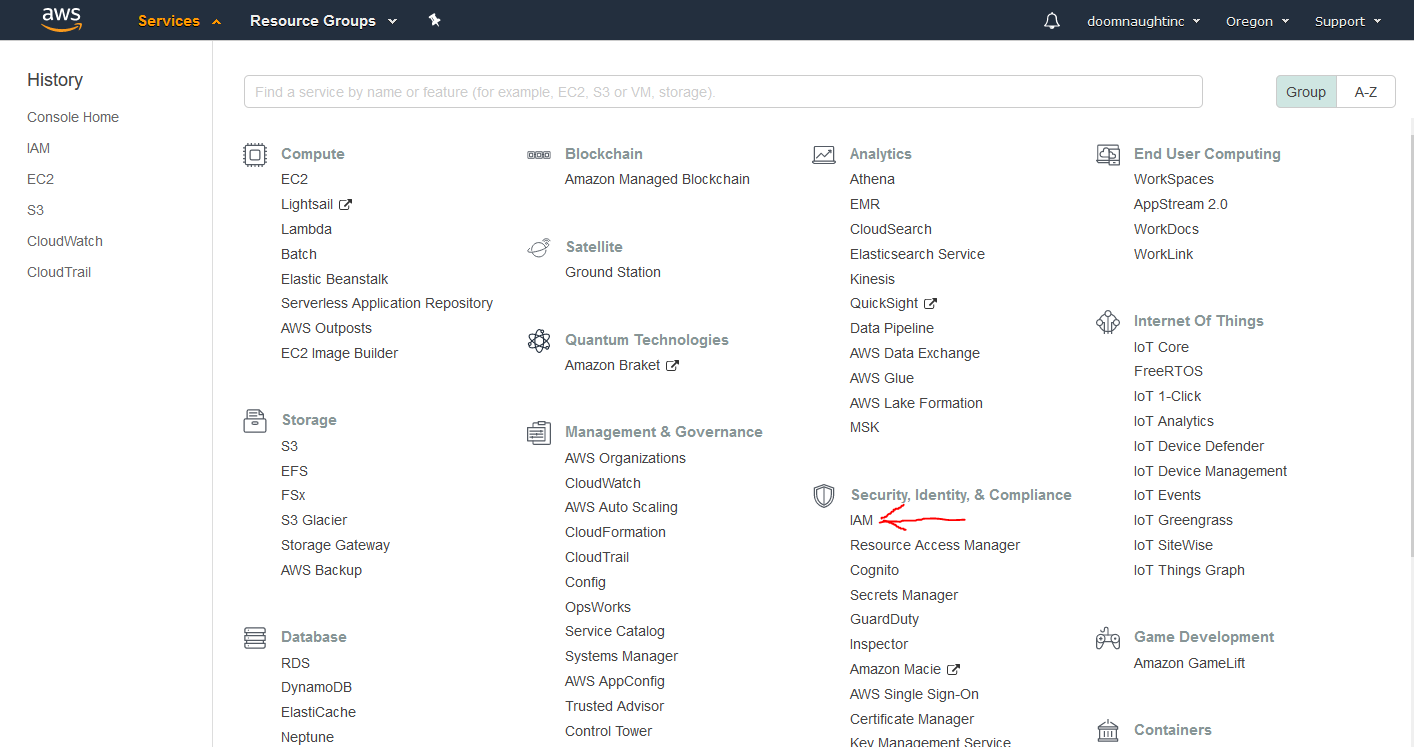
You should see the main page for AWS Identity and Access Management (IAM) come up.
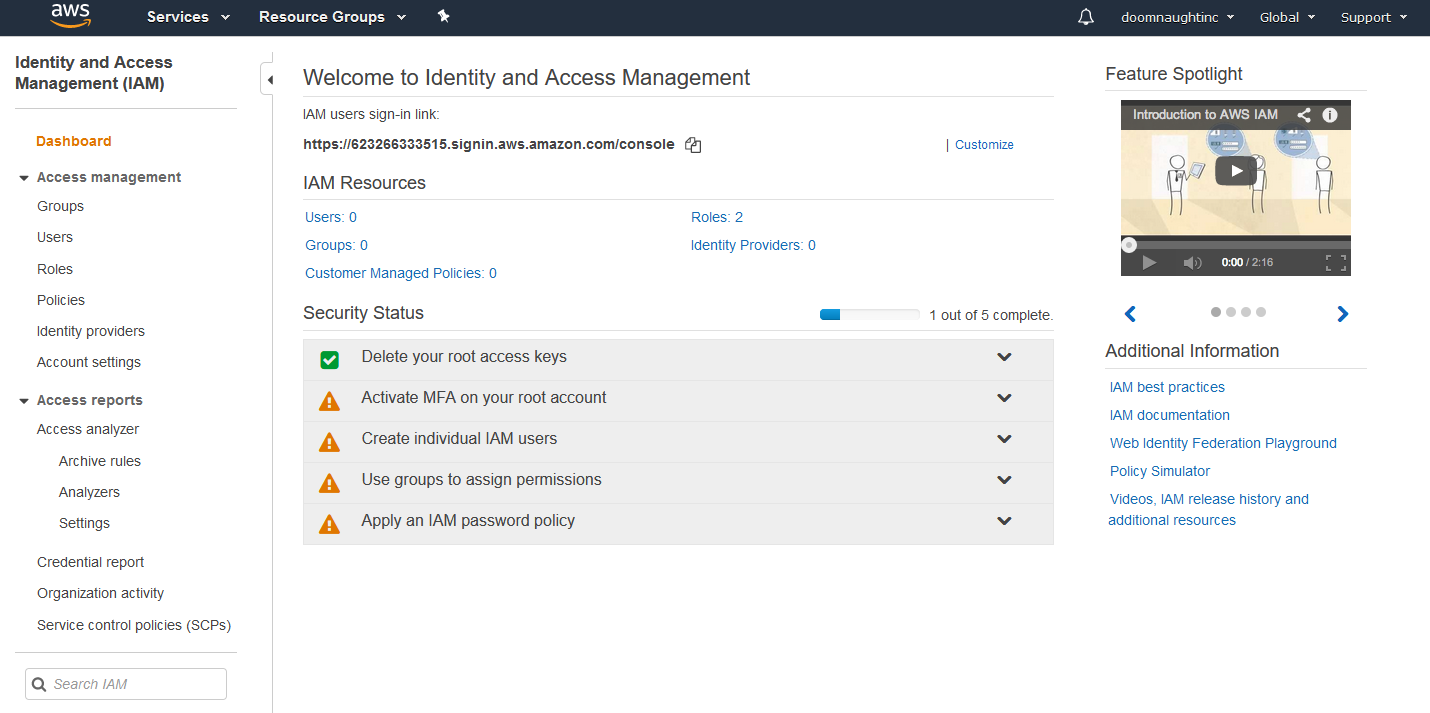
Right now we're most concerned about the Users link on the left. Click it and an empty user list will come up. First, we're going to set up the admin user. Click Add User at the top, and fill out the form that comes up.
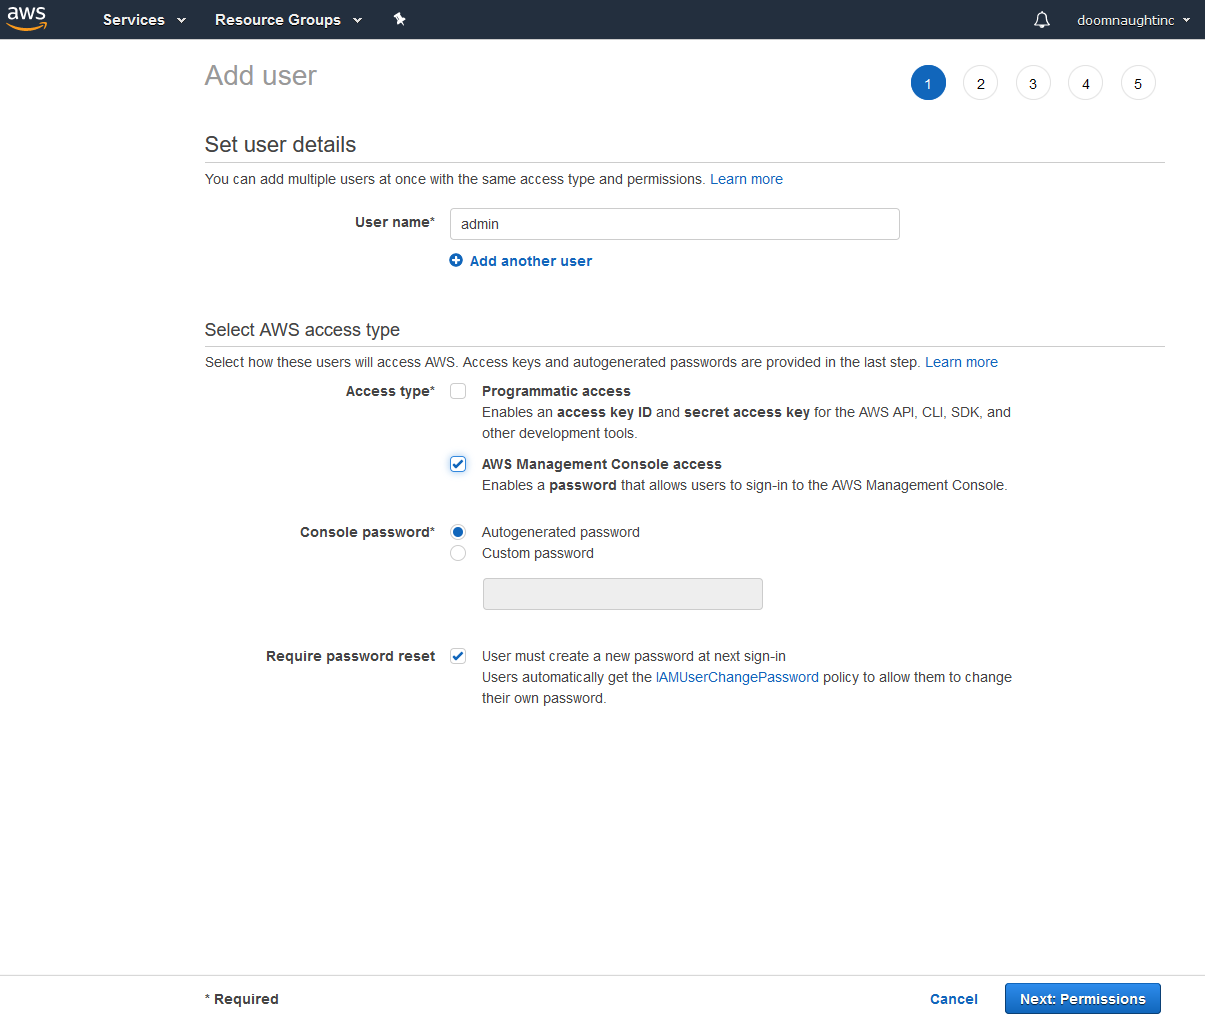
You can set the user name to whatever you'd like -- I put admin here for simplicity's sake. This user doesn't need a programmatic access key, so select AWS Management Console access only, and set them up with a custom password. Uncheck Require password reset as you don't need to reset a password only you should know. Click Next to get the set permissions dialog.

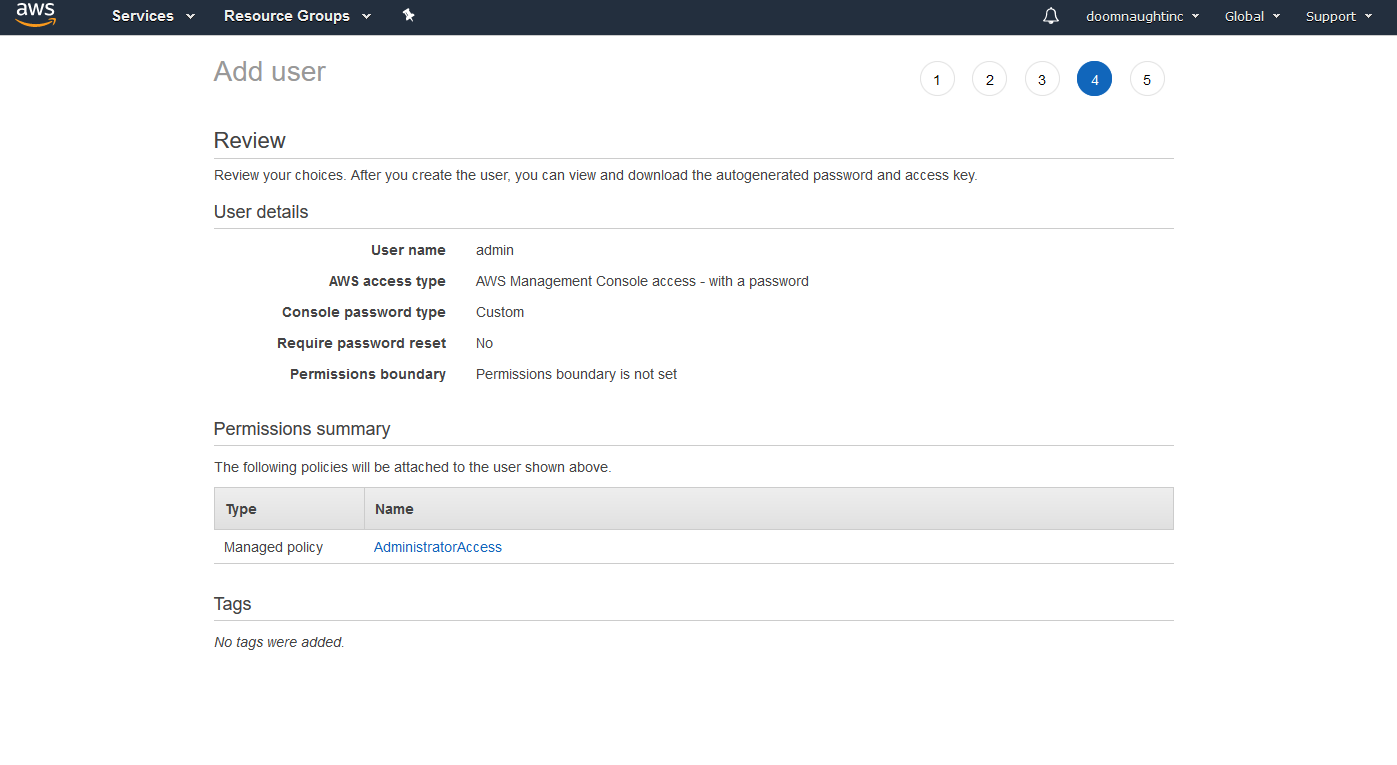
I've selected Attach existing policies directly and selected AdministratorAccess. This will allow your admin account to manage all AWS services. In a real world environment, we would want to be more picky on permissions, but this will do for this guide. Hit Next to go to the Tags page, then Next to review the account, then Create User. Hit Close in the bottom right after you're done.
Now that you have an admin account set up, let's create a user that Foundry will use to access assets on S3. Follow the same Add User process again, but this time give the user a name like "foundry-s3-user". Instead of giving them Console access, give them Programmatic Access. Don't attach any policies, and click through to the final screen. On step 5, you'll have the option to download a CSV file -- this contains the credentials that Foundry will use. Download it, but keep it somewhere safe.
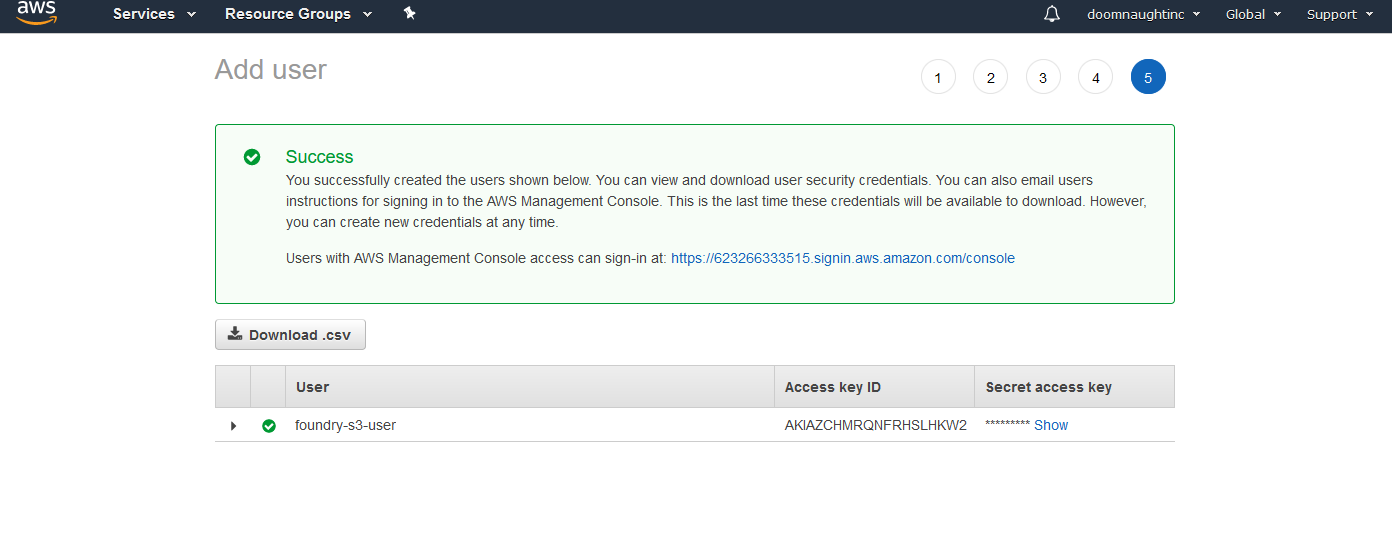
Our users are now set up. We'll revisit the foundry-s3-user in a later step to grant them actual access to S3, but we need to set up the S3 bucket before we can do that. Before we leave the first part of IAM setup, there's a couple more things we need to do. Click the Dashboard link on the left to go back to the main dashboard.
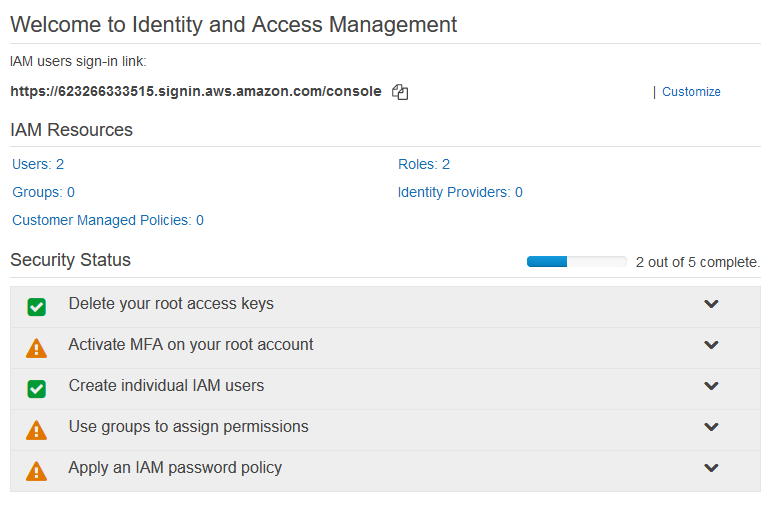
At the top, I'd recommend clicking Customize by the IAM users sign-in link and giving the account an easy to remember name. This will make it easier to log in as the admin user. The name has to be globally unique, but once you've set a friendlier name, you'll get a link you can copy and paste into a bookmark. Additionally, the checklist under Security Status is AWS' recommended ways to secure your account. At the very least, I suggest activating multi-factor authentication (MFA) on the root account. Google Authenticator and Authy are both good MFA apps available for all major smartphones. Once you log in with the admin account, you can come back to IAM to set up MFA for that user as well, and I recommend doing so.
Now that you have a customized signin link and a separate admin user, open up a new tab, paste in your signin link, and log in under the admin account.
On the same services menu you used to get to IAM, you'll note that EC2 is in the top left corner. This is because it is far and away Amazon Web Services' most heavily used service. It provides access to the setup and maintenance interface for the virtual private servers that put AWS on the map. This setup guide will be using screenshots from the New EC2 Experience control panel. If you toggle it off, things won't look exactly the same, but the same options should still be roughly available. However, as this is probably the most complex part of the infrastructure setup, I advise toggling on the New EC2 Experience for clarity's sake.
Before we get started, I need to introduce a basic concept: AWS regions. All AWS resources launch in a given region, usually indicated by a locale code, then what side of the locale it's in, and then the number of the region on that side of the country. For instance, AWS' Oregon data centers fall under US-West-2, while their Dublin data centers are EU-West-1. You can see what region you're in at the top right of any AWS dashboard. I suggest using one that's close to all of your players, to minimize latency.
On the left hand toolbar, click on Instances. You should see the following screen.
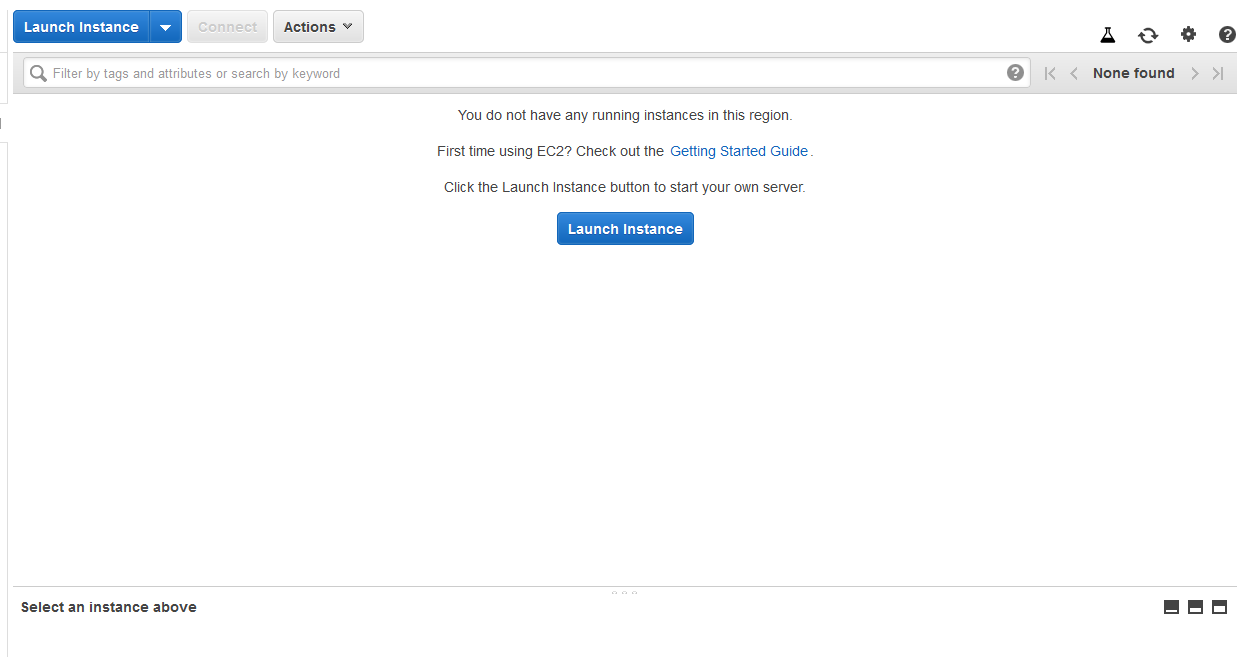
Click on either of the Launch Instances button. That'll take you to the page for selecting the AMI you want to launch. AMIs are base templates for instances -- they provide the OS install and a preselected software package. In this case, the Ubuntu 18.04 image will just come with Ubuntu and an assortment of must-have utilities.

For this guide, we'll be using the Ubuntu Server 18.04 LTS (HVM), SSD Volume Type AMI. Leave it on the default of 64-bit (x86), and hit Select. The next screen will let you choose the type of instance you want to use. It should default to t2.micro, which is reasonable for a Foundry server. Also, as the little label by the type will mention, it's eligible for free tier, which no other instance type is. Hit Next: Configure Instance Details.
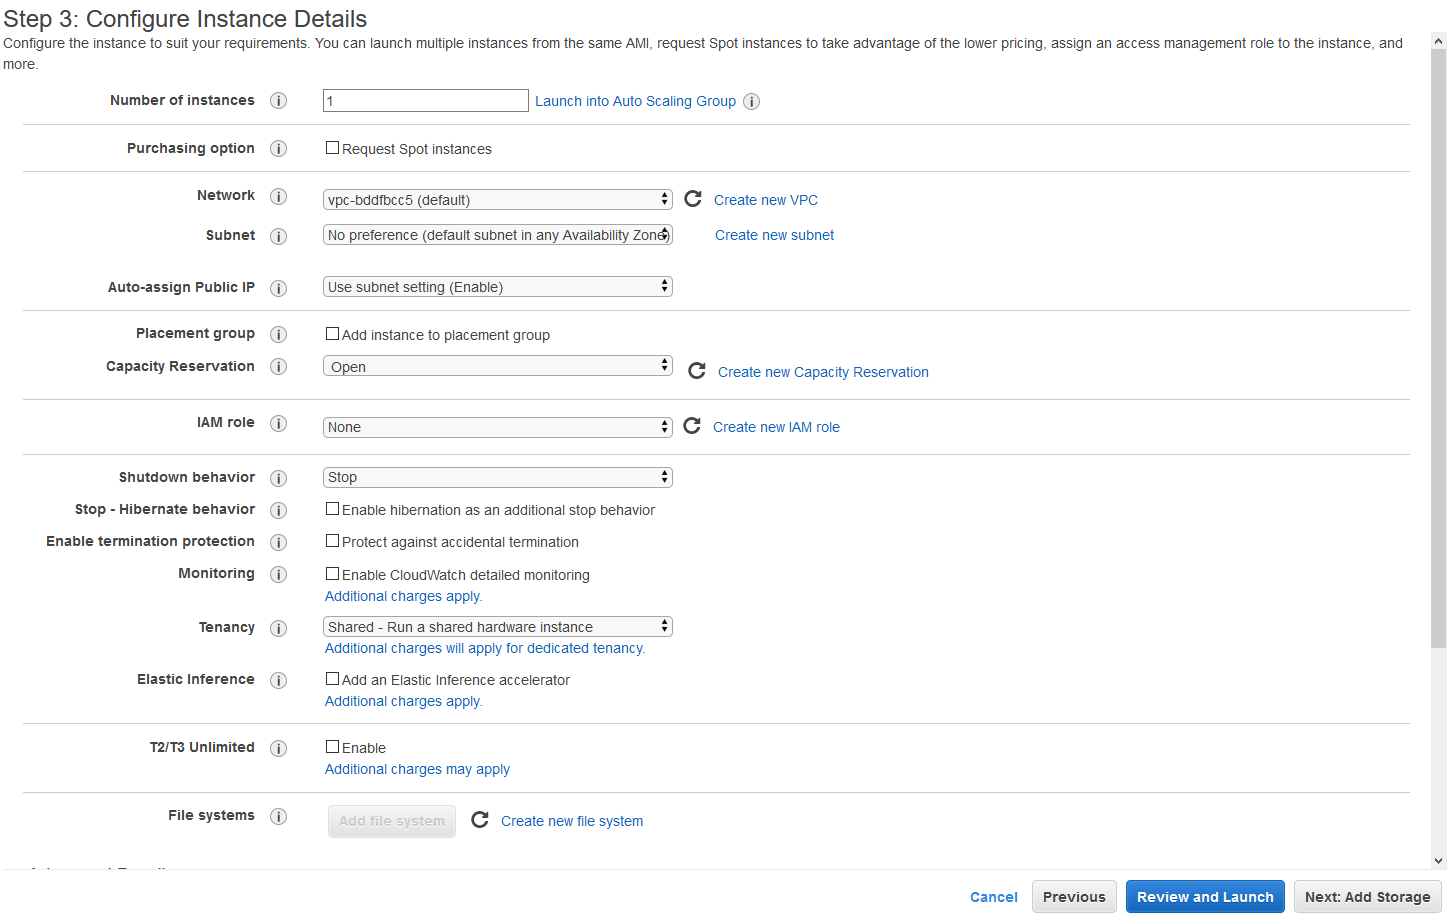
I have not included the full list as you can ignore most of them. Just make sure Number of instances is set to 1, and Auto-Assign Public IP is set to Use Subnet Setting (Enable) or Enable. Your instance will need a public IP to be accessible from the wider internet. The rest is a fairly reasonable set of defaults. Click Next: Add Storage.
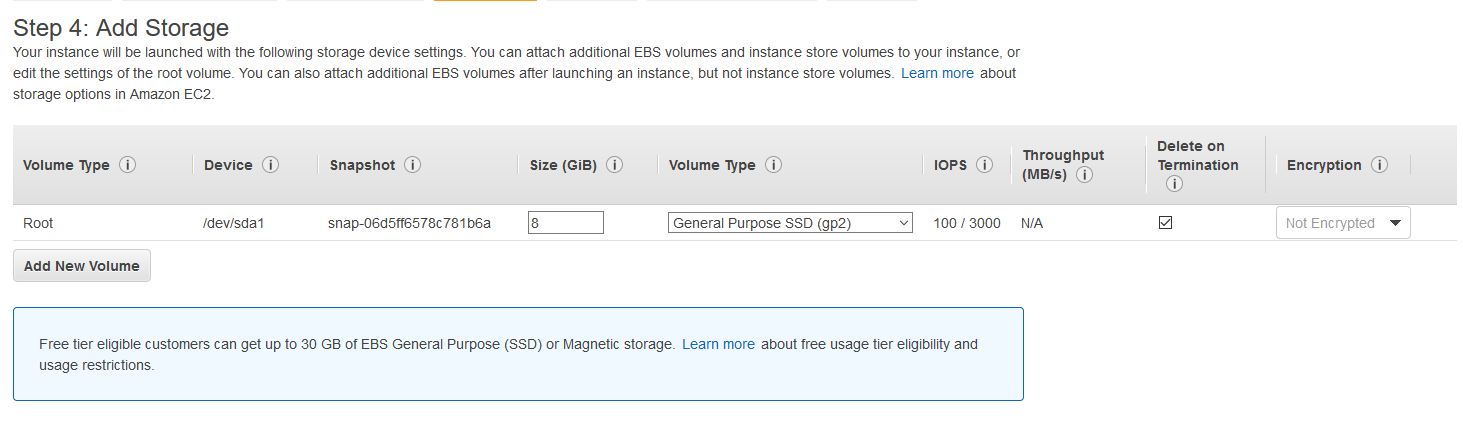
This set of defaults is perfectly reasonable, as we will not be storing the game assets on the instance itself. Ubuntu 18.04 Server and Foundry, along with all the required dependencies, take up about 2.2gb installed. Storage-heavy data like images will get pushed to S3, which is generally cheaper for storage and serving them up after the free tier benefits end. If you'd prefer on-instance asset storage, you can provision this with as much space as you think you'll need and use the standard local storage options in Foundry. However, do note that the charge for EBS space is higher, per gigabyte-month, than S3.
Once you've settled on how to handle your storage, click Next: Add Tags. You can add any tags you might want in key-value pairs here, but none are required. Tags are generally handy if you're running a number of different servers tasked with different things, so you might want to at least set a Name tag for your instance, but again, it's not required. Click Next: Configure Security Group.
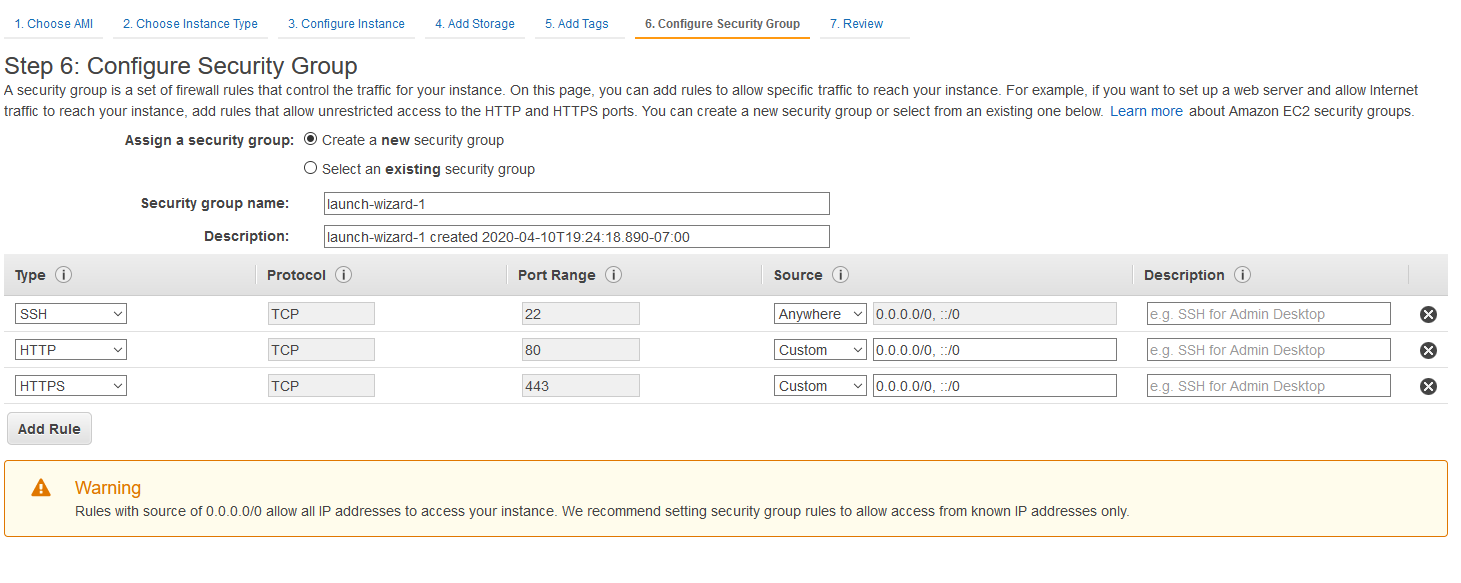
This is where you're going to set up the traffic allowed through to your instance. By default, your instance will permit SSH traffic for management from anywhere. You can make this more secure by clicking on the dropdown that says Anywhere, and changing it to My IP. AWS will automatically pull the public source IP for your traffic and restrict SSH traffic to that IP only. Please note that most residential ISPs do dynamic public IP addressing, so you are not guaranteed to have the same address day to day -- if SSH login works one day, but not the next, you'll need to edit the security group later.
If you intend on using nginx as a reverse proxy, like the Ubuntu VM guide lays out, you'll want to hit Add Rule twice and add rules to let traffic in on TCP ports 80 and 443. If you are just going to run Foundry on the instance by itself, you'll want to let in TCP port 30000 (or whatever port you intend to put Foundry on). You may also need to allow additional ports through for voice and video traffic -- I'd advise referring to the guides for those to get the appropriate port ranges.
You can edit security groups at any time via the EC2 control panel, and changes are instant, so don't feel you have to get things perfect right now. SSH, HTTP, and HTTPS are the minimums required to setup Foundry and verify it's working. Click Review and Launch when you're ready to move on. This will bring you to the last page, which lets you review your instance setup. There is one final task to do before the instance is launched. Click Launch, and this window should pop up.

By default, EC2 uses key pairs to regulate access. Select Create a new key pair, give it a name, and hit download. Save it somewhere safe where you will remember it. I cannot emphasize this strongly enough: if you lose this file, you will not be able to log into your instance. The instance will need to be recreated -- no one, not even AWS Support, can recover a lost private key.
Hit Launch, wait while the spinner spins, then hit View Instances once you get the Launch Status page. A new instance can take a few minutes to go from zero to hero, so go get a glass of water and come back. Refresh the page, and it should show as running and passing the status checks. Highlight it if it isn't already, and get the IPv4 Public IP out of the information at the bottom. Copy-paste that to a notepad, we'll need that later.
If EC2 is what runs everything on AWS, S3 is what stores it (mostly). The service mostly lives up to its name, as it provides an easy way to store large amounts of objects. These objects can be, so far as we're concerned for this, of basically unlimited size -- sending more than 5gb in a single file requires special transfer methods, but other than that, as long as you're willing to pay per gigabyte-month for it to get stored, they'll host it. Open the Services menu and click on S3 near the top left.
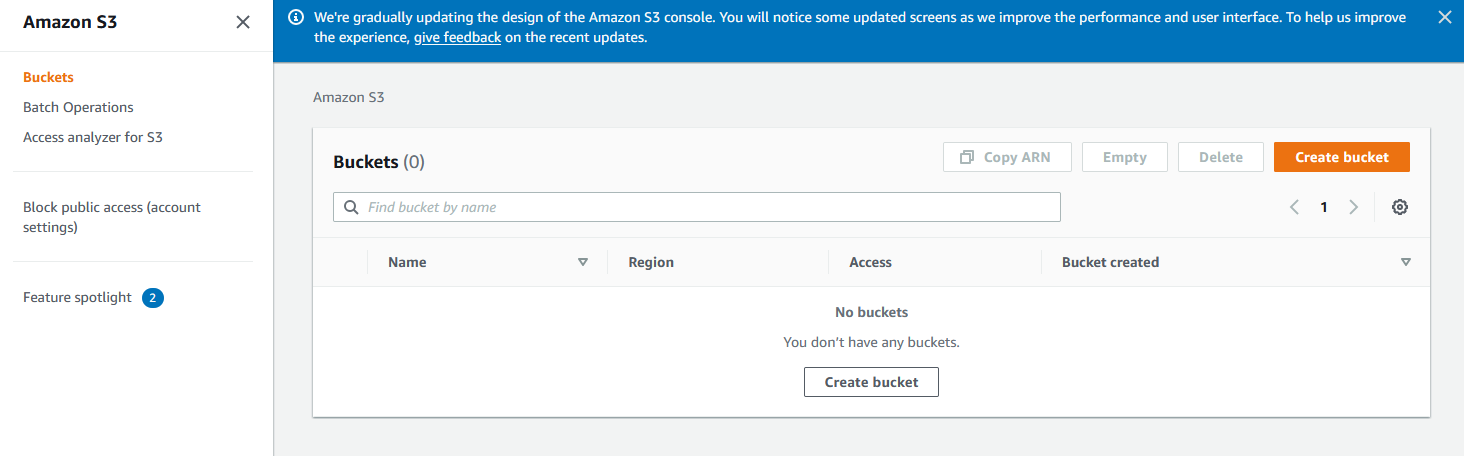
This is the basic S3 console. Hit Create Bucket.

The bucket name needs to follow a certain set of conventions. First, it can only contain lowercase letters, numbers, and dashes. Second it must be globally unique across all AWS regions and accounts -- for example, if I create a bucket called foundry-vtt-assets, you cannot create a bucket with the same name, even though we're using separate accounts. Leave the region on the default. Under Bucket settings for Block Public Access, uncheck Block all public access and acknowledge the risk.
Normally, I would not use this setting, but Foundry requires that the bucket be made public as it links players directly to assets in the bucket. If the bucket isn't public, the links won't work. Hit Create Bucket. Using the public permission for your S3 bucket is a security risk!
When you go back to the dashboard, you should see the new bucket there. Click on the little circle to the left of the name and click Copy ARN above it. Paste that into a notepad -- we'll need it in the next section. Click on the bucket name after you've got the ARN.

This is the bucket itself. Click on the Permissions Tab, then click on CORS configuration. The Foundry defaults for bucket setup can be found here. I suggest just copy-pasting the CORS configuration on that page in and hitting save.
Additionally, while we have made the bucket public, objects in it are not public by default. Both the bucket and the objects in it need to be public in order for Foundry to use S3 for static content. Click on Bucket Policy by the CORS configuration, and paste in the following bucket policy. Insert your bucket name in the Resource line.
 {
    "Version": "2012-10-17",
    "Statement": [
        {
            "Sid": "PublicReadGetObject",
            "Action": "s3:GetObject",
            "Effect": "Allow",
            "Resource": "arn:aws:s3:::<your bucket>/*",
            "Principal": "*"
        }
    ]
}
AWS will warn you that the bucket has public access. Again, this is generally not best practices, but it is required for Foundry to use S3. Please do not put anything in this bucket that you are not comfortable sharing with the world.
That's it for bucket setup. Now all we have to do is set up our system account to have permissions to access only this bucket.
We need to set up a custom policy that locks down the user we set up for Foundry to access S3 and allows them to only access Foundry-related assets. If this is the first time you've used AWS, it may not seem like it's necessary at this point, but if you start using it for more and more tasks, you'll come to appreciate restricting accounts access to anything they don't need. First we need to set up a custom permissions policy. Click Policies on the left, then click Create Policy. This will bring up the Policy Editor.
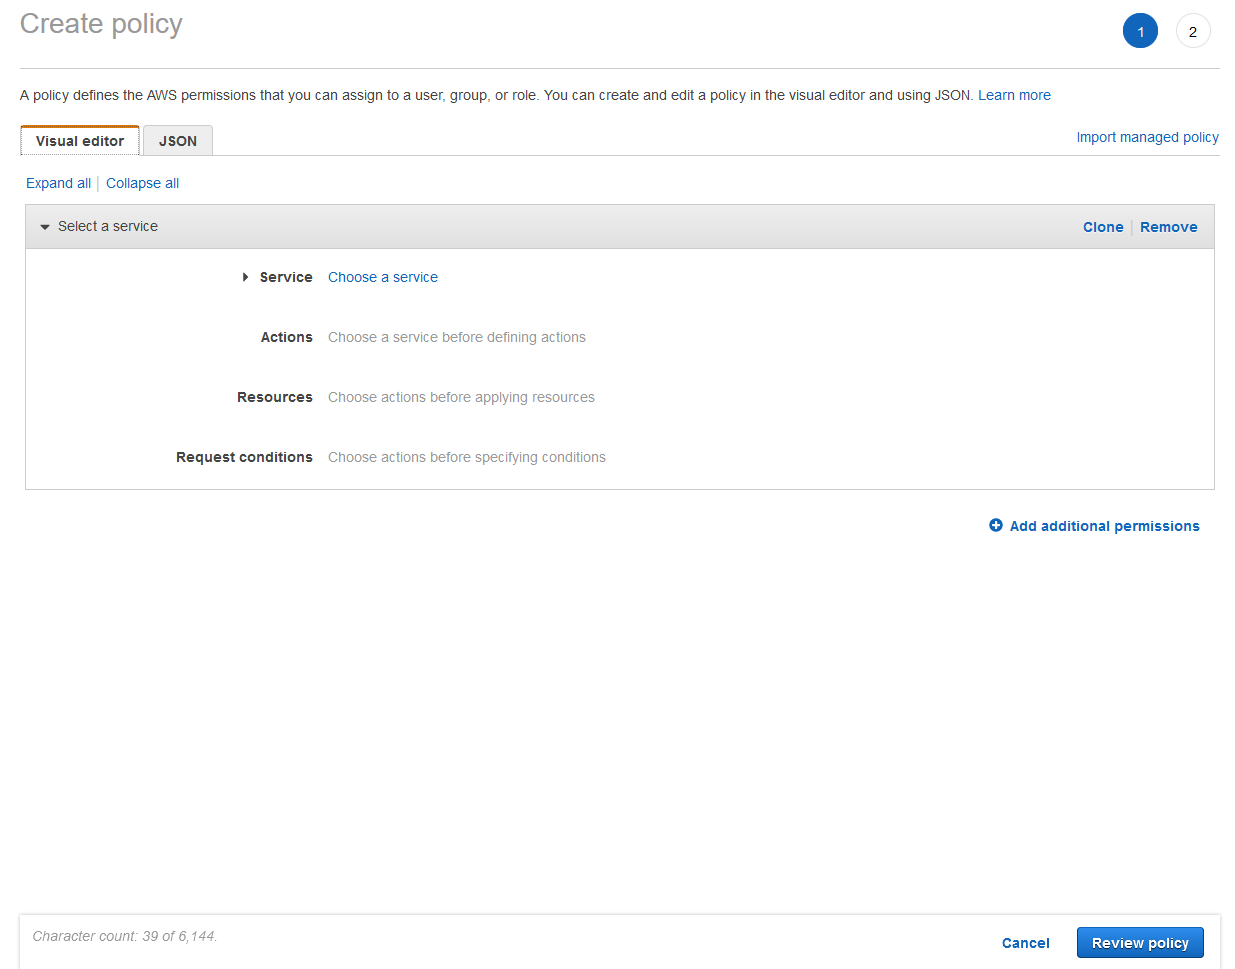
Click the JSON tab, delete the text already in the field, and paste in the following policy. Under Resource in the part of the statement with SID "VisualEditor0", put in your S3 bucket ARN that you copied down in the prior section.
{
    "Version": "2012-10-17",
    "Statement": [
        {
            "Sid": "VisualEditor0",
            "Effect": "Allow",
            "Action": [
                "s3:PutObject",
                "s3:GetObject",
                "s3:ListBucket",
                "s3:DeleteObject",
                "s3:PutObjectAcl"
            ],
            "Resource": [
                "<Insert bucket ARN>/*",
                "<Insert bucket ARN>"
            ]
        },
        {
            "Sid": "VisualEditor1",
            "Effect": "Allow",
            "Action": "s3:ListAllMyBuckets",
            "Resource": "*"
        }
    ]
}
Hit Review and give it a name that's easy to find -- like foundry-s3-access-policy. Next, click Users on the left hand side, then click on the name of your Foundry S3 user. You'll see a large button asking you to add permissions to the account, as it does not currently have any. This will bring up the Grant permissions dialog.
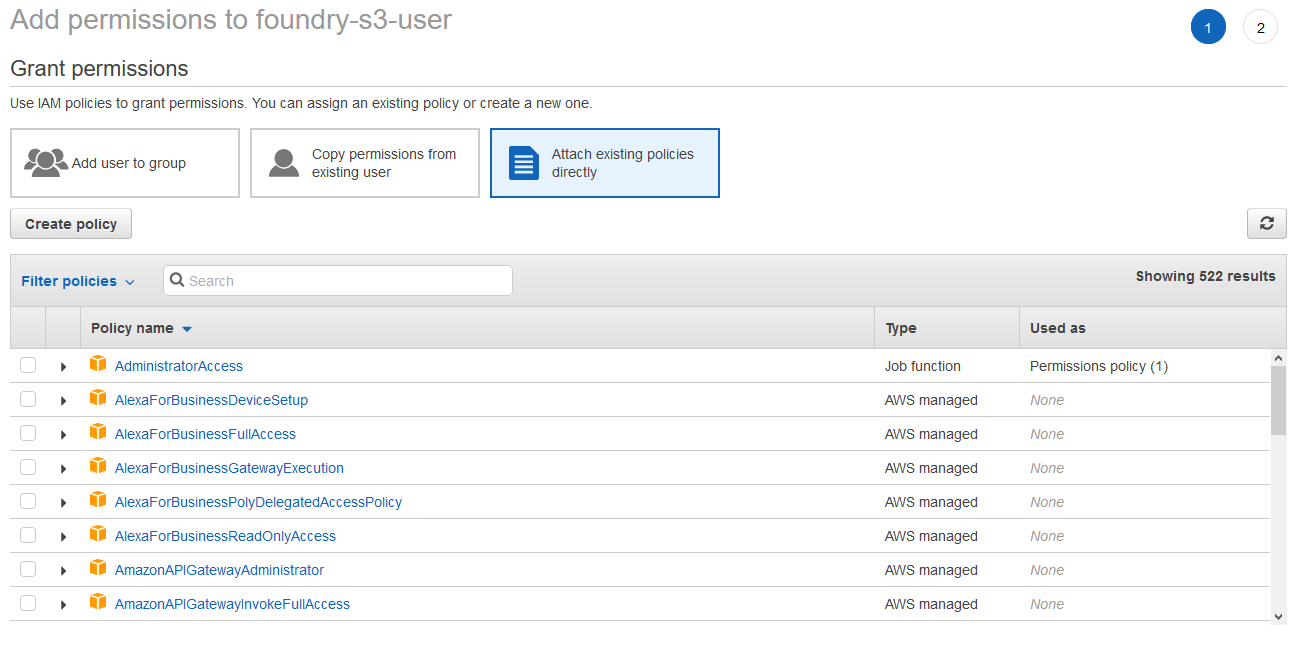
Click the Attach existing policies directly button. This will bring up a long list of Amazon-made permissions policies, but you can use the search bar at the top to bring up the policy we just made by searching for its name. Click the checkbox by it, and hit Next: Review, then Add Permissions.
You're now ready to set up your new AWS-hosted Ubuntu server with Foundry. Again, you can find the generic guide [here]https://foundryvtt.wiki/en/setup/linux-installation).
You'll need the private key you created in order to log in via ssh. Before you log in, though, you'll need to change the permissions on the keyfile so other users on your computer can't read it. On Linux/MacOS, you can do so with the following command:
chmod 600 /path/to/private_key.pem
A typical SSH command to log into an EC2 instance at the command line looks like this, with the file path to the private key replaced by your path:
ssh -i /path/to/private_key.pem ubuntu@<your-instance-public-ip>
This should work in both a Linux or MacOS terminal.
For Windows users, I advise using the free terminal emulator PuTTY. AWS themselves have a complete guide on how to connect to a running EC2 instance using PuTTY which is quite easy to follow.
After you've set up Foundry, you'll want to add in the information that Foundry needs to connect to S3. First, you need to create a .json file to contain the access key ID and secret access key, as well as your preferred region. You can place this anywhere you like, but for simplicity's sake, I like to put it alongside my options.json file, like so.
nano ~/.local/share/FoundryVTT/Config/aws.json
The precise path will vary based on how you installed it. The keys you need are in the .csv file you made all the way back in IAM, part 1. The region is the AWS-compliant name of the region your bucket is located in -- if you hit the Regions dropdown in the top right, it'll be in all lower case next to the friendlier name (e.g. us-west-2). Copy and paste the following into your aws.json file, replace the accessKeyId, secretAccessKey, bucket, and region with the appropriate selections:
{
    "region": "<your region>",
    "buckets": ["<your bucket name>"],
    "credentials": {
    	"accessKeyId": "<your access key id>",
    	"secretAccessKey": "<your secret access key"
    }
}
Save the file, then go into the Configuration tab of the Foundry setup page. Put the file path for the .json file into the AWS Configuration Path box, and hit Save Changes. Note that is is from my personal setup -- yours may look different.

Once you've done that, you should be able to launch a game table and open the image browser. You should see a tab for Amazon S3 that will let you choose objects uploaded to S3 as well as upload objects to S3. Note that if you like organization, you cannot create folders or delete in S3 from this tab at this time -- you'll need to use the S3 console to create folders for organization, or remove media you no longer need.
It's possible to use alternate storage providers other than S3, as long as they implement an S3 endpoint and provide the S3 API.
- Login to your B2 page and open the Buckets menu, then select Create a Bucket.

- Give the bucket a unique name (just as above) and make sure to select Public for bucket files.

- Copy the endpoint from the bucket, we'll need it for the
s3config.json. - Click App Keys, then Add a New Application Key

- Give the key a name. You probably want to restrict its access to your bucket for foundry, as above. If you do, make sure you check the box that says Allow List All Bucket Names.

- Now edit your
s3config.jsonas above with slightly different values. You get yourREGIONfrom your bucket endpoint, for instance if your endpoint iss3.us-west-001.backblazeb2.comthen your region isus-west-001.


{
    "accessKeyId": "ACCESSKEYID",
    "secretAccessKey": "SECRETKEY",
    "region": "REGION",
    "endpoint": "https://ENDPOINT,
    "s3ForcePathStyle":true,
    "signatureVersion":"v4"
  }
- Finally in order to set your CORS rules you need to use the B2 command line tools, which are installed from here. Once installed you'll need to authorize them with an app key,
b2 authorize-account appKeyId appKey - Next you need to update the CORS rules:
b2 update-bucket --corsRules "[ { \"corsRuleName\": \"bucket-rules\", \"allowedOperations\": [\"s3_get\", \"s3_post\", \"s3_head\"], \"allowedOrigins\": [\"*\"], \"allowedHeaders\": [\"*\"], \"maxAgeSeconds\": 3000 } ]" BUCKETNAME "allPublic"
- Now you can upload
s3config.jsonand configure its path in Foundry as above and you should be good to go.
Like most pieces of documentation, this is a living document. If you run into any issues with the instructions here, please reach out to me. I am @magichateball on the Foundry VTT Discord and will do my best to field any questions you have related to these instructions.