Tutorial
Let's investigate sidecar-less with Ambient Mesh
For Day 83 (and the final day of Service Mesh for #90DaysOfDevOps), I decided to provide some background on Istio Ambient Mesh, to provide more approaches to onboard a service mesh.
Istio has been around for a while and has been significantly battle-tested against various conditions, scenarios, configurations, and use-cases.
Design patterns have emerged where the sidecar might inhibit performance of applications and through experimentation and a constant feedback loop, Ambient Mesh was born. Ambient Mesh was a joint collaboration between Solo.io and Google. You can read abut the announcement here.
Ambient Mesh is still a part of Istio and as of this moment, is in Alpha under Istio 1.17. When you download istioctl, there is an Ambient Mesh profile.
-
Reduced resource consumption: Sidecar proxies can consume a significant amount of resources, particularly in terms of memory and CPU. Eliminating the need for sidecar proxies, allows us to reduce the resource overhead associated with your service mesh.
-
Simplified deployment: Without sidecar proxies, the deployment process becomes more straightforward, making it easier to manage and maintain your service mesh. You no longer need to worry about injecting sidecar proxies into your application containers or maintaining their configurations.
-
Faster startup times: Sidecar proxies can add latency to the startup time of your services, as they need to be initialized before your applications can start processing traffic. A sidecar-less approach can help improve startup times and reduce overall latency.
-
Lower maintenance: Sidecar proxies require regular updates, configuration management, and maintenance. A sidecar-less approach can simplify your operational tasks and reduce the maintenance burden.
-
Easier experimentation: A sidecar-less approach like Ambient Mesh allows you to experiment with service mesh architectures without making significant changes to your existing applications. This lowers the barrier to entry and allows you to more easily evaluate the benefits of a service mesh.
-
Faster time to Zero-Trust: Ambient Mesh deploys the necessary key components to employ mTLS, Authentication, L4 Authorization and L7 Authorization
-
Still Istio: Istio Ambient Mesh still has all the same CRDS present like Virtual Services, Gateway, Destination Rules, Service Entries, Authentication, and Authorization Policies.
-
Sidecar AND Sidecarless: With Istio in Ambient mode, you can still deploy sidecars to necessary resources, and still have communication between
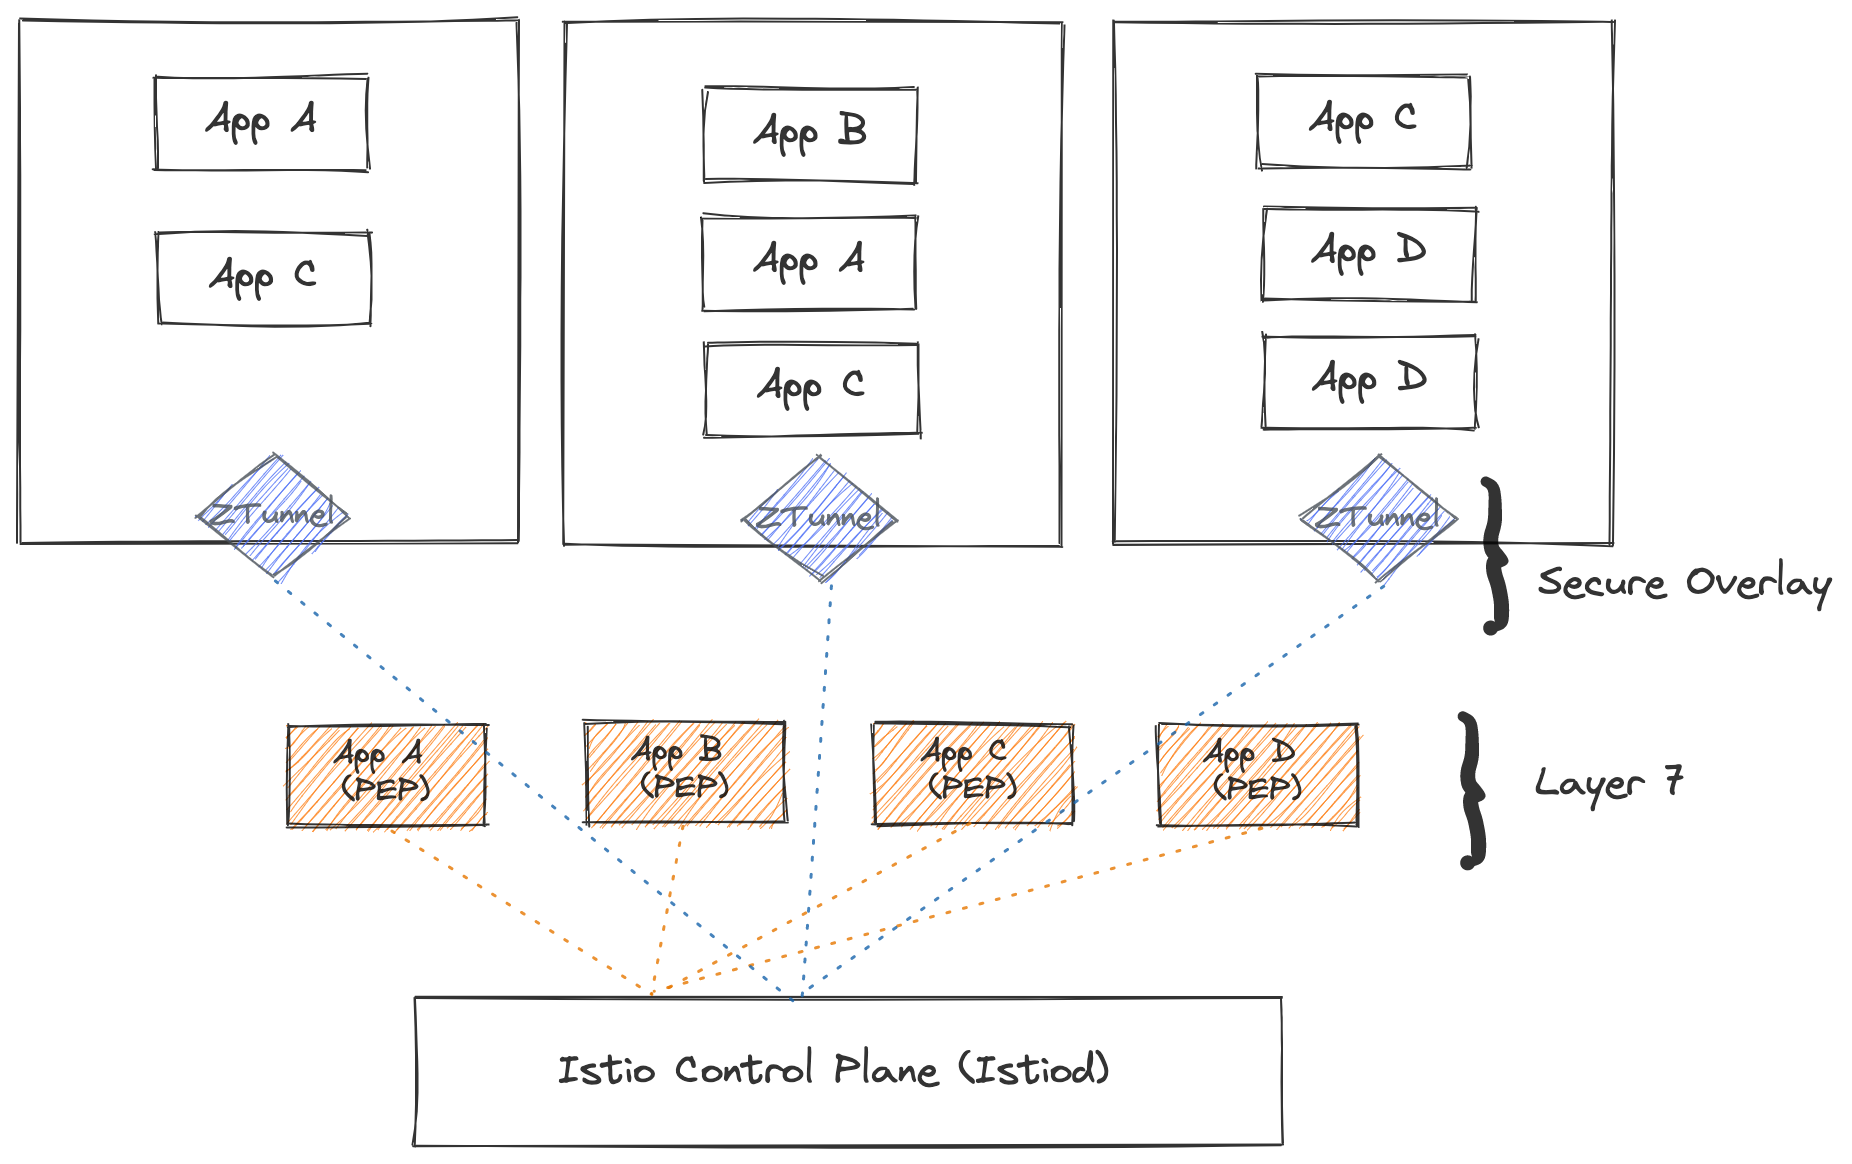
There are several main components that drive Ambient Mesh today:
- Istiod: Which is the control plane for the Istio service mesh and is the point of configuration, and certificate management.
- The L4 Ztunnel: This is strictly responsible for handle mTLS for communicating pods through ztunnel pods on each node. The ztunnel pods form mTLS between each other. The ztunnel is responsible for L4 Authorization as well. This is a
daemonsetin Kubernetes. - The Istio CNI Node: Responsible for directing traffic from a workload pod to the ztunnel. This is a
daemonsetin Kubernetes. - The WayPoint Proxy: The L7 proxy which provides the same functionality as the sidecar, except deployed at the destination of a request to process things like L7 Authorization Policies. This leverages the Gateway API resource.
- HBONE: The tunnel protocol which uses TCP Port 15008 to form tunnels between ztunnels on different nodes and between ztunnels and Waypoint Proxies.
This diagram from this Ambient Security Blog provides a good representation of the architecture.
To enhance the experience and performance of Ambient Mesh, the ztunnel which previously used a slimmed down Envoy instance, now uses Rust. Read more over at this Rust-Based Ztunnel blog
Before we get started, you want to make sure you have a basic Kubernetes cluster. K3s will not work today. I'd recommend KinD or Minikube so you have less restrictions and the setup is pretty easy.
Note You can actually run this on ARM, or x86, so this will run well on your ARM-based MAC. In my setup i'm using x86 based Ubuntu 22.04.
Let's first download the binary which you can select your flavour here: https://github.com/istio/istio/releases/tag/1.18.0-alpha.0
wget https://github.com/istio/istio/releases/download/1.18.0-alpha.0/istio-1.18.0-alpha.0-linux-amd64.tar.gz
And then uncompress the file and change to the directory so you'll have access to the istioctl binary:
tar -xf istio-1.18.0-alpha.0-linux-amd64.tar.gz istio-1.18.0-alpha.0/
cd istio-1.18.0-alpha.0/
Finally, let's make istioctl executable everywhere
export PATH=$PWD/bin:$PATH
Next, let's create your KinD cluster (assuming you already have Docker ready to go)
kind create cluster --config=- <<EOF
kind: Cluster
apiVersion: kind.x-k8s.io/v1alpha4
name: ambient
nodes:
- role: control-plane
- role: worker
- role: worker
EOF
Which should produce the following output after completed:
Creating cluster "ambient" ...
 ✓ Ensuring node image (kindest/node:v1.25.3) 🖼
 ✓ Preparing nodes 📦 📦 📦
 ✓ Writing configuration 📜
 ✓ Starting control-plane 🕹️
 ✓ Installing CNI 🔌
 ✓ Installing StorageClass 💾
 ✓ Joining worker nodes 🚜
Set kubectl context to "kind-ambient"
You can now use your cluster with:

kubectl cluster-info --context kind-ambient

Thanks for using kind! 😊
If you'd like, feel free to verify that the cluster is there by running
kubectl get nodes -o wide
If all looks good, let's install Istio with the Ambient Profile
istioctl install --set profile=ambient --skip-confirmation
Here is the output from my terminal assuming everything works:
marino@mwlinux02:~$ istioctl install --set profile=ambient --skip-confirmation
✔ Istio core installed
✔ Istiod installed
✔ CNI installed
✔ Ingress gateways installed
✔ Ztunnel installed
✔ Installation complete
Making this installation the default for injection and validation.
Let's verify that all the key components have been deployed:
kubectl get pods -n istio-system
And you should see:
marino@mwlinux02:~$ kubectl get pods -n istio-system
NAME                                  READY   STATUS    RESTARTS   AGE
istio-cni-node-2wxwt                  1/1     Running   0          40s
istio-cni-node-6cptk                  1/1     Running   0          40s
istio-cni-node-khvbq                  1/1     Running   0          40s
istio-ingressgateway-cb4d6fd7-mcgtz   1/1     Running   0          40s
istiod-7596fdbb4c-8tfz8               1/1     Running   0          46s
ztunnel-frxrc                         1/1     Running   0          47s
ztunnel-lq4gk                         1/1     Running   0          47s
ztunnel-qbz6w                         1/1     Running   0          47s
Now, we can go ahead and deploy our app. Make sure you're still in the istio-1.18.0-alpha.0/ directory.
kubectl apply -f samples/bookinfo/platform/kube/bookinfo.yaml
And proceed to deploy two additional pods, sleep and notsleep
kubectl apply -f samples/sleep/sleep.yaml
kubectl apply -f samples/sleep/notsleep.yaml
We also need to expose our app via the Istio Ingress Gateway. Let's quickly review the file:
apiVersion: networking.istio.io/v1alpha3
kind: Gateway
metadata:
  name: bookinfo-gateway
spec:
  # The selector matches the ingress gateway pod labels.
  # If you installed Istio using Helm following the standard documentation, this would be "istio=ingress"
  selector:
    istio: ingressgateway # use istio default controller
  servers:
  - port:
      number: 80
      name: http
      protocol: HTTP
    hosts:
    - "*"
---
apiVersion: networking.istio.io/v1alpha3
kind: VirtualService
metadata:
  name: bookinfo
spec:
  hosts:
  - "*"
  gateways:
  - bookinfo-gateway
  http:
  - match:
    - uri:
        exact: /productpage
    - uri:
        prefix: /static
    - uri:
        exact: /login
    - uri:
        exact: /logout
    - uri:
        prefix: /api/v1/products
    route:
    - destination:
        host: productpage
        port:
          number: 9080
If you need a refresher on the Gateway and Virtual Services resources, check out Day80!
The gateway resource here is listening on any host, for port 80 with the HTTP protocol, and is abstracting the Istio Ingress Gateway. The Virtual Service resource is directing requests to the appropriate Kubernetes Service and its port, based on the URI path.
Let's apply it
kubectl apply -f samples/bookinfo/networking/bookinfo-gateway.yaml
Next we can test basic connectivity:
kubectl exec deploy/sleep -- curl -s http://istio-ingressgateway.istio-system/productpage | grep -o "<title>.*</title>"
kubectl exec deploy/sleep -- curl -s http://productpage:9080/ | grep -o "<title>.*</title>"
kubectl exec deploy/notsleep -- curl -s http://productpage:9080/ | grep -o "<title>.*</title>"
Which will all produce the result:
<title>Simple Bookstore App</title>
So we know, we can access our apps and even with Istio installed, we need to enable the Mesh. So....
FINALLY, we're going to throw our services into the ambient-enabled mesh, notice how we label the namespace with the dataplane-mode=ambient versus using the normal istio-injection=enabled label.
kubectl label namespace default istio.io/dataplane-mode=ambient
This label effectively tells the ztunnel to capture the identity of an out-bound workload and act on its behalf for mTLS, whle also telling the istio-cni-node pods to route traffic towards the ztunnel.
You can re-run the curl commands above if you'd like but, I'd recommend just running this looped-curl, and we can check the logs:
for i in {1..10}; do kubectl exec deploy/notsleep -- curl -s http://productpage:9080/ | grep -o "<title>.*</title>"; sleep 1; done
Now, let's review the ztunnel logs:
kubectl logs -n istio-system -l app=ztunnel
And the output:
2023-03-25T15:21:34.772090Z  INFO inbound{id=50c102c520ed8af1a79e89b9dc38c4ba peer_ip=10.244.1.4 peer_id=spiffe://cluster.local/ns/default/sa/notsleep}: ztunnel::proxy::inbound: got CONNECT request to 10.244.2.8:9080
2023-03-25T15:21:29.935241Z  INFO outbound{id=a9056d62a14941a70613094ac981c5e6}: ztunnel::proxy::outbound: proxy to 10.244.2.8:9080 using HBONE via 10.244.2.8:15008 type Direct
The output is very interesting because you can see that notsleep is using the HBONE protocol on port 15008 to tunnel via the ztunnel over to productpage. If you ran kubectl get pods -o wide you will see that the IPs are owned by the notsleep and productpage pods. So NOW you've got a bit exposure to Ambient Mesh, go explore more!
This module has gotten pretty long, but I encourage you to dig deeper into Ambient Mesh and see how you can potentially use it for things like Edge Computing for low-resource environments. If you want some more guided labs, check out Solo Academy!!!
We have certainly reached the end of the Service Mesh section but, I encourage y'all to check out #70DaysofServiceMesh to get even deeper and get ultra meshy 😄!
See you on Day 84 and beyond! 😄!